Trong hướng dẫn này, chúng ta sẽ xây dựng một ứng dụng gồm TabLayout, ViewPager và nhiều Fragment. Bài viết sẽ triển khai chức năng truyền dữ liệu giữa các fragment trong Android.

Với Android, Intent chỉ phù hợp để truyền dữ liệu ở mức Activity. Để truyền dữ liệu giữa các fragment, chúng ta cần tự định nghĩa interface riêng. Flow hoạt động để gửi một String từ fragment này sang fragment khác được minh họa như sau:
Hãy bắt đầu thực hiện theo flow đó trong phần code tiếp theo.
Ví dụ
Layout XML dành cho lớp MainActivity.java được trình bày bên dưới.
Các style cho TabLayout và ToolBar được định nghĩa trong file styles.xml như minh họa bên dưới.
ViewPagerAdapter.java là nơi khởi tạo các Fragment. Mã nguồn được trình bày ngay sau đây.
public class ViewPagerAdapter extends FragmentPagerAdapter {

    public ViewPagerAdapter(FragmentManager fm) {
        super(fm);
    }

    @Override
    public Fragment getItem(int position) {
        Fragment fragment = null;
        if (position == 0) {
            fragment = new FragmentOne();
        } else if (position == 1) {
            fragment = new FragmentTwo();
        }
        return fragment;
    }

    @Override
    public int getCount() {
        return 2;
    }

    @Override
    public CharSequence getPageTitle(int position) {
        String title = null;
        if (position == 0) {
            title = "Tab-1";
        } else if (position == 1) {
            title = "Tab-2";
        }
        return title;
    }
}
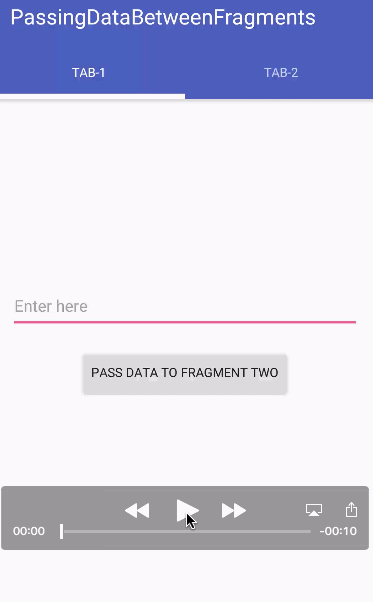
FragmentOne sẽ gửi dữ liệu được nhập trong EditText sang FragmentTwo. Layout xml cho fragment_one.xml được trình bày bên dưới.
Layout xml cho fragment_two.xml được trình bày bên dưới.
Mã nguồn cho lớp FragmentOne.java được trình bày bên dưới.
package com.journaldev.passingdatabetweenfragments;

import android.content.Context;
import android.os.Bundle;
import android.support.annotation.Nullable;
import android.support.v4.app.Fragment;
import android.view.LayoutInflater;
import android.view.View;
import android.view.ViewGroup;
import android.widget.Button;
import android.widget.EditText;

public class FragmentOne extends Fragment {

    SendMessage SM;

    @Nullable
    @Override
    public View onCreateView(LayoutInflater inflater, @Nullable ViewGroup container, @Nullable Bundle savedInstanceState) {
        View rootView = inflater.inflate(
                R.layout.fragment_one, container, false);
        return rootView;

    }

    @Override
    public void onViewCreated(View view, @Nullable Bundle savedInstanceState) {
        super.onViewCreated(view, savedInstanceState);

        Button btnPassData = (Button) view.findViewById(R.id.btnPassData);
        final EditText inData = (EditText) view.findViewById(R.id.inMessage);
        btnPassData.setOnClickListener(new View.OnClickListener() {
            @Override
            public void onClick(View v) {
                SM.sendData(inData.getText().toString().trim());
            }
        });

    }

    interface SendMessage {
        void sendData(String message);
    }

    @Override
    public void onAttach(Context context) {
        super.onAttach(context);

        try {
            SM = (SendMessage) getActivity();
        } catch (ClassCastException e) {
            throw new ClassCastException("Error in retrieving data. Please try again");
        }
    }
}
Interface tùy chỉnh có tên là SendMessage được khởi tạo trong phương thức onAttach. Interface này sẽ được MainActivity.java cài đặt — phần này sẽ được trình bày ở các bước tiếp theo. Mã nguồn cho lớp FragmentTwo.java được trình bày bên dưới.
package com.journaldev.passingdatabetweenfragments;

import android.os.Bundle;
import android.support.annotation.Nullable;
import android.support.v4.app.Fragment;
import android.view.LayoutInflater;
import android.view.View;
import android.view.ViewGroup;
import android.widget.TextView;

public class FragmentTwo extends Fragment {

    TextView txtData;

    @Nullable
    @Override
    public View onCreateView(LayoutInflater inflater, @Nullable ViewGroup container, @Nullable Bundle savedInstanceState) {
        View rootView = inflater.inflate(
                R.layout.fragment_two, container, false);
        return rootView;
    }

    @Override
    public void onViewCreated(View view, @Nullable Bundle savedInstanceState) {
        super.onViewCreated(view, savedInstanceState);

        txtData = (TextView)view.findViewById(R.id.txtData);
    }

    protected void displayReceivedData(String message)
    {
        txtData.setText("Data received: "+message);
    }
}
Phương thức `displayReceivedData()` sẽ được gọi thông qua thể hiện của **FragmentTwo.java** từ bên trong phương thức của Interface tùy chỉnh được định nghĩa trong **MainActivity.java**, như minh họa bên dưới.

```jsx
package com.journaldev.passingdatabetweenfragments;

import android.support.design.widget.TabLayout;
import android.support.v4.view.ViewPager;
import android.support.v7.app.AppCompatActivity;
import android.os.Bundle;
import android.support.v7.widget.Toolbar;

public class MainActivity extends AppCompatActivity implements FragmentOne.SendMessage{

    TabLayout tabLayout;
    ViewPager viewPager;
    ViewPagerAdapter viewPagerAdapter;

    @Override
    protected void onCreate(Bundle savedInstanceState) {
        super.onCreate(savedInstanceState);
        setContentView(R.layout.activity_main);
        Toolbar toolbar = (Toolbar) findViewById(R.id.toolbar);
        setSupportActionBar(toolbar);

        viewPager = (ViewPager) findViewById(R.id.viewPager);
        viewPagerAdapter = new ViewPagerAdapter(getSupportFragmentManager());
        viewPager.setAdapter(viewPagerAdapter);
        tabLayout = (TabLayout) findViewById(R.id.tabs);
        tabLayout.setupWithViewPager(viewPager);
    }

    @Override
    public void sendData(String message) {
        String tag = "android:switcher:" + R.id.viewPager + ":" + 1;
        FragmentTwo f = (FragmentTwo) getSupportFragmentManager().findFragmentByTag(tag);
        f.displayReceivedData(message);
    }
}
Phương thức sendData() trong đoạn mã trên sẽ được kích hoạt ngay khi người dùng nhấn nút trong FragmentOne. Chúng ta lấy từ FragmentTwo, vốn đã được khởi tạo trước đó trong ViewPagerAdapter, bằng cách sử dụng phương thức findFragmentByTag. Kết quả đầu ra của ứng dụng khi chạy được minh họa bên dưới.