Trong hướng dẫn này, chúng ta sẽ tìm hiểu chi tiết về các tính năng của TextInputLayout trong Android. Đây là một thành phần thiết kế nằm trong Material Design Support Library.

TextInputLayout trong Android là gì
TextInputLayout là một lớp mở rộng từ LinearLayout, được thiết kế chủ yếu để bao bọc quanh EditText (hoặc các lớp con của nó) và cung cấp hiệu ứng gợi ý nổi (floating hint).
Khi sử dụng, chúng ta nên đặt TextInputEditText làm phần tử con bên trong TextInputLayout thay vì dùng EditText thông thường. Lý do là vì TextInputEditText là một lớp con của EditText, được tối ưu hóa đặc biệt để hoạt động cùng với TextInputLayout.
Nếu sử dụng EditText thông thường, hệ thống sẽ đưa ra cảnh báo rằng phần tử này không phù hợp và khuyến nghị chuyển sang sử dụng TextInputEditText.
Ngoài hiệu ứng gợi ý nổi, TextInputLayout còn cung cấp nhiều tính năng nâng cao khác hỗ trợ cải thiện trải nghiệm người dùng khi nhập liệu.
Các tính năng của Android TextInputLayout
Một số tính năng mà chúng ta sẽ đề cập trong hướng dẫn này bao gồm:
- Bật/tắt gợi ý nổi
- Bật/tắt hiệu ứng hoạt hình của gợi ý nổi
- Hiển thị thông báo lỗi
- Hiển thị bộ đếm ký tự
- Cảnh báo người dùng khi số lượng ký tự vượt quá giới hạn
- Tùy chỉnh kiểu văn bản cho gợi ý nổi, nhãn lỗi, và bộ đếm ký tự
- Nút bật/tắt hiển thị mật khẩu
Chúng ta sẽ lần lượt tìm hiểu từng tính năng trên và triển khai chúng trong một dự án Android Studio.
Cấu trúc dự án ví dụ về Android TextInputLayout
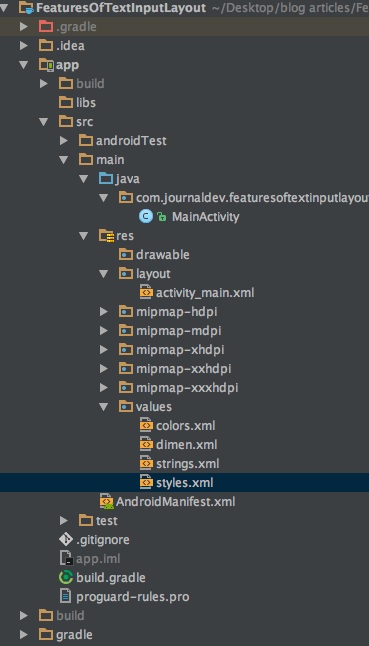
Đây là một ứng dụng có một Activity duy nhất. Toàn bộ nội dung sẽ được thực hiện bên trong các tập tin layout, activity, styles.xml và colors.xml. Trước tiên, thêm phần phụ thuộc cho thư viện thiết kế hỗ trợ vào tập tin build.gradle như sau:
compile 'com.android.support:design:25.3.1'
Bật/tắt gợi ý nổi
Gợi ý nổi được bật theo cấu hình mặc định trong TextInputLayout. Để tắt tính năng này, bạn cần thêm thuộc tính sau vào thẻ:
app:hintEnabled="false"
Đoạn mã XML bên dưới là từ tập tin activity_main.xml và chứa ba trường EditText.
<?xml version="1.0" encoding="utf-8"?>
<ScrollView xmlns:android="<https://schemas.android.com/apk/res/android>"
    xmlns:app="<https://schemas.android.com/apk/res-auto>"
    xmlns:tools="<https://schemas.android.com/tools>"
    android:layout_width="match_parent"
    android:layout_height="wrap_content"
    tools:context="com.journaldev.featuresoftextinputlayout.MainActivity">

    <LinearLayout
        android:layout_width="match_parent"
        android:layout_height="wrap_content"
        android:orientation="vertical">

        <android.support.design.widget.TextInputEditText
            android:layout_width="match_parent"
            android:layout_height="wrap_content"
            android:layout_margin="@dimen/activity_horizontal_margin"
            android:hint="TextInputEditText" />

        <android.support.design.widget.TextInputLayout
            android:layout_width="match_parent"
            android:layout_height="match_parent"
            android:layout_margin="@dimen/activity_horizontal_margin">

            <android.support.design.widget.TextInputEditText
                android:layout_width="match_parent"
                android:layout_height="wrap_content"
                android:hint="Floating Hint Enabled Default" />

        </android.support.design.widget.TextInputLayout>

        <android.support.design.widget.TextInputLayout
            android:layout_width="match_parent"
            android:layout_height="wrap_content"
            android:layout_margin="@dimen/activity_horizontal_margin"
            app:hintEnabled="false">

            <android.support.design.widget.TextInputEditText
                android:layout_width="match_parent"
                android:layout_height="wrap_content"
                android:hint="Floating Hint Disabled" />

        </android.support.design.widget.TextInputLayout>

</LinearLayout>
</ScrollView>
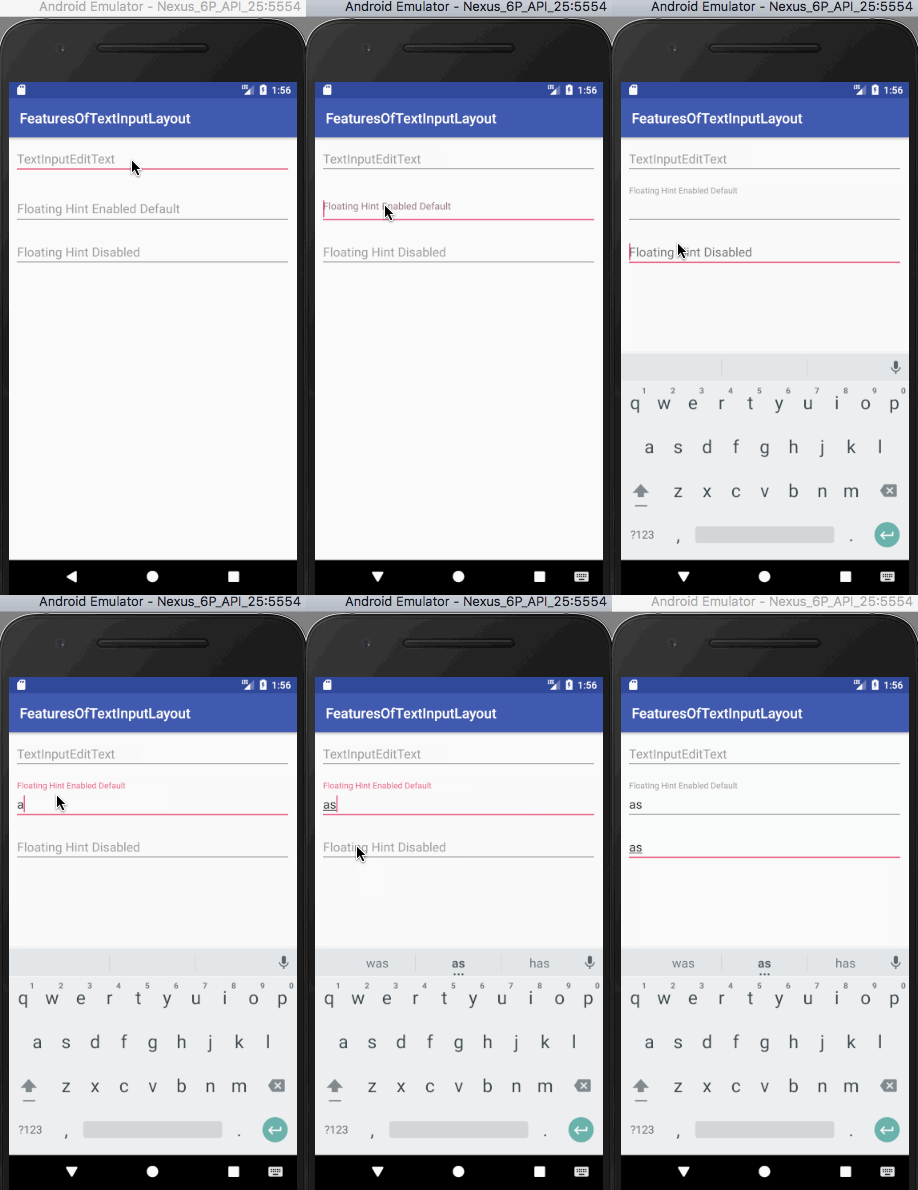
Trường EditText thứ ba đã được tắt gợi ý nổi. Dưới đây là giao diện đầu ra mà đoạn mã trên hiển thị:
Bật/tắt hiệu ứng hoạt hình của gợi ý nổi
Tương tự như tính năng trước, hiệu ứng hoạt hình của gợi ý nổi được bật theo mặc định. Để tắt hiệu ứng này, cần thêm thuộc tính sau vào thẻ TextInputLayout:
app:hintAnimationEnabled="false"
Đoạn mã XML dưới đây nằm trong tập tin activity_main.xml và chứa các trường EditText tương ứng với hai trường hợp có hoặc không có hiệu ứng hoạt hình.
<?xml version="1.0" encoding="utf-8"?>
<ScrollView xmlns:android="<https://schemas.android.com/apk/res/android>"
    xmlns:app="<https://schemas.android.com/apk/res-auto>"
    xmlns:tools="<https://schemas.android.com/tools>"
    android:layout_width="match_parent"
    android:layout_height="wrap_content"
    tools:context="com.journaldev.featuresoftextinputlayout.MainActivity">

    <LinearLayout
        android:layout_width="match_parent"
        android:layout_height="wrap_content"
        android:orientation="vertical">

        <android.support.design.widget.TextInputLayout
            android:layout_width="match_parent"
            android:layout_height="match_parent"
            android:layout_margin="@dimen/activity_horizontal_margin">

            <android.support.design.widget.TextInputEditText
                android:layout_width="match_parent"
                android:layout_height="wrap_content"
                android:hint="Floating Hint Enabled Default" />

        </android.support.design.widget.TextInputLayout>

        <android.support.design.widget.TextInputLayout
            android:layout_width="match_parent"
            android:layout_height="wrap_content"
            android:layout_margin="@dimen/activity_horizontal_margin"
            app:hintAnimationEnabled="false">

            <android.support.design.widget.TextInputEditText
                android:layout_width="match_parent"
                android:layout_height="wrap_content"
                android:hint="Hint Animation Disabled" />

        </android.support.design.widget.TextInputLayout>

    </LinearLayout>
</ScrollView>
Dưới đây là giao diện đầu ra của đoạn mã trên.
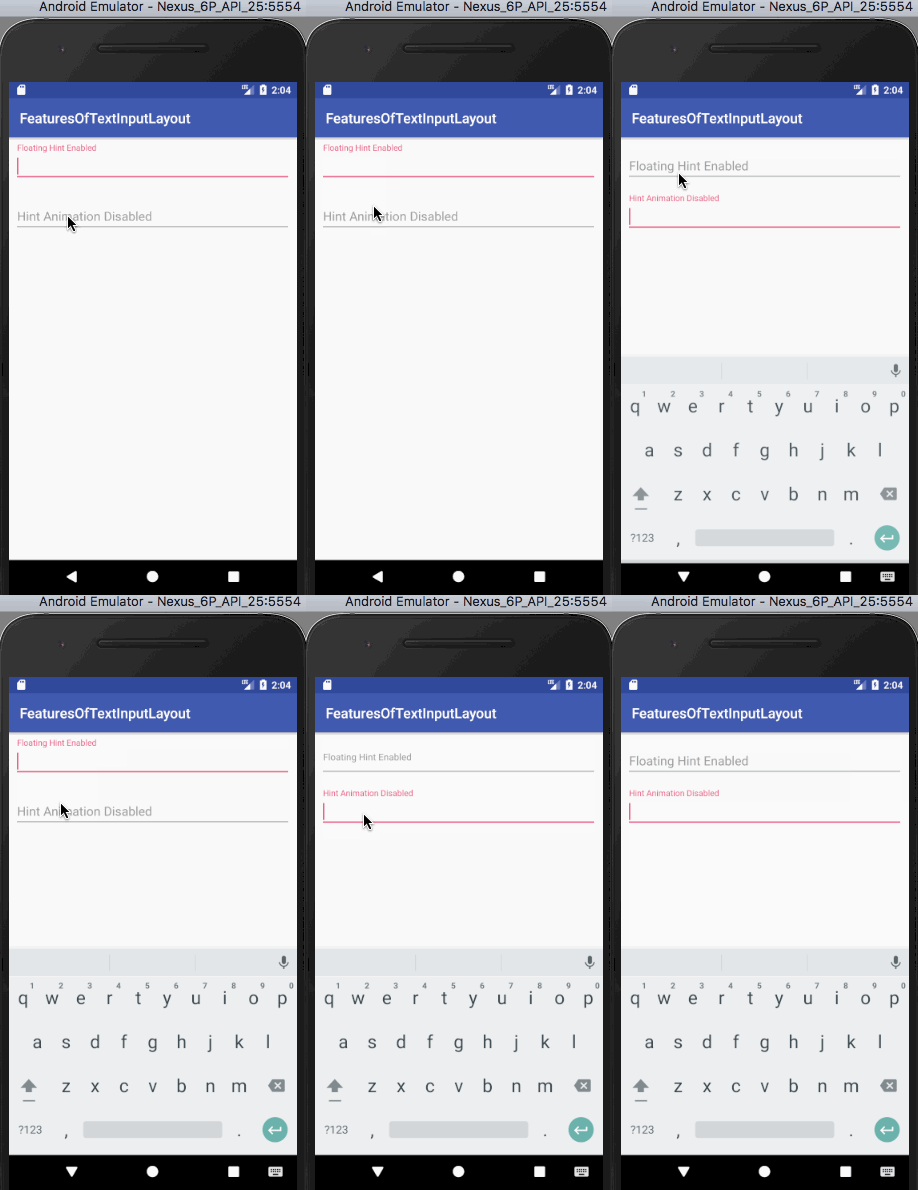
Lưu ý, trường EditText thứ hai sẽ không hiển thị hiệu ứng hoạt hình của gợi ý nổi khi được focus.
Tùy chỉnh kiểu hiển thị gợi ý bằng TextAppearance
Để sử dụng màu chữ và kích thước chữ tùy chỉnh cho phần gợi ý, bạn cần thêm thuộc tính sau:
app:hintTextAppearance="@style/HintText"
Style HintText được định nghĩa trong tập tin styles.xml như sau:
<style name="HintText" parent="TextAppearance.Design.Hint">
    <item name="android:textSize">16sp</item>
    <item name="android:textColor">@color/colorPrimary</item>
</style>
Đoạn mã XML dưới đây nằm trong tập tin activity_main.xml và chứa các trường EditText với và không có hintTextAppearance:
<?xml version="1.0" encoding="utf-8"?>
<ScrollView xmlns:android="<https://schemas.android.com/apk/res/android>"
    xmlns:app="<https://schemas.android.com/apk/res-auto>"
    xmlns:tools="<https://schemas.android.com/tools>"
    android:layout_width="match_parent"
    android:layout_height="wrap_content"
    tools:context="com.journaldev.featuresoftextinputlayout.MainActivity">

    <LinearLayout
        android:layout_width="match_parent"
        android:layout_height="wrap_content"
        android:orientation="vertical">

        <android.support.design.widget.TextInputLayout
            android:layout_width="match_parent"
            android:layout_height="match_parent"
            android:layout_margin="@dimen/activity_horizontal_margin">

            <android.support.design.widget.TextInputEditText
                android:layout_width="match_parent"
                android:layout_height="wrap_content"
                android:hint="Floating Hint Enabled" />

        </android.support.design.widget.TextInputLayout>

        <android.support.design.widget.TextInputLayout
            android:layout_width="match_parent"
            android:layout_height="match_parent"
            android:layout_margin="@dimen/activity_horizontal_margin"
            app:hintTextAppearance="@style/HintText">

            <android.support.design.widget.TextInputEditText
                android:layout_width="match_parent"
                android:layout_height="wrap_content"
                android:hint="Custom Hint TextAppearance" />

        </android.support.design.widget.TextInputLayout>

    </LinearLayout>
</ScrollView>
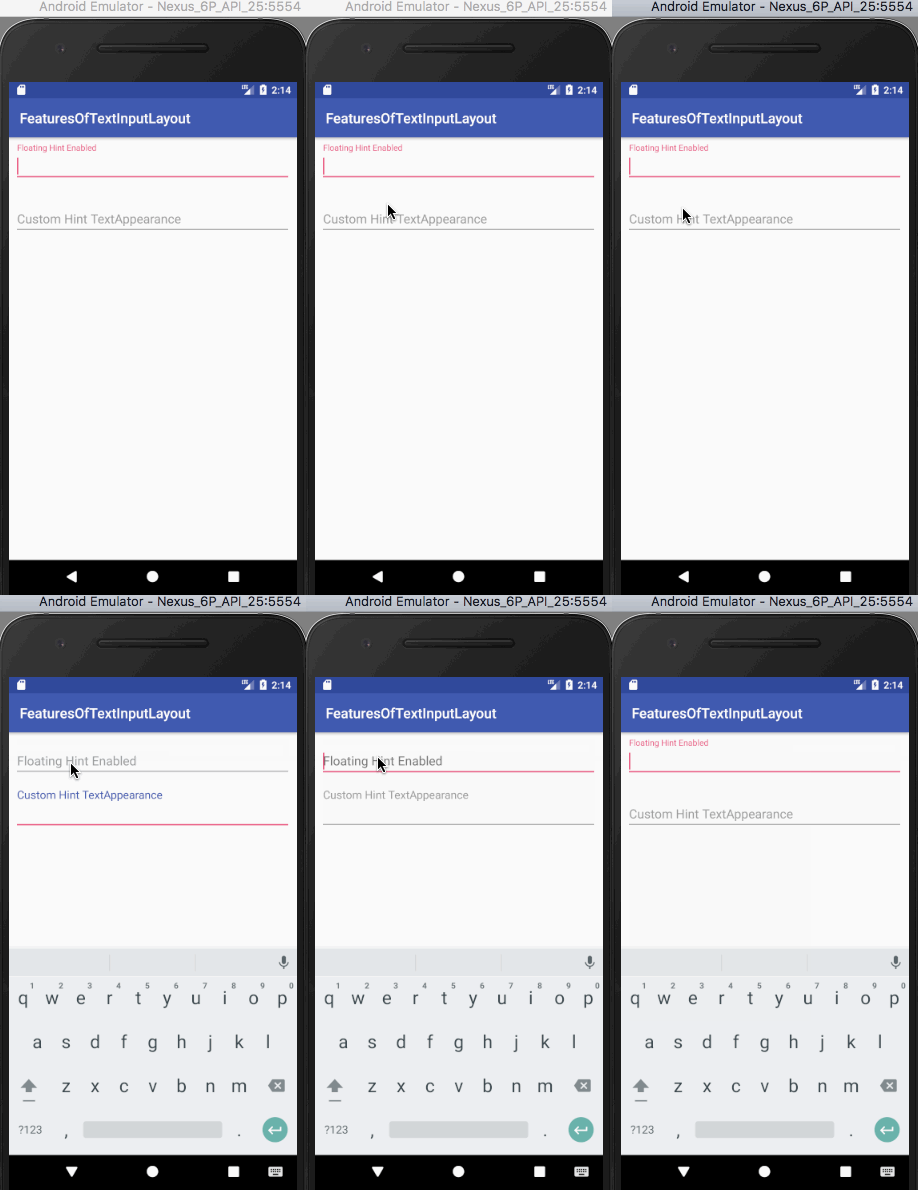
Dưới đây là giao diện đầu ra của đoạn mã trên.
Bộ đếm ký tự
Bộ đếm ký tự là một tính năng được sử dụng khá phổ biến trong nhiều ứng dụng (ví dụ giới hạn ký tự trong Twitter). Thiết lập app:counterEnabled="true" và app:counterMaxLength với số ký tự tối đa mà bạn muốn giới hạn trong TextInputLayout.
Theo mặc định, bộ đếm ký tự được hiển thị phía dưới trường EditText (góc dưới bên phải). Tính đến thời điểm viết hướng dẫn này, chưa có cách nào có thể thay đổi vị trí hiển thị. Việc tùy chỉnh giao diện bộ đếm cũng tương tự như phần gợi ý, sử dụng thuộc tính app:counterTextAppearance.
Style CounterText được thêm vào tập tin styles.xml như sau:
<style name="CounterText" parent="TextAppearance.Design.Counter">
    <item name="android:textSize">16sp</item>
    <item name="android:textColor">@color/my_pink</item>
</style>
Đoạn mã XML dưới đây nằm trong tập tin activity_main.xml, gồm một trường EditText với bộ đếm mặc định và một trường có giao diện bộ đếm tùy chỉnh:
<?xml version="1.0" encoding="utf-8"?>
<ScrollView xmlns:android="<https://schemas.android.com/apk/res/android>"
    xmlns:app="<https://schemas.android.com/apk/res-auto>"
    xmlns:tools="<https://schemas.android.com/tools>"
    android:layout_width="match_parent"
    android:layout_height="wrap_content"
    tools:context="com.journaldev.featuresoftextinputlayout.MainActivity">

    <LinearLayout
        android:layout_width="match_parent"
        android:layout_height="wrap_content"
        android:orientation="vertical">

        <android.support.design.widget.TextInputLayout
            android:layout_width="match_parent"
            android:layout_height="wrap_content"
            android:layout_margin="@dimen/activity_horizontal_margin"
            app:counterEnabled="true"
            app:counterMaxLength="5"
            app:hintTextAppearance="@style/HintText">

            <android.support.design.widget.TextInputEditText
                android:layout_width="match_parent"
                android:layout_height="wrap_content"
                android:hint="Character Counter Limit 10" />

        </android.support.design.widget.TextInputLayout>

        <android.support.design.widget.TextInputLayout
            android:layout_width="match_parent"
            android:layout_height="wrap_content"
            android:layout_margin="@dimen/activity_horizontal_margin"
            app:counterEnabled="true"
            app:counterMaxLength="5"
            app:counterTextAppearance="@style/CounterText"
            app:hintTextAppearance="@style/HintText">

            <android.support.design.widget.TextInputEditText
                android:layout_width="match_parent"
                android:layout_height="wrap_content"
                android:hint="Character Counter Custom TextAppearance" />

        </android.support.design.widget.TextInputLayout>

    </LinearLayout>
</ScrollView>
Dưới đây là giao diện đầu ra của đoạn mã trên.
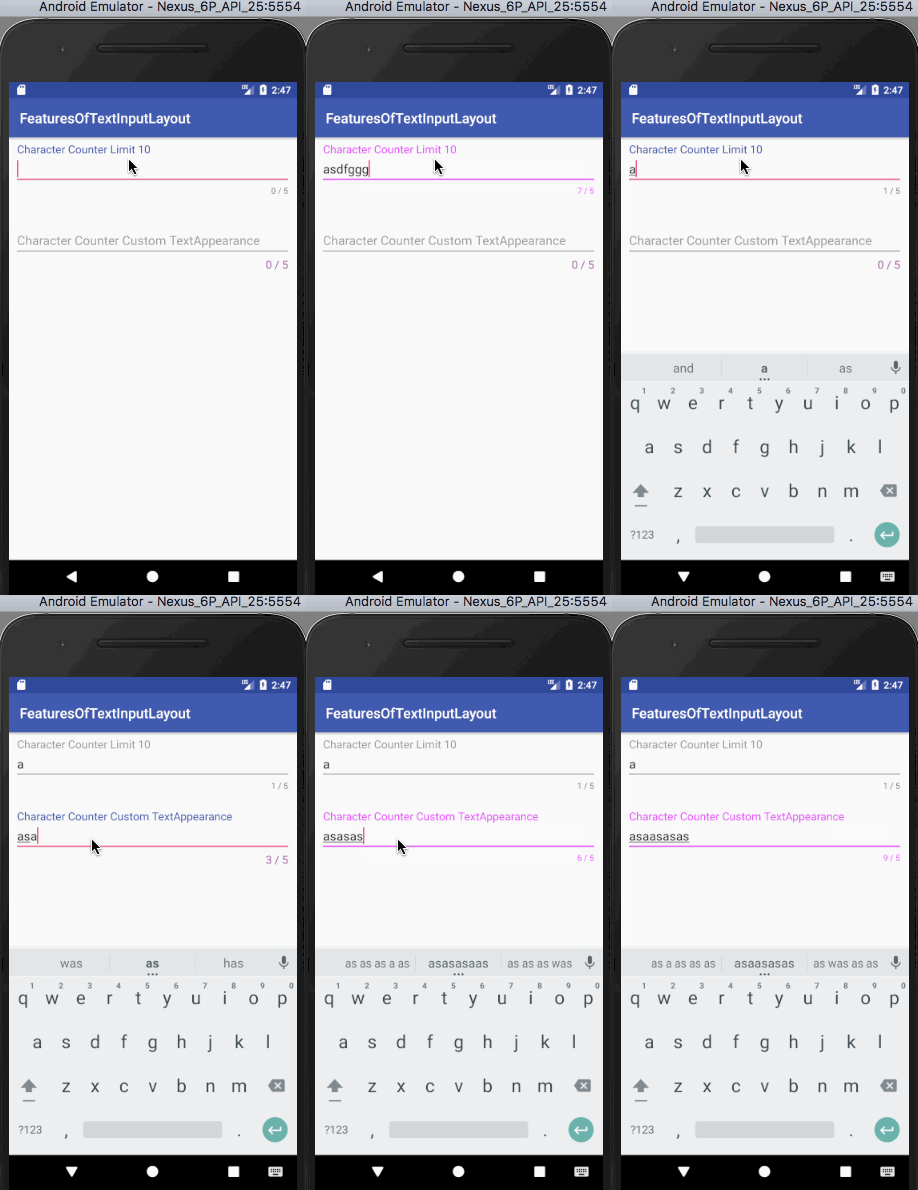
Quan sát kỹ giao diện đầu ra ở trên.
- Trường EditText đầu tiên thay đổi màu chữ bộ đếm, màu chữ gợi ý và màu viền chỉ báo khi số ký tự vượt quá giới hạn.
- Trường EditText thứ hai cũng có hành vi tương tự nhưng đồng thời thay đổi cả màu chữ và kích thước chữ tùy chỉnh của bộ đếm khi vượt giới hạn.
Để chỉ định style khi bộ đếm ký tự vượt quá giới hạn, ta sử dụng thuộc tính counterOverflowTextAppearance, sẽ được trình bày trong phần tiếp theo.
Bộ đếm ký tự vượt giới hạn
Như đã đề cập, khi số lượng ký tự vượt quá giới hạn thiết lập, bộ đếm sẽ sử dụng các thuộc tính được định nghĩa trong counterOverflowTextAppearance. Nếu không chỉ định, hệ thống sẽ sử dụng style mặc định.
Sử dụng thuộc tính sau để tùy chỉnh giao diện khi vượt giới hạn:
app:counterOverflowTextAppearance
Style cho CounterOverflow được định nghĩa trong tập tin styles.xml như sau:
<style name="CounterOverFlow" parent="TextAppearance.Design.Counter.Overflow">
    <item name="android:textSize">16sp</item>
    <item name="android:textColor">@color/my_orange</item>
</style>
Thêm đoạn mã dưới đây vào activity_main.xml:
<android.support.design.widget.TextInputLayout
    android:layout_width="match_parent"
    android:layout_height="wrap_content"
    android:layout_margin="@dimen/activity_horizontal_margin"
    app:counterEnabled="true"
    app:counterMaxLength="5"
    app:counterOverflowTextAppearance="@style/CounterOverFlow"
    app:counterTextAppearance="@style/CounterText"
    app:hintTextAppearance="@style/HintText">

    <android.support.design.widget.TextInputEditText
        android:layout_width="match_parent"
        android:layout_height="wrap_content"
        android:hint="CounterOverflow CustomTextAppearance" />

</android.support.design.widget.TextInputLayout>
Chạy lại ứng dụng để xem kết quả đầu ra.
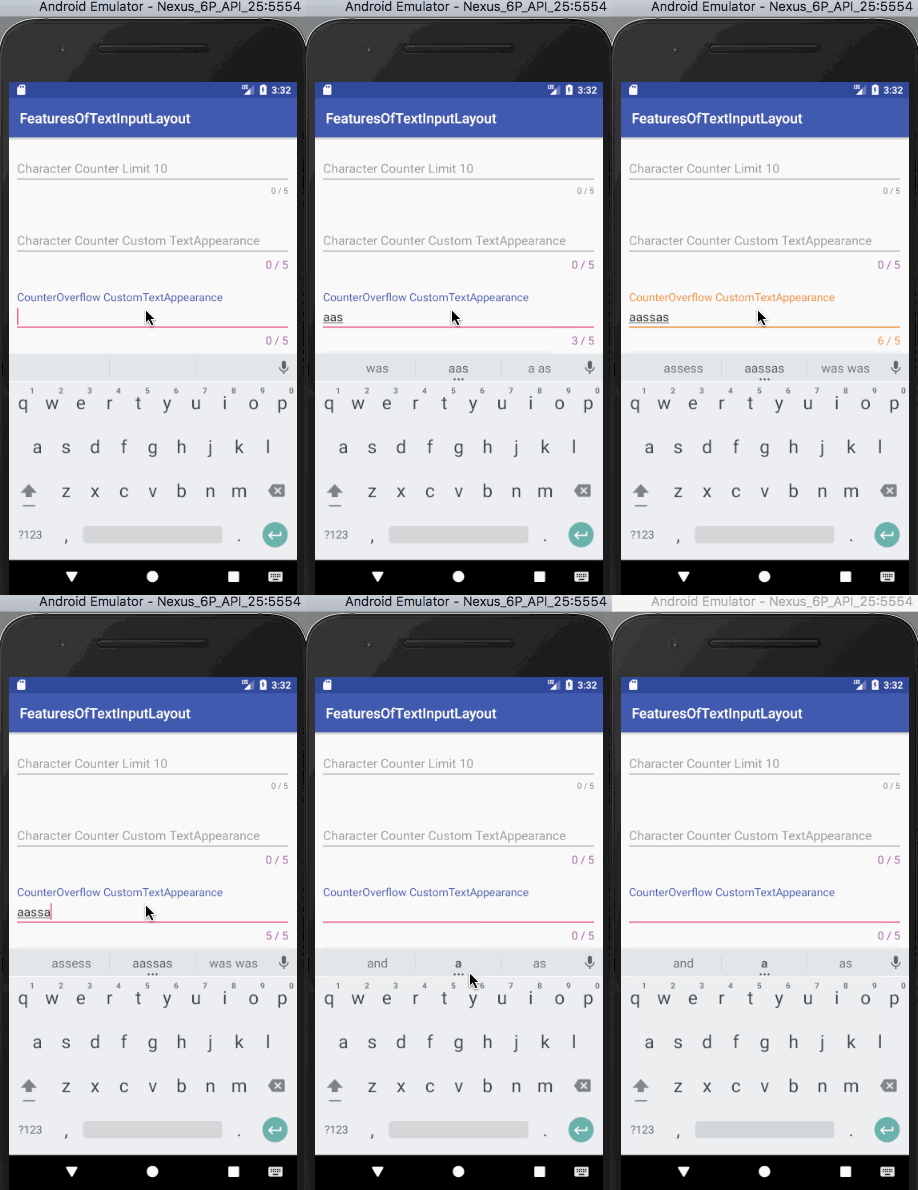
Nhãn lỗi
Thiết lập app:errorEnabled="true" cho phép hiển thị văn bản lỗi dưới trường EditText khi có điều kiện kích hoạt.
Để tùy chỉnh giao diện văn bản lỗi, sử dụng thuộc tính app:errorTextAppearance và thêm style sau vào styles.xml:
<style name="ErrorText" parent="TextAppearance.Design.Error">
    <item name="android:textSize">16sp</item>
    <item name="android:textColor">@color/my_black</item>
</style>
Đoạn mã XML dưới đây nằm trong tệp giao diện activity_main.xml và chứa các trường EditText với nhãn lỗi mặc định và nhãn lỗi tùy chỉnh.
<?xml version="1.0" encoding="utf-8"?>
<ScrollView xmlns:android="<https://schemas.android.com/apk/res/android>"
    xmlns:app="<https://schemas.android.com/apk/res-auto>"
    xmlns:tools="<https://schemas.android.com/tools>"
    android:layout_width="match_parent"
    android:layout_height="wrap_content"
    tools:context="com.journaldev.featuresoftextinputlayout.MainActivity">

    <LinearLayout
        android:layout_width="match_parent"
        android:layout_height="wrap_content"
        android:orientation="vertical">

        <android.support.design.widget.TextInputLayout
            android:id="@+id/errorInputLayout"
            android:layout_width="match_parent"
            android:layout_height="wrap_content"
            android:layout_margin="@dimen/activity_horizontal_margin"
            app:counterEnabled="true"
            app:counterMaxLength="5"
            app:counterOverflowTextAppearance="@style/CounterOverFlow"
            app:counterTextAppearance="@style/CounterText"
            app:errorEnabled="true"
            app:hintTextAppearance="@style/HintText">

            <android.support.design.widget.TextInputEditText
                android:id="@+id/errorEditText"
                android:layout_width="match_parent"
                android:layout_height="wrap_content"
                android:hint="Default Error Label" />

        </android.support.design.widget.TextInputLayout>

        <android.support.design.widget.TextInputLayout
            android:id="@+id/customErrorInputLayout"
            android:layout_width="match_parent"
            android:layout_height="wrap_content"
            android:layout_margin="@dimen/activity_horizontal_margin"
            app:counterEnabled="true"
            app:counterMaxLength="5"
            app:counterOverflowTextAppearance="@style/CounterOverFlow"
            app:counterTextAppearance="@style/CounterText"
            app:errorEnabled="true"
            app:errorTextAppearance="@style/ErrorText"
            app:hintTextAppearance="@style/HintText">

            <android.support.design.widget.TextInputEditText
                android:id="@+id/customErrorEditText"
                android:layout_width="match_parent"
                android:layout_height="wrap_content"
                android:hint="Custom Error Label" />

        </android.support.design.widget.TextInputLayout>

    </LinearLayout>
</ScrollView>
Để hiển thị văn bản lỗi, gọi phương thức setError(String) trên đối tượng TextInputLayout trong lớp MainActivity.java như sau:
package com.journaldev.featuresoftextinputlayout;

import android.support.design.widget.TextInputEditText;
import android.support.design.widget.TextInputLayout;
import android.support.v7.app.AppCompatActivity;
import android.os.Bundle;
import android.text.Editable;
import android.text.TextWatcher;

public class MainActivity extends AppCompatActivity {

    TextInputLayout errorInputLayout, customErrorInputLayout;
    TextInputEditText errorEditText, customErrorEditText;

    @Override
    protected void onCreate(Bundle savedInstanceState) {
        super.onCreate(savedInstanceState);
        setContentView(R.layout.activity_main);

        errorEditText = findViewById(R.id.errorEditText);
        errorInputLayout = findViewById(R.id.errorInputLayout);

        customErrorEditText = findViewById(R.id.customErrorEditText);
        customErrorInputLayout = findViewById(R.id.customErrorInputLayout);

        errorEditText.addTextChangedListener(new TextWatcher() {
            @Override
            public void beforeTextChanged(CharSequence s, int start, int count, int after) { }

            @Override
            public void onTextChanged(CharSequence s, int start, int before, int count) { }

            @Override
            public void afterTextChanged(Editable s) {
                if (s.length() > errorInputLayout.getCounterMaxLength())
                    errorInputLayout.setError("Max character length is " + errorInputLayout.getCounterMaxLength());
                else
                    errorInputLayout.setError(null);
            }
        });

        customErrorEditText.addTextChangedListener(new TextWatcher() {
            @Override
            public void beforeTextChanged(CharSequence s, int start, int count, int after) { }

            @Override
            public void onTextChanged(CharSequence s, int start, int before, int count) { }

            @Override
            public void afterTextChanged(Editable s) {
                if (s.length() > customErrorInputLayout.getCounterMaxLength())
                    customErrorInputLayout.setError("Max character length is " + customErrorInputLayout.getCounterMaxLength());
                else
                    customErrorInputLayout.setError(null);
            }
        });
    }
}
Trong đoạn mã trên, chúng ta thêm một TextChangedListener (triển khai giao diện TextWatcher) cho từng đối tượng TextInputEditText. Nhãn lỗi sẽ được hiển thị khi số ký tự hiện tại vượt quá giới hạn tối đa được thiết lập trong bộ đếm. Để xóa nhãn lỗi, ta truyền giá trị null vào phương thức setError(). Kết quả mà đoạn mã trên tạo ra là:
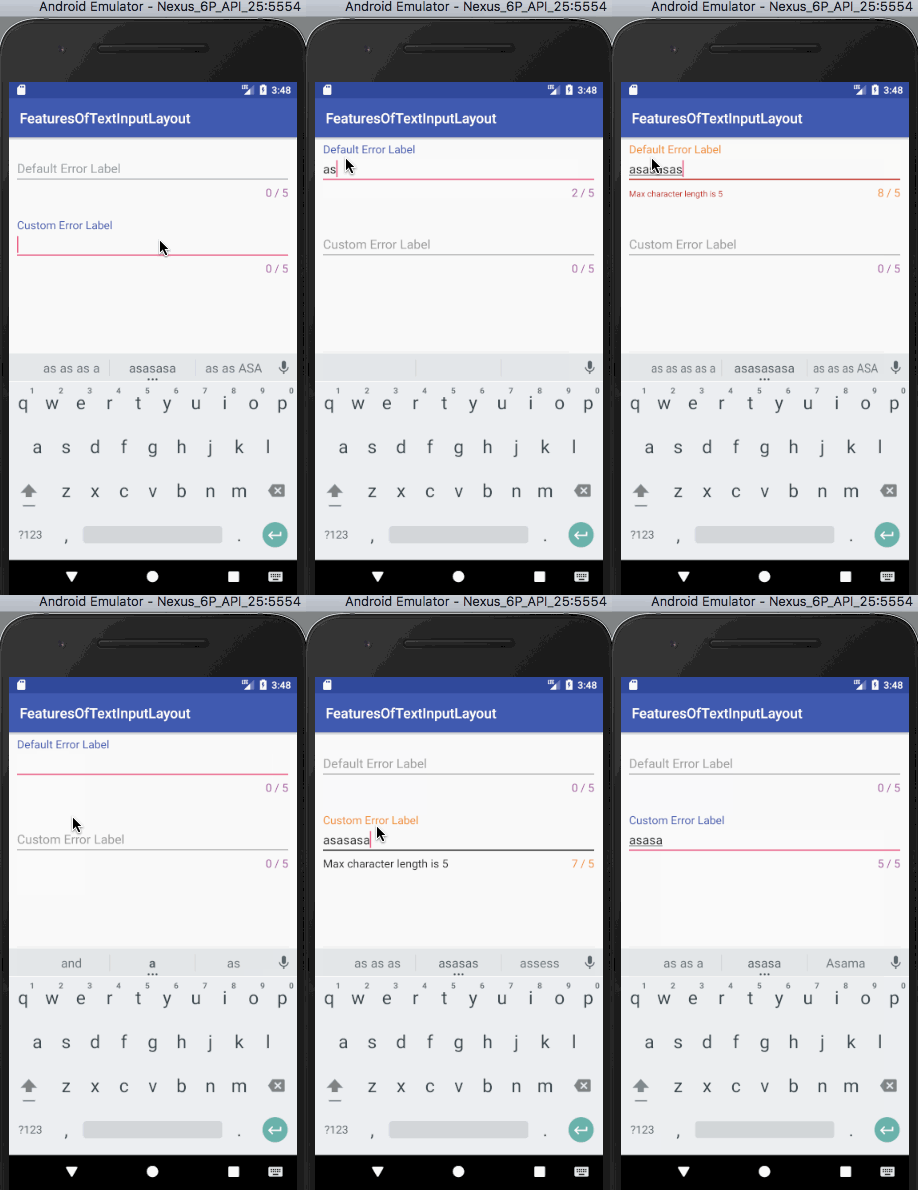
Lưu ý: Màu chỉ báo (indicator) của trường văn bản sẽ sử dụng màu của nhãn lỗi. Nó sẽ ghi đè màu đã thiết lập trong counterOverflow, do đó có mức ưu tiên cao hơn.
Nút bật/tắt hiển thị mật khẩu
Thiết lập app:passwordToggleEnabled="true" cho phép hiển thị hoặc ẩn mật khẩu.
Để thay đổi màu biểu tượng, sử dụng app:passwordToggleTint.
Đoạn mã XML sau từ activity_main.xml chứa hai trường EditText: một với biểu tượng mặc định và một với màu biểu tượng tùy chỉnh.
<?xml version="1.0" encoding="utf-8"?>
<ScrollView xmlns:android="<https://schemas.android.com/apk/res/android>"
    xmlns:app="<https://schemas.android.com/apk/res-auto>"
    xmlns:tools="<https://schemas.android.com/tools>"
    android:layout_width="match_parent"
    android:layout_height="wrap_content"
    tools:context="com.journaldev.featuresoftextinputlayout.MainActivity">

    <LinearLayout
        android:layout_width="match_parent"
        android:layout_height="wrap_content"
        android:orientation="vertical">

        <android.support.design.widget.TextInputLayout
            android:layout_width="match_parent"
            android:layout_height="wrap_content"
            android:layout_margin="@dimen/activity_horizontal_margin"
            app:counterEnabled="true"
            app:counterMaxLength="5"
            app:counterOverflowTextAppearance="@style/CounterOverFlow"
            app:counterTextAppearance="@style/CounterText"
            app:hintTextAppearance="@style/HintText"
            app:passwordToggleEnabled="true">

            <android.support.design.widget.TextInputEditText
                android:layout_width="match_parent"
                android:layout_height="wrap_content"
                android:hint="Password Visibility Toggle"
                android:inputType="textPassword" />

        </android.support.design.widget.TextInputLayout>

        <android.support.design.widget.TextInputLayout
            android:layout_width="match_parent"
            android:layout_height="wrap_content"
            android:layout_margin="@dimen/activity_horizontal_margin"
            app:counterEnabled="true"
            app:counterMaxLength="5"
            app:counterOverflowTextAppearance="@style/CounterOverFlow"
            app:counterTextAppearance="@style/CounterText"
            app:hintTextAppearance="@style/HintText"
            app:passwordToggleEnabled="true"
            app:passwordToggleTint="@color/my_orange">

            <android.support.design.widget.TextInputEditText
                android:layout_width="match_parent"
                android:layout_height="wrap_content"
                android:hint="Password Visibility Toggle Tint"
                android:inputType="textPassword" />

        </android.support.design.widget.TextInputLayout>

    </LinearLayout>
</ScrollView>
Đây là giao diện đầu ra của đoạn mã trên.
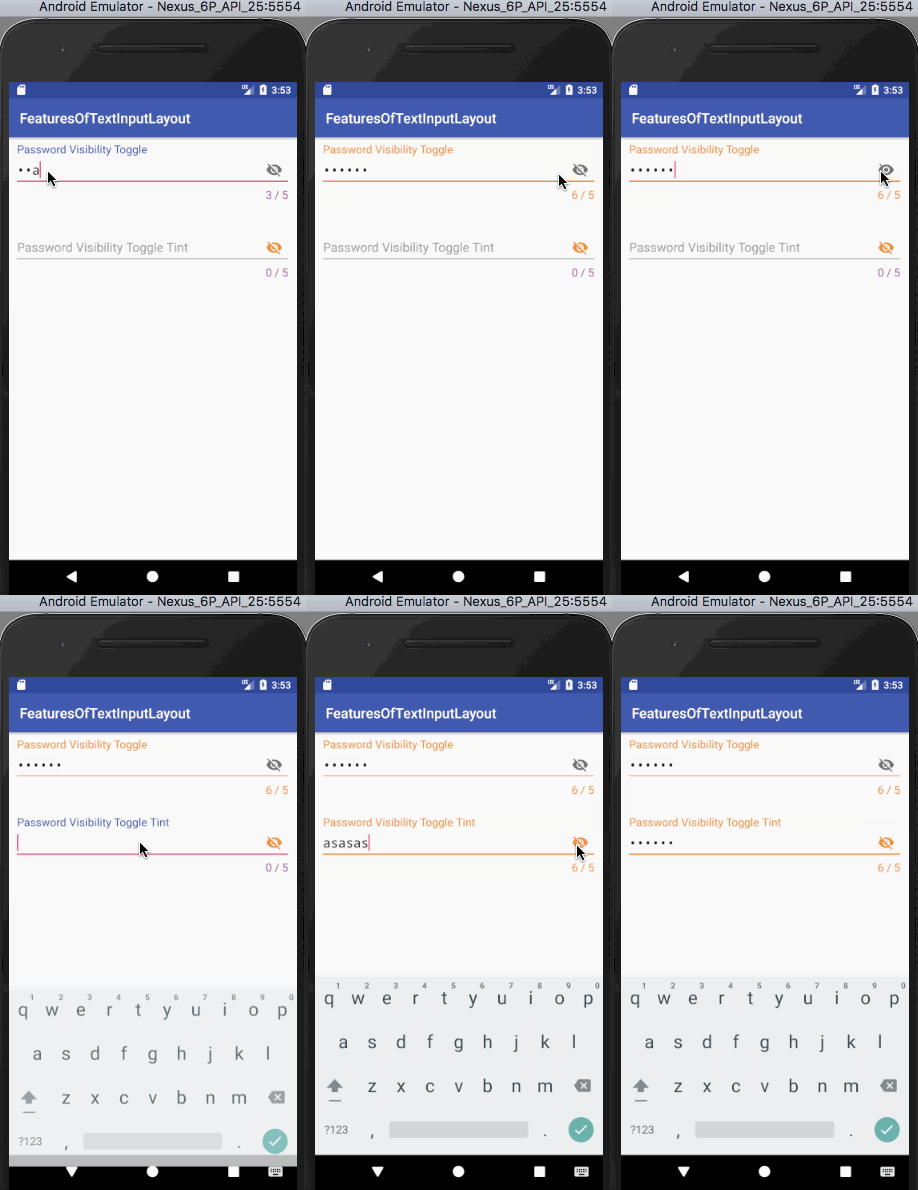
Lưu ý: Có thể sử dụng biểu tượng tùy chỉnh cho nút bật/tắt hiển thị mật khẩu bằng thuộc tính app:passwordToggleDrawable.
Vậy là chúng ta đã cùng khám phá đầy đủ các tính năng chính của TextInputLayout. Nếu muốn xem lại hoặc thử trực tiếp, bạn có thể tải mã nguồn ví dụ Android TextInputLayout từ liên kết bên dưới.
Dự án đã bao gồm toàn bộ đoạn mã được trình bày trong hướng dẫn.
Tài liệu tham khảo: Android Official Doc.
 7 phút để đọc
