Trong bài hướng dẫn Spring MVC trước đây, chúng ta đã tìm hiểu cách tạo một ứng dụng Spring MVC bằng Spring Tool Suite. Hôm nay, chúng ta sẽ thử tạo một ứng dụng Spring MVC đơn giản bằng Maven và Eclipse.

Spring MVC
Spring MVC được xây dựng dựa trên kiến trúc Model-View-Controller (MVC). Hình ảnh dưới đây mô tả tổng quan về kiến trúc Spring MVC .
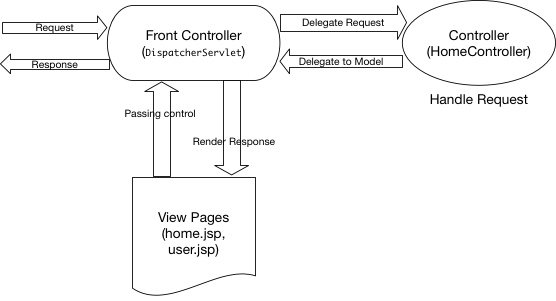
DispatcherServlet là một lớp controller ở phía trước, có nhiệm vụ tiếp nhận mọi request và bắt đầu xử lý chúng. Ta cần cấu hình servlet này trong file web.xml. Nhiệm vụ của nó là chuyển request đến lớp controller phù hợp và gửi response theo hướng ngược lại sau khi các trang view đã render xong.
Trong ví dụ này, chúng ta sẽ có HelloWorldController là lớp controller duy nhất. Các trang view bao gồm home.jsp và user.jsp. User sẽ là lớp model duy nhất.
Cấu trúc dự án Spring MVC Hello World trong Eclipse
Đây là cấu trúc dự án Spring MVC của chúng ta trong Eclipse.
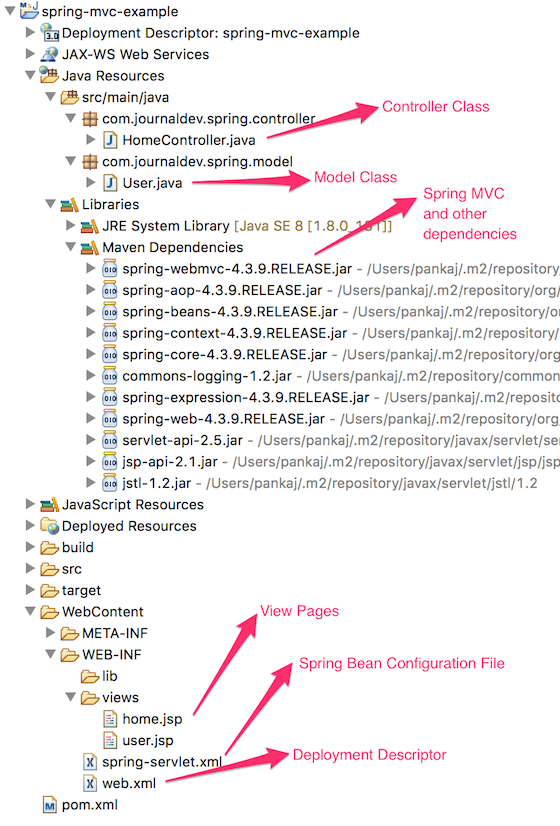
Bây giờ, hãy bắt đầu tạo dự án này từ đầu.
Thiết lập dự án Spring MVC trong Eclipse
Vì đây là một ứng dụng web và chúng ta muốn dùng Maven để quản lý dependency, trước hết ta cần tạo một Dynamic Web Project rồi chuyển đổi nó sang một dự án Maven. Các hình ảnh dưới đây sẽ hướng dẫn cách thực hiện để có được cấu trúc sườn cho dự án.
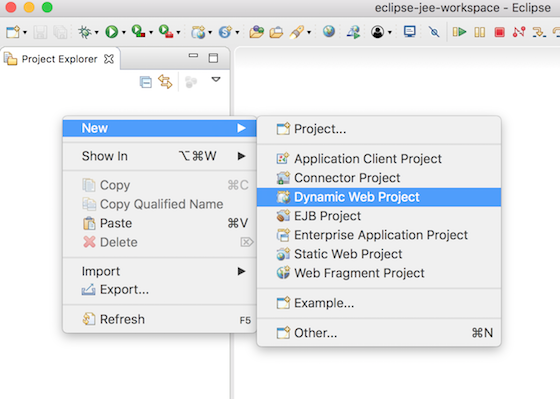
Nhấp chuột phải vào cửa sổ project explorer và chọn New → Dynamic Web Project như hình bên dưới.
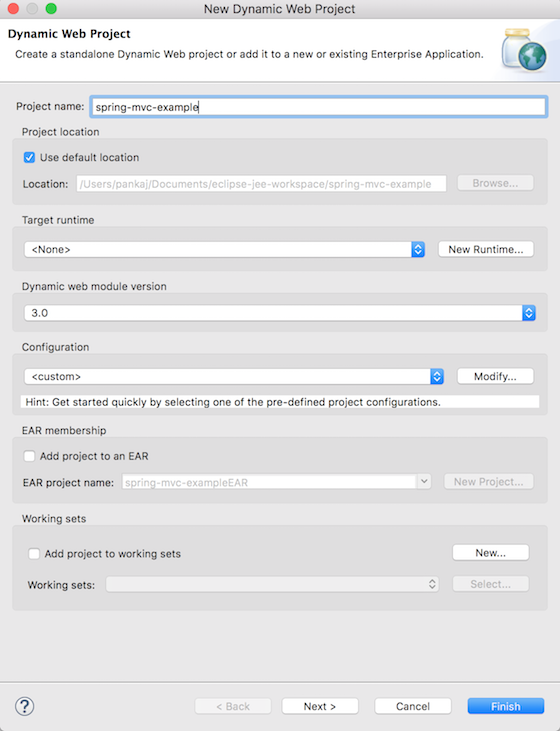
Trong cửa sổ popup hiện ra, nhập tên dự án là “spring-mvc-example”, các mục còn lại có thể giữ nguyên.
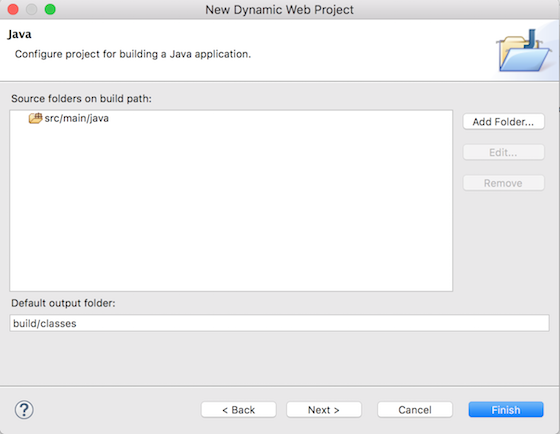
Ở trang tiếp theo, thiết lập thư mục mã nguồn là “src/main/java”. Bạn có thể cần phải xóa thư mục src khỏi danh sách trước khi thêm đường dẫn mới này.
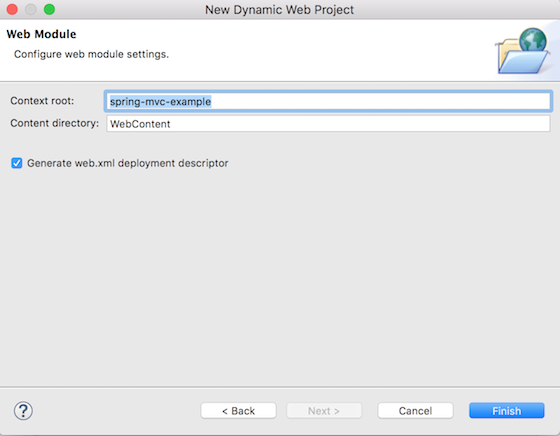
Kế đến là cửa sổ web module, hãy đặt context root của ứng dụng là “spring-mvc-example” và đảm bảo bạn đã tích vào tùy chọn Generate web.xml deployment descriptor.
Nhấp Finish, và một Dynamic Web Project mới sẽ xuất hiện trong project explorer của Eclipse.
Chuyển đổi Dynamic Web Project sang Maven Project
Để tiện cho việc quản lý các dependency của Spring MVC, chúng ta sẽ chuyển đổi dự án web này sang Maven.
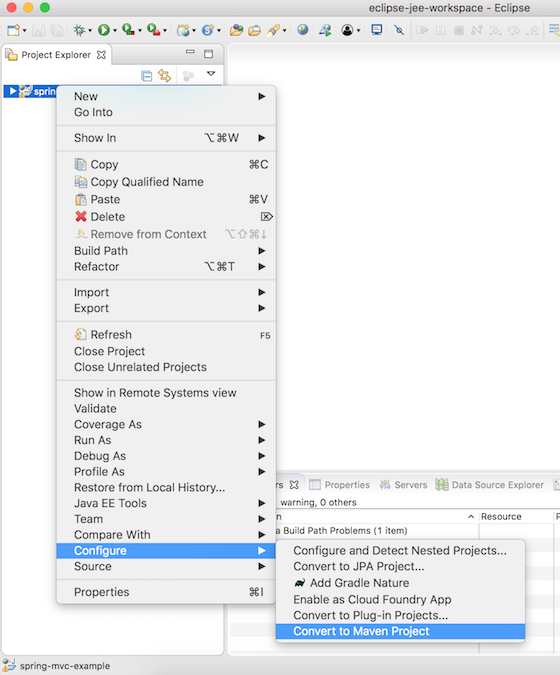
Hãy nhấp chuột phải vào dự án và chọn Configure → Convert to Maven Project.
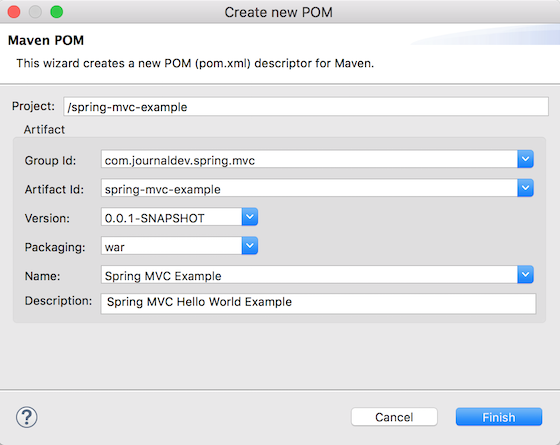
Tiếp theo, nhập các thông tin cấu hình cho file pom.xml như hình dưới.
Sau bước này, chúng ta đã có một cấu trúc sườn để sử dụng cho việc phát triển thành một ứng dụng web Maven hoàn chỉnh.
Khai báo các dependency Spring MVC trong pom.xml
Chúng ta cần thêm các dependency spring-web và spring-webmvc vào pom.xml, cùng với các dependency servlet-api, jsp-api và jstl.
File pom.xml hoàn chỉnh sẽ trông như dưới đây.
<project xmlns="<https://maven.apache.org/POM/4.0.0>" xmlns:xsi="<https://www.w3.org/2001/XMLSchema-instance>"
	xsi:schemaLocation="<https://maven.apache.org/POM/4.0.0> <https://maven.apache.org/xsd/maven-4.0.0.xsd>">
	<modelVersion>4.0.0</modelVersion>
	<groupId>com.journaldev.spring.mvc</groupId>
	<artifactId>spring-mvc-example</artifactId>
	<version>0.0.1-SNAPSHOT</version>
	<packaging>war</packaging>
	<name>Spring MVC Example</name>
	<description>Spring MVC Hello World Example</description>

	<!-- Add Spring Web and MVC dependencies -->
	<dependencies>
		<dependency>
			<groupId>org.springframework</groupId>
			<artifactId>spring-webmvc</artifactId>
			<version>4.3.9.RELEASE</version>
		</dependency>
		<dependency>
			<groupId>org.springframework</groupId>
			<artifactId>spring-web</artifactId>
			<version>4.3.9.RELEASE</version>
		</dependency>
		<!-- Servlet -->
		<dependency>
			<groupId>javax.servlet</groupId>
			<artifactId>servlet-api</artifactId>
			<version>2.5</version>
			<scope>provided</scope>
		</dependency>
		<dependency>
			<groupId>javax.servlet.jsp</groupId>
			<artifactId>jsp-api</artifactId>
			<version>2.1</version>
			<scope>provided</scope>
		</dependency>
		<dependency>
			<groupId>javax.servlet</groupId>
			<artifactId>jstl</artifactId>
			<version>1.2</version>
		</dependency>
	</dependencies>

	<build>
		<plugins>
			<plugin>
				<artifactId>maven-compiler-plugin</artifactId>
				<version>3.6.1</version>
				<configuration>
					<source>1.8</source>
					<target>1.8</target>
				</configuration>
			</plugin>
			<plugin>
				<artifactId>maven-war-plugin</artifactId>
				<version>3.0.0</version>
				<configuration>
					<warSourceDirectory>WebContent</warSourceDirectory>
				</configuration>
			</plugin>
		</plugins>
		<finalName>${project.artifactId}</finalName> <!-- added to remove Version from WAR file -->
	</build>
</project>
Lưu ý cấu hình finalName nằm trong trong thẻ <build> để giúp tên file WAR của chúng ta không chứa thông tin về phiên bản. Khi Eclipse build dự án, bạn sẽ thấy tất cả các file jar cần thiết xuất hiện trong mục Maven Dependencies.
Cấu hình Spring MVC DispatcherServlet làm Front Controller
Để tích hợp Spring MVC framework vào ứng dụng, ta cần cấu hình DispatcherServlet trong file web.xml như sau.
<?xml version="1.0" encoding="UTF-8"?>
<web-app xmlns:xsi="<https://www.w3.org/2001/XMLSchema-instance>" xmlns="<https://java.sun.com/xml/ns/javaee>" xsi:schemaLocation="<https://java.sun.com/xml/ns/javaee> <https://java.sun.com/xml/ns/javaee/web-app_3_0.xsd>" id="WebApp_ID" version="3.0">
  <display-name>spring-mvc-example</display-name>

	<!-- Add Spring MVC DispatcherServlet as front controller -->
	<servlet>
        <servlet-name>spring</servlet-name>
        <servlet-class>
                org.springframework.web.servlet.DispatcherServlet
        </servlet-class>
        <init-param>
       		<param-name>contextConfigLocation</param-name>
       		<param-value>/WEB-INF/spring-servlet.xml</param-value>
    		</init-param>
        <load-on-startup>1</load-on-startup>
    </servlet>

    <servlet-mapping>
        <servlet-name>spring</servlet-name>
        <url-pattern>/</url-pattern>
    </servlet-mapping>

 </web-app>
Thẻ init-param contextConfigLocation được dùng để khai báo vị trí của file cấu hình Spring bean.
File cấu hình Spring Bean
Bước tiếp theo là tạo file cấu hình Spring bean mvc-dispatcher-servlet.xml như dưới đây.
<?xml version="1.0" encoding="UTF-8"?>
<beans:beans xmlns="<https://www.springframework.org/schema/mvc>"
	xmlns:xsi="<https://www.w3.org/2001/XMLSchema-instance>" xmlns:beans="<https://www.springframework.org/schema/beans>"
	xmlns:context="<https://www.springframework.org/schema/context>"
	xsi:schemaLocation="<https://www.springframework.org/schema/mvc> <https://www.springframework.org/schema/mvc/spring-mvc.xsd>
		<https://www.springframework.org/schema/beans> <https://www.springframework.org/schema/beans/spring-beans.xsd>
		<https://www.springframework.org/schema/context> <https://www.springframework.org/schema/context/spring-context.xsd>">

	<!-- DispatcherServlet Context: defines this servlet's request-processing
		infrastructure -->

	<!-- Enables the Spring MVC @Controller programming model -->
	<annotation-driven />
	<context:component-scan base-package="com.journaldev.spring" />

	<!-- Resolves views selected for rendering by @Controllers to .jsp resources
		in the /WEB-INF/views directory -->
	<beans:bean
		class="org.springframework.web.servlet.view.InternalResourceViewResolver">
		<beans:property name="prefix" value="/WEB-INF/views/" />
		<beans:property name="suffix" value=".jsp" />
	</beans:bean>

</beans:beans>
File này có ba cấu hình quan trọng:
annotation-drivenchỉ thị choDispatcherServletquét tìm các class Controller thông qua annotation@Controller.- Thuộc tính
context:component-scanchỉ định nơi chứa các class controller. - Bean
InternalResourceViewResolverđược cấu hình để xác định vị trí của các trang view và hậu tố (suffix) của chúng. Các phương thức trong Controller sẽ trả về tên của view, và suffix sẽ được thêm vào nhằm giúp tìm ra file view tương ứng và render tạo response.
Controller Class trong Spring MVC
Chúng ta sẽ có một controller class duy nhất để xử lý hai URI: “/” cho trang chủ và “/user” cho trang người dùng.
package com.journaldev.spring.controller;

import java.text.DateFormat;
import java.util.Date;
import java.util.Locale;

import org.springframework.stereotype.Controller;
import org.springframework.ui.Model;
import org.springframework.validation.annotation.Validated;
import org.springframework.web.bind.annotation.RequestMapping;
import org.springframework.web.bind.annotation.RequestMethod;

import com.journaldev.spring.model.User;

@Controller
public class HomeController {

	/**
	 * Simply selects the home view to render by returning its name.
	 */
	@RequestMapping(value = "/", method = RequestMethod.GET)
	public String home(Locale locale, Model model) {
		System.out.println("Home Page Requested, locale = " + locale);
		Date date = new Date();
		DateFormat dateFormat = DateFormat.getDateTimeInstance(DateFormat.LONG, DateFormat.LONG, locale);

		String formattedDate = dateFormat.format(date);

		model.addAttribute("serverTime", formattedDate);

		return "home";
	}

	@RequestMapping(value = "/user", method = RequestMethod.POST)
	public String user(@Validated User user, Model model) {
		System.out.println("User Page Requested");
		model.addAttribute("userName", user.getUserName());
		return "user";
	}
}
Lưu ý rằng để cho đơn giản, ta không sử dụng bất kỳ logging framework nào như Log4j trong ví dụ này.
Model Class trong Spring MVC
Model của chúng ta là một class đơn giản chỉ với một biến và các phương thức getter/setter tương ứng. Đây là một class POJO thuần túy.
package com.journaldev.spring.model;

public class User {
	private String userName;

	public String getUserName() {
		return userName;
	}

	public void setUserName(String userName) {
		this.userName = userName;
	}
}
Các trang View trong Spring MVC
Chúng ta có hai trang view được định nghĩa như dưới đây.
home.jsp
<%@ page language="java" contentType="text/html; charset=UTF-8"
	pageEncoding="UTF-8"%>
<%@ taglib uri="<https://java.sun.com/jsp/jstl/core>" prefix="c"%>
<%@ page session="false"%>
<html>
<head>
<title>Home</title>
</head>
<body>
	<h1>Hello world!</h1>

	<P>The time on the server is ${serverTime}.</p>

	<form action="user" method="post">
		<input type="text" name="userName"><br> <input
			type="submit" value="Login">
	</form>
</body>
</html>
user.jsp
<%@ page language="java" contentType="text/html; charset=UTF-8"
    pageEncoding="UTF-8"%>
<!DOCTYPE html PUBLIC "-//W3C//DTD HTML 4.01 Transitional//EN" "<https://www.w3.org/TR/html4/loose.dtd>">
<html>
<head>
<meta http-equiv="Content-Type" content="text/html; charset=UTF-8">
<title>User Home Page</title>
</head>
<body>
<h3>Hi ${userName}</h3>
</body>
</html>
Lưu ý rằng Spring MVC sẽ tự động map các biến trong form với các biến trong model class, đó là lý do ta đặt tên biến giống nhau ở cả hai nơi. Đến đây, dự án ví dụ Spring MVC của chúng ta đã sẵn sàng để deploy và kiểm thử.
Deploy dự án Spring MVC trong Eclipse
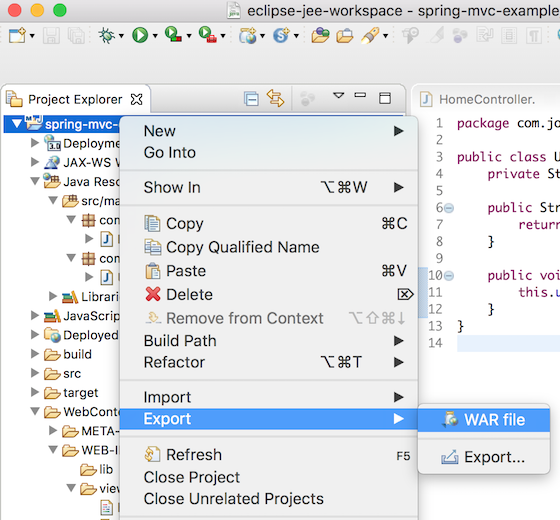
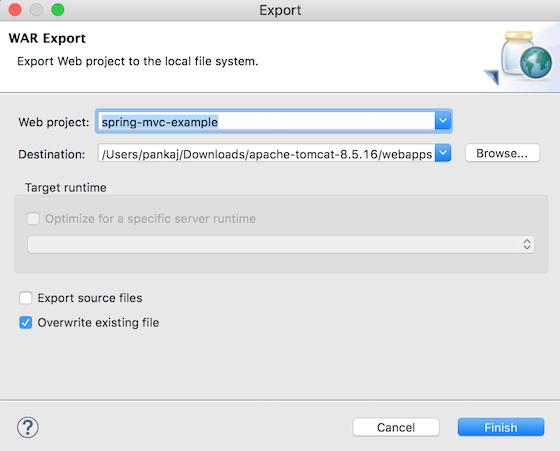
Ta có thể sử dụng tùy chọn export ra file WAR trong Eclipse để deploy trực tiếp vào thư mục webapps của bất kỳ server Tomcat nào đang chạy. Ngoài ra, bạn cũng có thể dùng dòng lệnh để build dự án rồi sao chép file WAR vào thư mục deploy của servlet container mà bạn muốn.
Kiểm thử ứng dụng Spring MVC ví dụ
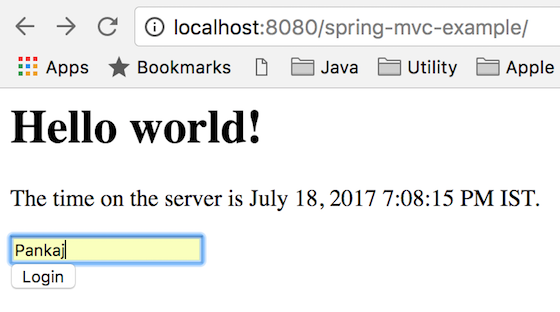
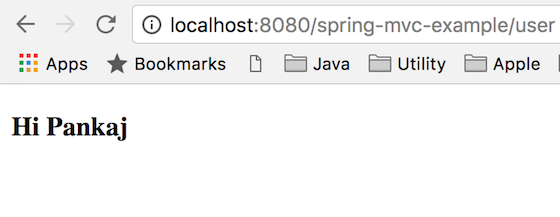
Sau khi dự án được deploy, chúng ta có thể truy cập trang chủ tại địa chỉ http://localhost:8080/spring-mvc-example/. Hãy nhớ thay đổi port của Tomcat và context-root cho phù hợp với cấu hình của bạn.
Trên đây là toàn bộ một ví dụ đơn giản về ứng dụng Spring MVC. Bạn có thể tải code hoàn chỉnh của nó từ đây. Nếu bạn gặp bất kỳ vấn đề nào, hãy để lại một bình luận và chúng tôi sẽ cố gắng hết sức để giải đáp thắc mắc của bạn.
 6 phút để đọc
