
Trong hướng dẫn này, chúng ta sẽ cùng tìm hiểu và triển khai tính năng Endless Scrolling (hay Infinite Scroll) của RecyclerView trong Android. Tính năng này rất phổ biến trong các ứng dụng như Facebook, Twitter, cho phép tải thêm dữ liệu từ cơ sở dữ liệu hoặc máy chủ khi người dùng cuộn đến cuối danh sách, kèm theo biểu tượng tải (loading icon).
Trước khi đi tiếp, bạn nên tham khảo qua hướng dẫn RecyclerView cơ bản để nắm rõ cách hoạt động của nó.

Tải thêm dữ liệu trong RecyclerView
Để hiển thị icon Loading ở cuối RecyclerView trong khi tải trang dữ liệu tiếp theo, chúng ta cần sử dụng nhiều loại View (Multiple View Types) trong RecyclerView Adapter.
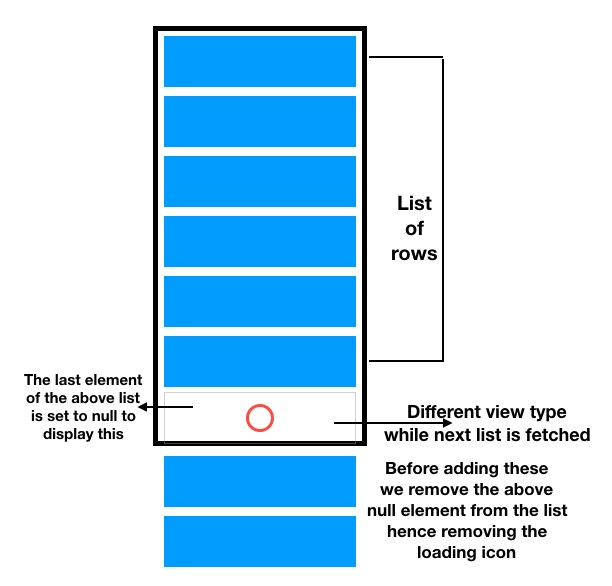
Thông thường, với một RecyclerView đơn giản, chúng ta sẽ tải các item vào Adapter từ một cấu trúc dữ liệu (chẳng hạn như một List). Để hiển thị một view chứa icon loading ở cuối RecyclerView, trước tiên chúng ta cần thêm một phần tử null vào cuối cấu trúc dữ liệu đó.
Tại sao lại là null?
Mục đích là để phân biệt phần tử này với các phần tử còn lại, từ đó hiển thị một loại view khác cho hàng đó (chính là hàng loading).
Sau khi thêm null, chúng ta sẽ thông báo cho Adapter về phần tử mới này và bắt đầu quá trình tải về tập dữ liệu tiếp theo. Một khi tập dữ liệu mới đã được tải về, chúng ta sẽ xóa phần tử null đi và thêm tập dữ liệu vừa tải vào cuối danh sách.
Sơ đồ dưới đây minh họa quá trình thực tế diễn ra trong RecyclerView và Adapter tương ứng.
Để phát hiện người dùng đã cuộn đến cuối danh sách trong RecyclerView, chúng ta cần triển khai OnScrollListener() cho RecyclerView.
Bây giờ chúng ta sẽ bắt tay vào mã hóa. Trong phần tiếp theo, chúng ta sẽ minh họa cách triển khai tính năng Endless Scrolling trên RecyclerView bằng cách hiển thị một danh sách chuỗi (List of Strings) và tải tiếp danh sách kế tiếp sau một khoảng trễ, sử dụng Handler.
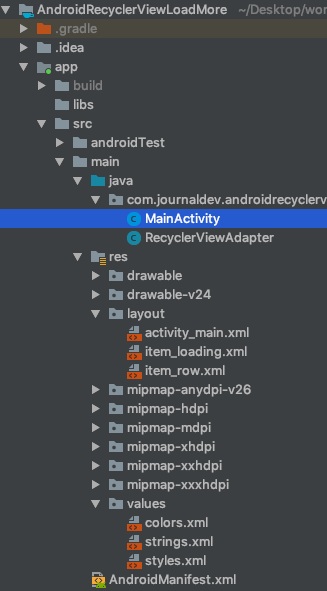
Cấu trúc dự án
Mã nguồn
Mã giao diện activity_main.xml được trình bày như sau:
Giao diện cho từng dòng của RecyclerView được định nghĩa trong tệp item_row.xml như sau:
Giao diện cho phần hiển thị trạng thái tải được định nghĩa trong tệp item_loading.xml như sau:
Mã nguồn lớp RecyclerViewAdapter.java như sau:
package com.journaldev.androidrecyclerviewloadmore;

import android.support.annotation.NonNull;
import android.support.v7.widget.RecyclerView;
import android.view.LayoutInflater;
import android.view.View;
import android.view.ViewGroup;
import android.widget.ProgressBar;
import android.widget.TextView;

import java.util.List;

public class RecyclerViewAdapter extends RecyclerView.Adapter {

    private final int VIEW_TYPE_ITEM = 0;
    private final int VIEW_TYPE_LOADING = 1;

    public List mItemList;

    public RecyclerViewAdapter(List itemList) {

        mItemList = itemList;
    }

    @NonNull
    @Override
    public RecyclerView.ViewHolder onCreateViewHolder(@NonNull ViewGroup parent, int viewType) {
        if (viewType == VIEW_TYPE_ITEM) {
            View view = LayoutInflater.from(parent.getContext()).inflate(R.layout.item_row, parent, false);
            return new ItemViewHolder(view);
        } else {
            View view = LayoutInflater.from(parent.getContext()).inflate(R.layout.item_loading, parent, false);
            return new LoadingViewHolder(view);
        }
    }

    @Override
    public void onBindViewHolder(@NonNull RecyclerView.ViewHolder viewHolder, int position) {

        if (viewHolder instanceof ItemViewHolder) {

            populateItemRows((ItemViewHolder) viewHolder, position);
        } else if (viewHolder instanceof LoadingViewHolder) {
            showLoadingView((LoadingViewHolder) viewHolder, position);
        }

    }

    @Override
    public int getItemCount() {
        return mItemList == null ? 0 : mItemList.size();
    }

    /**
     * The following method decides the type of ViewHolder to display in the RecyclerView
     *
     * @param position
     * @return
     */
    @Override
    public int getItemViewType(int position) {
        return mItemList.get(position) == null ? VIEW_TYPE_LOADING : VIEW_TYPE_ITEM;
    }

    private class ItemViewHolder extends RecyclerView.ViewHolder {

        TextView tvItem;

        public ItemViewHolder(@NonNull View itemView) {
            super(itemView);

            tvItem = itemView.findViewById(R.id.tvItem);
        }
    }

    private class LoadingViewHolder extends RecyclerView.ViewHolder {

        ProgressBar progressBar;

        public LoadingViewHolder(@NonNull View itemView) {
            super(itemView);
            progressBar = itemView.findViewById(R.id.progressBar);
        }
    }

    private void showLoadingView(LoadingViewHolder viewHolder, int position) {
        //ProgressBar would be displayed

    }

    private void populateItemRows(ItemViewHolder viewHolder, int position) {

        String item = mItemList.get(position);
        viewHolder.tvItem.setText(item);

    }

}
Phương thức getItemViewType được sử dụng để kiểm tra từng phần tử trong danh sách. Nếu phần tử là null, chúng ta gán kiểu hiển thị là 1, ngược lại là 0. Dựa vào loại hiển thị này, ViewHolder tương ứng sẽ được tạo trong onCreateViewHolder. Trong onBindViewHolder, chúng ta kiểm tra kiểu ViewHolder và cập nhật dòng tương ứng.
Bây giờ hãy xem xét lớp MainActivity.java chỗ mà chúng ta khởi tạo Adapter trên:
package com.journaldev.androidrecyclerviewloadmore;

import android.os.Handler;
import android.support.annotation.NonNull;
import android.support.v7.app.AppCompatActivity;
import android.os.Bundle;
import android.support.v7.widget.LinearLayoutManager;
import android.support.v7.widget.RecyclerView;

import java.util.ArrayList;

public class MainActivity extends AppCompatActivity {

    RecyclerView recyclerView;
    RecyclerViewAdapter recyclerViewAdapter;
    ArrayList rowsArrayList = new ArrayList<>();

    boolean isLoading = false;

    @Override
    protected void onCreate(Bundle savedInstanceState) {
        super.onCreate(savedInstanceState);
        setContentView(R.layout.activity_main);

        recyclerView = findViewById(R.id.recyclerView);
        populateData();
        initAdapter();
        initScrollListener();
    }

    private void populateData() {
        int i = 0;
        while (i < 10) {
            rowsArrayList.add("Item " + i);
            i++;
        }
    }

    private void initAdapter() {
        recyclerViewAdapter = new RecyclerViewAdapter(rowsArrayList);
        recyclerView.setAdapter(recyclerViewAdapter);
    }

    private void initScrollListener() {
        recyclerView.addOnScrollListener(new RecyclerView.OnScrollListener() {
            @Override
            public void onScrollStateChanged(@NonNull RecyclerView recyclerView, int newState) {
                super.onScrollStateChanged(recyclerView, newState);
            }

            @Override
            public void onScrolled(@NonNull RecyclerView recyclerView, int dx, int dy) {
                super.onScrolled(recyclerView, dx, dy);

                LinearLayoutManager linearLayoutManager = (LinearLayoutManager) recyclerView.getLayoutManager();

                if (!isLoading) {
                    if (linearLayoutManager != null && linearLayoutManager.findLastCompletelyVisibleItemPosition() == rowsArrayList.size() - 1) {
                        // Đã cuộn đến cuối danh sách
                        loadMore();
                        isLoading = true;
                    }
                }
            }
        });
    }

    private void loadMore() {
        rowsArrayList.add(null);
        recyclerViewAdapter.notifyItemInserted(rowsArrayList.size() - 1);

        Handler handler = new Handler();
        handler.postDelayed(new Runnable() {
            @Override
            public void run() {
                rowsArrayList.remove(rowsArrayList.size() - 1);
                int scrollPosition = rowsArrayList.size();
                recyclerViewAdapter.notifyItemRemoved(scrollPosition);
                int currentSize = scrollPosition;
                int nextLimit = currentSize + 10;

                while (currentSize - 1 < nextLimit) {
                    rowsArrayList.add("Item " + currentSize);
                    currentSize++;
                }

                recyclerViewAdapter.notifyDataSetChanged();
                isLoading = false;
            }
        }, 2000);
    }
}
initScrollListener là phương thức quan trọng nhất trong đoạn mã trên. Tại đây, ta kiểm tra trạng thái cuộn của RecyclerView và nếu phần tử cuối cùng hiển thị, chúng ta hiển thị giao diện đang tải và cập nhật danh sách kế tiếp.
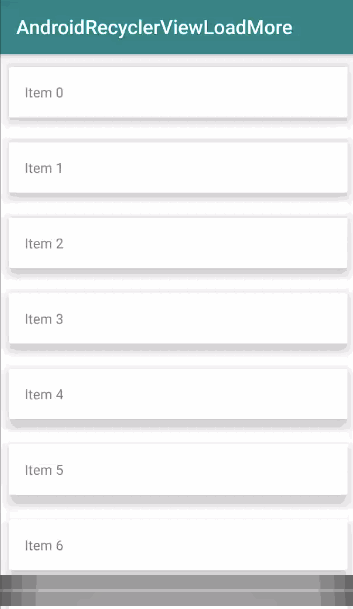
Kết quả hiển thị khi chạy ứng dụng trên sẽ như sau:
Vậy là chúng ta đã hoàn thành phần hướng dẫn. Bạn có thể tải toàn bộ mã nguồn của dự án tại liên kết dưới đây:
AndroidRecyclerViewLoadMore
Github Project Link