Trong hướng dẫn này, chúng ta sẽ có cái nhìn tổng quan về layout trong Android. Chúng ta cũng sẽ tìm hiểu một số thành phần layout phổ biến được sử dụng để bố trí nội dung trên màn hình, cụ thể là Android LinearLayout và Android RelativeLayout.
Android Layout
Khối xây dựng cơ bản cho giao diện người dùng là một đối tượng View được tạo từ lớp View và chiếm một vùng hình chữ nhật trên màn hình. View là lớp cơ sở cho các thành phần giao diện người dùng (UI components) như TextView, Button, EditText… ViewGroup là một lớp con của View. Một hoặc nhiều View có thể được nhóm lại trong một ViewGroup. ViewGroup cung cấp layout trong Android, tại đây chúng ta có thể sắp xếp hình thức và thứ tự của các View. Ví dụ về ViewGroup là LinearLayout, FrameLayout, RelativeLayout…
Các loại Android Layout
Android cung cấp các ViewGroup hoặc layout sau:
LinearLayout: là mộtViewGroupsắp xếp tất cả các thành phần con theo một hướng duy nhất, dọc hoặc ngangRelativeLayout: là mộtViewGrouphiển thị các thành phần con ở các vị trí tương đốiAbsoluteLayout: cho phép chúng ta chỉ định chính xác vị trí của các thành phần con và widgetTableLayout: là mộtViewnhóm các thành phần con thành hàng và cộtFrameLayout: là một vùng chứa trên màn hình được dùng để hiển thị mộtViewduy nhấtScrollView: là một loại đặc biệt củaFrameLayoutcho phép người dùng cuộn qua danh sách cácViewchiếm nhiều không gian hơn so với màn hình vật lý.ScrollViewchỉ có thể chứa mộtViewhoặcViewGroupcon, thường là mộtLinearLayoutListView: là mộtViewGrouphiển thị một danh sách các mục có thể cuộnGridView: là mộtViewGrouphiển thị các mục trong một lưới cuộn hai chiều. Các mục trong lưới đến từListAdapterliên kết vớiViewnày
Trong hướng dẫn này chúng ta sẽ tập trung vào hai layout được sử dụng nhiều nhất trong Android:
LinearLayoutRelativeLayout
Thuộc tính Android Layout
android:id: Đây là ID xác định duy nhấtViewandroid:layout_width: Đây là chiều rộng của layoutandroid:layout_height: Đây là chiều cao của layoutandroid:layout_margin: Đây là khoảng cách thêm bên ngoàiView. Ví dụ nếu bạn đặtandroid:marginLeft=20dp, thìViewsẽ được sắp xếp cách 20dp từ bên tráiandroid:layout_padding: Tương tựandroid:layout_marginnhưng chỉ định khoảng cách thêm bên trongViewandroid:layout_gravity: Xác định cách đặt vị trí cácchild viewandroid:layout_weight: Xác định bao nhiêu phần không gian thừa trong layout sẽ được phân bổ choViewandroid:layout_x: Xác định tọa độ x của layoutandroid:layout_y: Xác định tọa độ y của layout
android:layout_width=wrap_content báo cho View tự điều chỉnh kích thước theo nội dung của nó.
android:layout_width=match_parent báo cho View mở rộng hết cỡ so với Parent View của nó.
Xác định View
Cú pháp để định nghĩa một ID trong thẻ XML là:
- Ký hiệu
@ở đầu chuỗi cho biết trình phân tích XML nên phân tích và mở rộng phần còn lại của chuỗi ID và nhận diện nó như một tài nguyên ID - Ký hiệu
+có nghĩa đây là một tên tài nguyên mới cần được tạo và thêm vào tập tài nguyên của chúng ta
Android LinearLayout
Android LinearLayout sắp xếp các phần tử theo một dòng duy nhất. Chúng ta có thể chỉ định dòng đó là dọc hay ngang bằng cách sử dụng android:orientation. Mặc định, orientation là ngang. Một LinearLayout theo chiều dọc sẽ chỉ có một thành phần con trên mỗi hàng (nên sẽ tạo thành một cột các phần tử đơn), và một LinearLayout theo chiều ngang sẽ chỉ có một hàng các phần tử trên màn hình. Thuộc tính android:layout_weight biểu thị mức độ quan trọng của phần tử. Một phần tử có giá trị weight lớn hơn sẽ chiếm nhiều không gian màn hình hơn.
Dưới đây là một ví dụ về Layout XML sử dụng LinearLayout: layout_linear.xml
<LinearLayout xmlns:android="<https://schemas.android.com/apk/res/android>"
    android:orientation="vertical"
    android:layout_width="fill_parent"
    android:layout_height="fill_parent"
    android:layout_margin="@dimen/activity_horizontal_margin">
    <Button
        android:id="@+id/backbutton"
        android:text="Back"
        android:layout_width="wrap_content"
        android:layout_height="wrap_content" />
    <TextView
        android:text="Row 2"
        android:layout_width="wrap_content"
        android:textSize="18sp"
        android:layout_margin="10dp"
        android:layout_height="wrap_content" />
    <TextView
        android:text="Row 3"
        android:textSize="18sp"
        android:layout_margin="10dp"
        android:layout_width="wrap_content"
        android:layout_height="wrap_content" />
    <TextView
        android:text="Row 4"
        android:textSize="18sp"
        android:layout_margin="10dp"
        android:layout_width="wrap_content"
        android:layout_height="wrap_content" />
    <TextView
        android:text="Row 5"
        android:textSize="18sp"
        android:layout_margin="10dp"
        android:layout_width="wrap_content"
        android:layout_height="wrap_content" />

    <LinearLayout
        android:orientation="horizontal"
        android:layout_width="match_parent"
        android:layout_height="wrap_content">
        <Button
            android:id="@+id/next_button"
            android:text="next"
            android:layout_width="wrap_content"
            android:layout_height="wrap_content" />
        <TextView
            android:text="Row 6b"
            android:textSize="18sp"
            android:layout_margin="10dp"
            android:layout_gravity="center"
            android:layout_width="wrap_content"
            android:layout_height="wrap_content" />
        <TextView
            android:text="Row 6c"
            android:textSize="18sp"
            android:layout_margin="10dp"
            android:layout_gravity="center"
            android:layout_width="wrap_content"
            android:layout_height="wrap_content" />
        <TextView
            android:text="Row 6d"
            android:textSize="18sp"
            android:layout_margin="10dp"
            android:layout_gravity="center"
            android:layout_width="wrap_content"
            android:layout_height="wrap_content" />

    </LinearLayout>

</LinearLayout>
Trong layout này, chúng ta có một Parent LinearLayout với orientation dọc, chứa các Button, TextView và một LinearLayout lồng bên trong (có orientation ngang) làm các child view.
Lưu ý, các layout lồng nhau không nhất thiết phải cùng loại.
Ví dụ, chúng ta có thể sử dụng LinearLayout làm thành phần con trong một RelativeLayout và ngược lại.
Android RelativeLayout
Android RelativeLayout sắp xếp các phần tử dựa trên mối quan hệ của chúng với nhau và với parent container. Đây là một trong những loại layout phức tạp nhất, và chúng ta cần nhiều thuộc tính để có được bố cục như mong muốn. Cụ thể, khi sử dụng RelativeLayout, chúng ta có thể đặt một View ở bên trái (toLeftOf), bên phải (toRightOf), bên dưới (below) hoặc bên trên (above) so với các View cùng cấp (siblings). Chúng ta cũng có thể đặt một View dựa theo parent, ví dụ như căn giữa theo chiều ngang, chiều dọc hoặc cả hai, hoặc căn chỉnh theo bất kỳ cạnh nào của parent RelativeLayout. Nếu không chỉ định thuộc tính nào cho child view thì mặc định View đó sẽ được hiển thị ở góc trên bên trái.
Các thuộc tính Android RelativeLayout
Dưới đây là các thuộc tính chính được sử dụng trong RelativeLayout. Chúng được chia thành 3 nhóm:
- Tương đối so với Container
android:layout_alignParentBottom: Đặt cạnh dưới của phần tử trùng với cạnh dưới của containerandroid:layout_alignParentLeft: Đặt cạnh trái của phần tử trùng với cạnh trái của containerandroid:layout_alignParentRight: Đặt cạnh phải của phần tử trùng với cạnh phải của containerandroid:layout_alignParentTop: Đặt phần tử trùng với cạnh trên của containerandroid:layout_centerHorizontal: Căn giữa phần tử theo chiều ngang trongparent containerandroid:layout_centerInParent: Căn giữa phần tử cả theo chiều ngang và chiều dọc trongcontainerandroid:layout_centerVertical: Căn giữa phần tử theo chiều dọc trongparent container
2. Tương đối so với các phần tử cùng cấp
android:layout_above: Đặt phần tử phía trên phần tử được chỉ địnhandroid:layout_below: Đặt phần tử phía dưới phần tử được chỉ địnhandroid:layout_toLeftOf: Đặt phần tử bên trái phần tử được chỉ địnhandroid:layout_toRightOf: Đặt phần tử bên phải phần tử được chỉ định
“@id/XXXXX” được dùng để tham chiếu đến một phần tử thông qua id của nó. Nếu tham chiếu đến phần tử chưa được khai báo, hệ thống sẽ báo lỗi, vì vậy trong trường hợp này cần dùng @+id/.
3. Căn chỉnh với các phần tử khác
android:layout_alignBaseline: Căn chỉnh đường cơ sở (baseline) của phần tử mới với đường cơ sở của phần tử được chỉ địnhandroid:layout_alignBottom: Căn chỉnh cạnh dưới của phần tử mới với cạnh dưới của phần tử được chỉ địnhandroid:layout_alignLeft: Căn chỉnh cạnh trái của phần tử mới với cạnh trái của phần tử được chỉ địnhandroid:layout_alignRight: Căn chỉnh cạnh phải của phần tử mới với cạnh phải của phần tử được chỉ địnhandroid:layout_alignTop: Căn chỉnh cạnh trên của phần tử mới với cạnh trên của phần tử được chỉ định
Đoạn XML dưới đây sử dụng RelativeLayout: layout_relative.xml
<RelativeLayout
    android:layout_width="fill_parent"
    android:layout_height="fill_parent"
    xmlns:android="<https://schemas.android.com/apk/res/android>">
    <Button
        android:id="@+id/backbutton"
        android:text="Back"
        android:layout_width="wrap_content"
        android:layout_height="wrap_content" />
    <TextView
        android:id="@+id/firstName"
        android:text="First Name"
        android:textSize="18sp"
        android:layout_width="wrap_content"
        android:layout_height="wrap_content"
        android:layout_below="@id/backbutton" />
    <TextView
        android:id="@+id/editFirstName"
        android:text="JournalDev"
        android:textSize="18sp"
        android:layout_width="wrap_content"
        android:layout_marginLeft="10dp"
        android:layout_height="wrap_content"
        android:layout_toRightOf="@id/firstName"
        android:layout_below="@id/backbutton"/>
    <TextView
        android:id="@+id/editLastName"
        android:text="Layout Tutorial Example"
        android:textSize="18sp"
        android:layout_width="wrap_content"
        android:layout_height="wrap_content"
        android:layout_alignTop="@+id/lastName"
        android:layout_toRightOf="@+id/lastName"
        android:layout_toEndOf="@+id/lastName" />
    <TextView
        android:id="@+id/lastName"
        android:text="Last Name"
        android:textSize="18sp"
        android:layout_width="wrap_content"
        android:layout_height="wrap_content"
        android:layout_marginTop="48dp"
        android:layout_below="@+id/firstName"
        android:layout_alignParentLeft="true"
        android:layout_alignParentStart="true"
        android:layout_marginRight="10dp"
        android:layout_marginLeft="40dp"
        android:layout_marginStart="40dp" />

    <Button
        android:id="@+id/next"
        android:text="Next"
        android:layout_width="wrap_content"
        android:layout_height="wrap_content"
        android:layout_below="@+id/editLastName"
        android:layout_alignLeft="@+id/editLastName"
        android:layout_alignStart="@+id/editLastName"
        android:layout_marginTop="37dp" />
</RelativeLayout>
Như bạn thấy, chúng ta có thể sắp xếp lại các phần tử dựa trên vị trí tương đối của chúng. Đoạn XML sau đây biểu diễn một bố cục tùy chỉnh có chứa LinearLayout và RelativeLayout lồng vào nhau: layout_mixed.xml
<RelativeLayout
    android:layout_width="fill_parent"
    android:layout_height="fill_parent"
    xmlns:android="<https://schemas.android.com/apk/res/android>">

    <TextView
        android:id="@+id/parent_rl"
        android:text="Parent RelativeLayout"
        android:textSize="18sp"
        android:layout_width="wrap_content"
        android:layout_height="wrap_content" />

    <LinearLayout
        android:orientation="horizontal"
        android:layout_width="match_parent"
        android:layout_height="wrap_content"
        android:id="@+id/linearLayout"
        android:layout_below="@id/parent_rl"
        android:layout_alignParentRight="true"
        android:layout_alignParentEnd="true">

        <TextView
            android:text="Nested Horizontal"
            android:textSize="18sp"
            android:layout_margin="10dp"
            android:layout_width="wrap_content"
            android:layout_height="wrap_content" />

        <TextView
            android:text="LL"
            android:textSize="18sp"
            android:layout_margin="10dp"
            android:layout_width="wrap_content"
            android:layout_height="wrap_content" />

        <LinearLayout
            android:orientation="vertical"
            android:layout_width="wrap_content"
            android:layout_height="wrap_content">

            <TextView
                android:text="Double Nested"
                android:textSize="18sp"
                android:layout_margin="10dp"
                android:layout_gravity="center"
                android:layout_width="wrap_content"
                android:layout_height="wrap_content" />
            <TextView
                android:text="Vertical"
                android:textSize="18sp"
                android:layout_margin="10dp"
                android:layout_gravity="center"
                android:layout_width="wrap_content"
                android:layout_height="wrap_content" />
            <TextView
                android:text="LL"
                android:textSize="18sp"
                android:layout_margin="10dp"
                android:layout_gravity="center"
                android:layout_width="wrap_content"
                android:layout_height="wrap_content" />

        </LinearLayout>

    </LinearLayout>

    <RelativeLayout
        android:layout_width="match_parent"
        android:layout_height="match_parent"
        android:layout_below="@id/linearLayout">

    <TextView
        android:layout_width="wrap_content"
        android:layout_height="wrap_content"
        android:textAppearance="?android:attr/textAppearanceMedium"
        android:text="Nested Relative Layout"
        android:id="@+id/textView"
        android:layout_alignParentTop="true"
        android:layout_centerHorizontal="true" />

        <Button
            android:id="@+id/back_button_pressed"
            android:text="back"
            android:layout_width="wrap_content"
            android:layout_height="wrap_content"
            android:layout_below="@+id/textView"
            android:layout_centerHorizontal="true"
            android:layout_marginTop="66dp" />

    </RelativeLayout>

</RelativeLayout>
Cấu trúc Project Android Layout
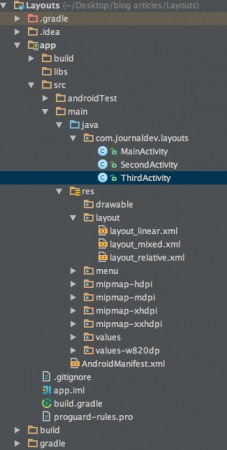
Dự án này gồm ba Activity và các layout tương ứng đã được thảo luận ở trên.
Mã nguồn Android Layout
Ứng dụng khởi chạy vào MainActivity và tải nội dung layout_linear.xml bằng đoạn code sau:
package com.journaldev.layouts;

import android.content.Intent;
import android.support.v7.app.AppCompatActivity;
import android.os.Bundle;
import android.view.Menu;
import android.view.MenuItem;
import android.view.View;
import android.widget.Button;

public class MainActivity extends AppCompatActivity {

    Button back,next;
    @Override
    protected void onCreate(Bundle savedInstanceState) {
        super.onCreate(savedInstanceState);
        setContentView(R.layout.layout_linear);
        back=(Button)findViewById(R.id.back_button);
        next=(Button)findViewById(R.id.next_button);

        next.setOnClickListener(new View.OnClickListener() {
            @Override
            public void onClick(View v) {
                Intent intent=new Intent(MainActivity.this,SecondActivity.class);
                intent.setFlags(Intent.FLAG_ACTIVITY_CLEAR_TOP);
                startActivity(intent);
            }
        });
        back.setOnClickListener(new View.OnClickListener() {
            @Override
            public void onClick(View v) {
                finish();
            }
        });

    }

}
SecondActivity và ThirdActivity lần lượt tải các layout layout_relative.xml và layout_mixed.xml như sau:
package com.journaldev.layouts;

import android.app.Activity;
import android.content.Intent;
import android.os.Bundle;
import android.view.View;
import android.widget.Button;

public class SecondActivity extends Activity {
    Button back,next;
    @Override
    protected void onCreate(Bundle savedInstanceState) {
        super.onCreate(savedInstanceState);
        setContentView(R.layout.layout_relative);
        back=(Button)findViewById(R.id.backbutton);
        next=(Button)findViewById(R.id.next);

        next.setOnClickListener(new View.OnClickListener() {
            @Override
            public void onClick(View v) {
                Intent intent=new Intent(SecondActivity.this,ThirdActivity.class);
                intent.setFlags(Intent.FLAG_ACTIVITY_CLEAR_TOP);
                startActivity(intent);
            }
        });
        back.setOnClickListener(new View.OnClickListener() {
            @Override
            public void onClick(View v) {
                Intent intent=new Intent(SecondActivity.this,MainActivity.class);
                intent.setFlags(Intent.FLAG_ACTIVITY_CLEAR_TOP);
                startActivity(intent);
            }
        });

    }
}
package com.journaldev.layouts;

import android.app.Activity;
import android.content.Intent;
import android.os.Bundle;
import android.view.View;
import android.widget.Button;

public class ThirdActivity extends Activity {
    Button back;
    @Override
    protected void onCreate(Bundle savedInstanceState) {
        super.onCreate(savedInstanceState);
        setContentView(R.layout.layout_mixed);
        back=(Button)findViewById(R.id.back_button_pressed);

        back.setOnClickListener(new View.OnClickListener() {
            @Override
            public void onClick(View v) {
                Intent intent=new Intent(ThirdActivity.this,SecondActivity.class);
                intent.setFlags(Intent.FLAG_ACTIVITY_CLEAR_TOP);
                startActivity(intent);
            }
        });

    }
}
Kết quả hình ảnh của ba tệp layout được hiển thị dưới đây: layout_linear.xml
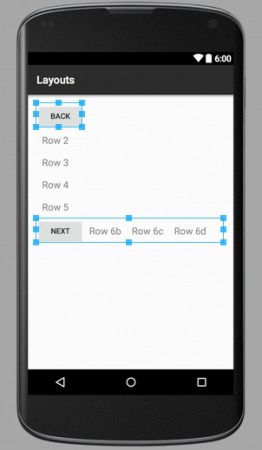
layout_linear.xml – ví dụ về Android LinearLayout
Như bạn thấy, Parent LinearLayout gồm 6 phần tử con trong một cột dọc, trong đó có một LinearLayout lồng bên trong chứa 4 thành phần theo hướng ngang.
layout_relative.xml
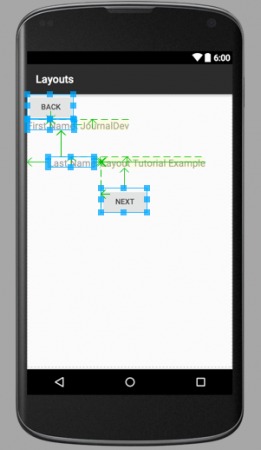
layout_relative.xml – ví dụ về Android RelativeLayout
Các mũi tên trong hình minh họa cho thấy các phần tử cùng cấp được sắp xếp vị trí tương đối với nhau và với container.
layout_mixed.xml
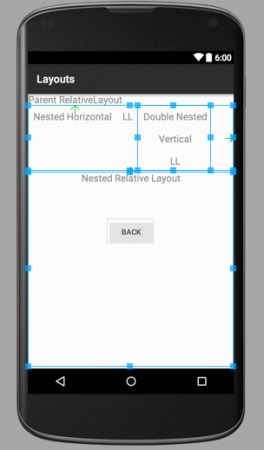
layout_mixed.xml – ví dụ về Android Layout
RelativeLayout này bao gồm một Vertical LinearLayout nằm trong một Nested Horizontal LinearLayout cùng với một Child RelativeLayout.
Lưu ý: Các thành phần thuộc về những layout khác nhau thì không phải là siblings, do đó không thể định vị tương đối trực tiếp với nhau. Chỉ có các container layout của chúng mới là siblings và có thể định vị tương đối với nhau.
Nếu bạn thắc mắc về các hình chữ nhật viền xanh và mũi tên, đó là bởi vì hình ảnh được chụp từ XML layout ở chế độ xem đồ họa. Khi chạy ứng dụng, các đường viền và mũi tên màu xanh này sẽ không xuất hiện.
Như vậy chúng ta đã hoàn thành bài hướng dẫn về Layout trong Android. Ở các hướng dẫn tiếp theo, chúng ta sẽ tìm hiểu các layout khác trong Android.
Bạn có thể tải Project Android Layout hoàn chỉnh từ liên kết dưới đây:
Download Android LinearLayout RelativeLayout Example Project
Tham khảo: API Doc
 8 phút để đọc
