
Hôm nay chúng ta sẽ tìm hiểu về Hibernate Many-to-Many Mapping bằng cả cấu hình XML và annotation.

Quan hệ Many-to-Many trong cơ sở dữ liệu thường được triển khai thông qua một Join Table.
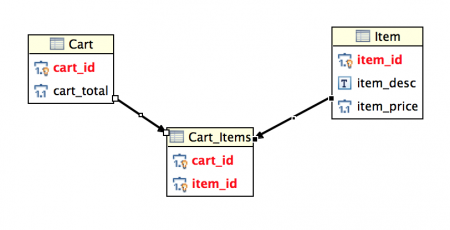
Ví dụ: chúng ta có bảng Cart và bảng Item, cùng với bảng Cart_Items để ánh xạ quan hệ many-to-many.
Mỗi cart có thể chứa nhiều item, và mỗi item cũng có thể thuộc về nhiều cart, đây chính là quan hệ many-to-many.
Thiết lập cơ sở dữ liệu cho Hibernate Many-to-Many Mapping
Đoạn script dưới đây được dùng để tạo các bảng trong ví dụ many-to-many. Script này được viết cho MySQL database. Nếu bạn dùng loại cơ sở dữ liệu khác, có thể cần chỉnh sửa đôi chút để chạy được.
DROP TABLE IF EXISTS `Cart_Items`;
DROP TABLE IF EXISTS `Cart`;
DROP TABLE IF EXISTS `Item`;

CREATE TABLE `Cart` (
  `cart_id` int(11) unsigned NOT NULL AUTO_INCREMENT,
  `cart_total` decimal(10,0) NOT NULL,
  PRIMARY KEY (`cart_id`)
) ENGINE=InnoDB AUTO_INCREMENT=1 DEFAULT CHARSET=utf8;

CREATE TABLE `Item` (
  `item_id` int(11) unsigned NOT NULL AUTO_INCREMENT,
  `item_desc` varchar(20) NOT NULL,
  `item_price` decimal(10,0) NOT NULL,
  PRIMARY KEY (`item_id`)
) ENGINE=InnoDB DEFAULT CHARSET=utf8;

CREATE TABLE `Cart_Items` (
  `cart_id` int(11) unsigned NOT NULL,
  `item_id` int(11) unsigned NOT NULL,
  PRIMARY KEY (`cart_id`,`item_id`),
  CONSTRAINT `fk_cart` FOREIGN KEY (`cart_id`) REFERENCES `Cart` (`cart_id`),
  CONSTRAINT `fk_item` FOREIGN KEY (`item_id`) REFERENCES `Item` (`item_id`)
) ENGINE=InnoDB DEFAULT CHARSET=utf8;
Lưu ý rằng bảng Cart_Items không có bất kỳ cột bổ sung nào.
Thực tế, trong bảng ánh xạ many-to-many, việc thêm các cột khác thường không cần thiết.
Tuy nhiên, nếu bảng này có thêm các cột bổ sung, cách triển khai sẽ thay đổi một chút và chúng ta sẽ tìm hiểu chi tiết hơn về trường hợp đó trong một bài viết khác.
Sơ đồ dưới đây minh họa mối quan hệ giữa các Entity trong các bảng này.
Cơ sở dữ liệu của chúng ta đã được thiết lập xong, bây giờ hãy bắt đầu tạo dự án Hibernate Many-to-Many Mapping.
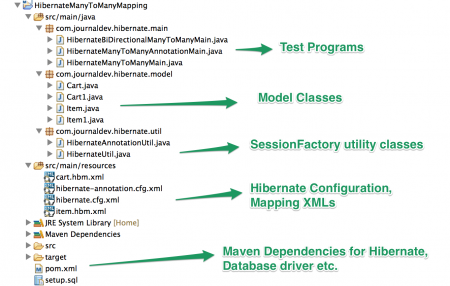
Cấu trúc dự án Hibernate Many-to-Many Mapping
Hãy tạo một Maven project trong Eclipse hoặc bất kỳ IDE nào bạn yêu thích. Hình dưới đây minh họa cấu trúc và các thành phần khác nhau trong ứng dụng.
Trước tiên, chúng ta sẽ tìm hiểu cách triển khai mapping dựa trên XML, sau đó sẽ chuyển sang sử dụng JPA annotations.
Hibernate Maven Dependencies
Tệp pom.xml cuối cùng của chúng ta chứa các Hibernate dependencies, phiên bản mới nhất 4.3.5.Final và MySQL driver dependencies.
Dưới đây là nội dung của pom.xml
	4.0.0
	com.journaldev.hibernate
	HibernateManyToManyMapping
	0.0.1-SNAPSHOT


			org.hibernate
			hibernate-core
			4.3.5.Final


			mysql
			mysql-connector-java
			5.0.5
Hibernate Many-to-Many – Cấu hình XML cho Model Classes
Cart.java
package com.journaldev.hibernate.model;
import java.util.Set;
public class Cart {
private long id;
private double total;
private Set- items;
public double getTotal() {
return total;
}
public void setTotal(double total) {
this.total = total;
}
public long getId() {
return id;
}
public void setId(long id) {
this.id = id;
}
public Set
- getItems() {
return items;
}
public void setItems(Set
- items) {
this.items = items;
}
}
Item.java
package com.journaldev.hibernate.model;

import java.util.Set;

public class Item {

	private long id;
	private double price;
	private String description;

	private Set carts;

	public long getId() {
		return id;
	}

	public void setId(long id) {
		this.id = id;
	}

	public double getPrice() {
		return price;
	}

	public void setPrice(double price) {
		this.price = price;
	}

	public String getDescription() {
		return description;
	}

	public void setDescription(String description) {
		this.description = description;
	}

	public Set getCarts() {
		return carts;
	}

	public void setCarts(Set carts) {
		this.carts = carts;
	}
}
Hãy lưu ý rằng Cart có một tập hợp các Item và Item cũng có một tập hợp các Cart. Đây là cách chúng ta triển khai quan hệ hai chiều. Điều này có nghĩa là chúng ta có thể cấu hình để khi lưu Cart thì các Item liên quan cũng sẽ được lưu, và ngược lại.
Với quan hệ một chiều, thông thường chúng ta chỉ khai báo tập hợp ở một trong hai lớp model. Trong phần mapping một chiều, chúng ta sẽ sử dụng annotations.
Cấu hình XML cho Hibernate Many-to-Many Mapping
Bây giờ, chúng ta sẽ tạo các tệp cấu hình XML cho Cart và Item để ánh xạ quan hệ many-to-many. Trong ví dụ này, chúng ta sẽ triển khai quan hệ hai chiều.
Tệp đầu tiên: cart.hbm.xml.
">
Lưu ý rằng tập hợp các Item được ánh xạ tới bảng CART_ITEMS. Vì Cart là đối tượng chính, nên cart_id sẽ đóng vai trò là khóa chính, và quan hệ many-to-many sẽ sử dụng cột item_id của class Item.
item.hbm.xml
" >
Như bạn có thể thấy ở trên, phần mapping của Item rất giống với cấu hình mapping của Cart.
Cấu hình Hibernate cho Many-to-Many mapping dựa trên XML
Tệp cấu hình Hibernate của chúng ta sẽ trông như sau: hibernate.cfg.xml.
">


		com.mysql.jdbc.Driver
		pankaj123
		jdbc:mysql://localhost/TestDB
		pankaj
		org.hibernate.dialect.MySQLDialect

		thread
		true
Hibernate SessionFactory Utility Class cho mapping dựa trên XML
HibernateUtil.java
package com.journaldev.hibernate.util;

import org.hibernate.SessionFactory;
import org.hibernate.boot.registry.StandardServiceRegistryBuilder;
import org.hibernate.cfg.Configuration;
import org.hibernate.service.ServiceRegistry;

public class HibernateUtil {

	private static SessionFactory sessionFactory;

	private static SessionFactory buildSessionFactory() {
		try {
			// Create the SessionFactory from hibernate.cfg.xml
			Configuration configuration = new Configuration();
			configuration.configure("hibernate.cfg.xml");
			System.out.println("Hibernate Configuration loaded");

			ServiceRegistry serviceRegistry = new StandardServiceRegistryBuilder()
					.applySettings(configuration.getProperties()).build();
			System.out.println("Hibernate serviceRegistry created");

			SessionFactory sessionFactory = configuration
					.buildSessionFactory(serviceRegistry);

			return sessionFactory;
		} catch (Throwable ex) {
			System.err.println("Initial SessionFactory creation failed." + ex);
			ex.printStackTrace();
			throw new ExceptionInInitializerError(ex);
		}
	}

	public static SessionFactory getSessionFactory() {
		if (sessionFactory == null)
			sessionFactory = buildSessionFactory();
		return sessionFactory;
	}

}
Đây là một utility class đơn giản, hoạt động như một factory để tạo ra SessionFactory.
Chương trình kiểm thử Hibernate Many-to-Many mapping với cấu hình XML
Bây giờ, cấu hình Hibernate many-to-many mapping của chúng ta đã sẵn sàng, hãy tiến hành kiểm thử.
Chúng ta sẽ viết hai chương trình:
- Lưu một Cart và kiểm tra xem thông tin Item và Cart_Items có được lưu hay không.
- Lưu dữ liệu Item và kiểm tra xem Cart cùng Cart_Items tương ứng có được lưu hay không.
HibernateManyToManyMain.java
package com.journaldev.hibernate.main;
import java.util.HashSet;
import java.util.Set;
import org.hibernate.Session;
import org.hibernate.SessionFactory;
import org.hibernate.Transaction;
import com.journaldev.hibernate.model.Cart;
import com.journaldev.hibernate.model.Item;
import com.journaldev.hibernate.util.HibernateUtil;
public class HibernateManyToManyMain {
//Saving many-to-many where Cart is primary
public static void main(String[] args) {
Item iphone = new Item();
iphone.setPrice(100); iphone.setDescription("iPhone");
Item ipod = new Item();
ipod.setPrice(50); ipod.setDescription("iPod");
Set- items = new HashSet
- ();
items.add(iphone); items.add(ipod);
Cart cart = new Cart();
cart.setItems(items);
cart.setTotal(150);
Cart cart1 = new Cart();
Set
- items1 = new HashSet
- ();
items1.add(iphone);
cart1.setItems(items1);
cart1.setTotal(100);
SessionFactory sessionFactory = null;
try{
sessionFactory = HibernateUtil.getSessionFactory();
Session session = sessionFactory.getCurrentSession();
Transaction tx = session.beginTransaction();
session.save(cart);
session.save(cart1);
System.out.println("Before committing transaction");
tx.commit();
sessionFactory.close();
System.out.println("Cart ID="+cart.getId());
System.out.println("Cart1 ID="+cart1.getId());
System.out.println("Item1 ID="+iphone.getId());
System.out.println("Item2 ID="+ipod.getId());
}catch(Exception e){
e.printStackTrace();
}finally{
if(sessionFactory != null && !sessionFactory.isClosed()) sessionFactory.close();
}
}
}
Khi chúng ta chạy chương trình ví dụ Hibernate many-to-many mapping ở trên, kết quả đầu ra sẽ như sau.
Hibernate Configuration loaded
Hibernate serviceRegistry created
Hibernate: insert into CART (cart_total) values (?)
Hibernate: insert into ITEM (item_desc, item_price) values (?, ?)
Hibernate: insert into ITEM (item_desc, item_price) values (?, ?)
Hibernate: insert into CART (cart_total) values (?)
Before committing transaction
Hibernate: insert into CART_ITEMS (cart_id, item_id) values (?, ?)
Hibernate: insert into CART_ITEMS (cart_id, item_id) values (?, ?)
Hibernate: insert into CART_ITEMS (cart_id, item_id) values (?, ?)
Cart ID=1
Cart1 ID=2
Item1 ID=1
Item2 ID=2
Lưu ý rằng khi dữ liệu item được lưu thông qua Cart đầu tiên, một item_id sẽ được tạo ra. Khi lưu Cart thứ hai, Item này sẽ không được lưu lại lần nữa.
Một điểm quan trọng khác là dữ liệu của bảng join many-to-many chỉ được lưu khi chúng ta commit giao dịch. Điều này được thực hiện để tối ưu hiệu năng trong trường hợp chúng ta chọn rollback giao dịch.
HibernateBiDirectionalManyToManyMain.java
package com.journaldev.hibernate.main;

import java.util.HashSet;
import java.util.Set;

import org.hibernate.Session;
import org.hibernate.SessionFactory;
import org.hibernate.Transaction;

import com.journaldev.hibernate.model.Cart;
import com.journaldev.hibernate.model.Item;
import com.journaldev.hibernate.util.HibernateUtil;

public class HibernateBiDirectionalManyToManyMain {

	//Saving many-to-many where Item is primary
	public static void main(String[] args) {

		Item iphone = new Item();
		iphone.setPrice(100); iphone.setDescription("iPhone");

		Item ipod = new Item();
		ipod.setPrice(50); ipod.setDescription("iPod");

		Cart cart = new Cart();
		cart.setTotal(150);

		Cart cart1 = new Cart();
		cart1.setTotal(100);

		Set cartSet = new HashSet();
		cartSet.add(cart);cartSet.add(cart1);

		Set cartSet1 = new HashSet();
		cartSet1.add(cart);

		iphone.setCarts(cartSet1);
		ipod.setCarts(cartSet);

		SessionFactory sessionFactory = null;
		try{
		sessionFactory = HibernateUtil.getSessionFactory();
		Session session = sessionFactory.getCurrentSession();
		Transaction tx = session.beginTransaction();
		session.save(iphone);
		session.save(ipod);
		tx.commit();
		sessionFactory.close();

		System.out.println("Cart ID="+cart.getId());
		System.out.println("Cart1 ID="+cart1.getId());
		System.out.println("Item1 ID="+iphone.getId());
		System.out.println("Item2 ID="+ipod.getId());

		}catch(Exception e){
			e.printStackTrace();
		}finally{
			if(sessionFactory != null && !sessionFactory.isClosed()) sessionFactory.close();
		}

	}

}
Kết quả đầu ra của chương trình trên là:
Hibernate Configuration loaded
Hibernate serviceRegistry created
Hibernate: insert into ITEM (item_desc, item_price) values (?, ?)
Hibernate: insert into CART (cart_total) values (?)
Hibernate: insert into ITEM (item_desc, item_price) values (?, ?)
Hibernate: insert into CART (cart_total) values (?)
Hibernate: insert into CART_ITEMS (item_id, cart_id) values (?, ?)
Hibernate: insert into CART_ITEMS (item_id, cart_id) values (?, ?)
Hibernate: insert into CART_ITEMS (item_id, cart_id) values (?, ?)
Cart ID=3
Cart1 ID=4
Item1 ID=3
Item2 ID=4
Bạn có thể dễ dàng liên hệ kết quả này với chương trình kiểm thử trước đó.
Vì chúng ta đã cấu hình bi-directional mapping, nên chỉ cần lưu Item hoặc Cart là dữ liệu ánh xạ liên quan sẽ tự động được lưu theo.
Hibernate Many-to-Many mapping bằng Annotation
Sau khi đã xem cách cấu hình many-to-many mapping bằng Hibernate XML, bây giờ chúng ta sẽ đến ví dụ triển khai bằng annotations.
Ở đây, chúng ta sẽ thực hiện one-directional many-to-many mapping sử dụng JPA annotations.
Hibernate Configuration XML File
Tệp cấu hình Hibernate cho phiên bản sử dụng annotations sẽ có dạng như sau: hibernate-annotation.cfg.xml
">


		com.mysql.jdbc.Driver
		pankaj123
		jdbc:mysql://localhost/TestDB
		pankaj
		org.hibernate.dialect.MySQLDialect

		thread
		true
Hibernate SessionFactory Utility Class
Lớp tiện ích của chúng ta để tạo SessionFactory sẽ có dạng như sau: HibernateAnnotationUtil.java
package com.journaldev.hibernate.util;

import org.hibernate.SessionFactory;
import org.hibernate.boot.registry.StandardServiceRegistryBuilder;
import org.hibernate.cfg.Configuration;
import org.hibernate.service.ServiceRegistry;

public class HibernateAnnotationUtil {

	private static SessionFactory sessionFactory;

	private static SessionFactory buildSessionFactory() {
        try {
            // Create the SessionFactory from hibernate-annotation.cfg.xml
        	Configuration configuration = new Configuration();
        	configuration.configure("hibernate-annotation.cfg.xml");
        	System.out.println("Hibernate Annotation Configuration loaded");

        	ServiceRegistry serviceRegistry = new StandardServiceRegistryBuilder().applySettings(configuration.getProperties()).build();
        	System.out.println("Hibernate Annotation serviceRegistry created");

        	SessionFactory sessionFactory = configuration.buildSessionFactory(serviceRegistry);

            return sessionFactory;
        }
        catch (Throwable ex) {
            System.err.println("Initial SessionFactory creation failed." + ex);
            ex.printStackTrace();
            throw new ExceptionInInitializerError(ex);
        }
    }

	public static SessionFactory getSessionFactory() {
		if(sessionFactory == null) sessionFactory = buildSessionFactory();
        return sessionFactory;
    }
}
Hibernate Many-to-Many Mapping – Annotation Model Classes
Đây là phần quan trọng nhất khi dùng annotation-based mapping.
Trước tiên, chúng ta sẽ xem model class cho bảng Item, sau đó sẽ đến model class cho bảng Cart.
Item1.java
package com.journaldev.hibernate.model;

import javax.persistence.Column;
import javax.persistence.Entity;
import javax.persistence.GeneratedValue;
import javax.persistence.GenerationType;
import javax.persistence.Id;
import javax.persistence.Table;

@Entity
@Table(name="ITEM")
public class Item1 {

	@Id
	@Column(name="item_id")
	@GeneratedValue(strategy=GenerationType.IDENTITY)
	private long id;

	@Column(name="item_price")
	private double price;

	@Column(name="item_desc")
	private String description;

// Getter Setter methods
}
Lớp Item1 trông khá đơn giản, chưa có phần ánh xạ quan hệ nào ở đây.
Cart1.java
package com.journaldev.hibernate.model;

import java.util.Set;

import javax.persistence.CascadeType;
import javax.persistence.Column;
import javax.persistence.Entity;
import javax.persistence.GeneratedValue;
import javax.persistence.GenerationType;
import javax.persistence.Id;
import javax.persistence.JoinColumn;
import javax.persistence.JoinTable;
import javax.persistence.ManyToMany;
import javax.persistence.Table;

@Entity
@Table(name = "CART")
public class Cart1 {

	@Id
	@Column(name = "cart_id")
	@GeneratedValue(strategy = GenerationType.IDENTITY)
	private long id;

	@Column(name = "cart_total")
	private double total;

	@ManyToMany(targetEntity = Item1.class, cascade = { CascadeType.ALL })
	@JoinTable(name = "CART_ITEMS",
				joinColumns = { @JoinColumn(name = "cart_id") },
				inverseJoinColumns = { @JoinColumn(name = "item_id") })
	private Set items;

//Getter Setter methods
}
Phần quan trọng nhất ở đây là việc sử dụng annotation @ManyToMany và @JoinTable, trong đó chúng ta chỉ định tên bảng và các cột sẽ được dùng cho quan hệ many-to-many mapping.
Chương trình kiểm thử Hibernate Many-to-Many
Dưới đây là một chương trình kiểm thử đơn giản cho cấu hình Hibernate many-to-many mapping sử dụng annotation:
HibernateManyToManyAnnotationMain.java
package com.journaldev.hibernate.main;

import java.util.HashSet;
import java.util.Set;

import org.hibernate.Session;
import org.hibernate.SessionFactory;
import org.hibernate.Transaction;

import com.journaldev.hibernate.model.Cart1;
import com.journaldev.hibernate.model.Item1;
import com.journaldev.hibernate.util.HibernateAnnotationUtil;

public class HibernateManyToManyAnnotationMain {

	public static void main(String[] args) {
		Item1 item1 = new Item1();
		item1.setDescription("samsung"); item1.setPrice(300);
		Item1 item2 = new Item1();
		item2.setDescription("nokia"); item2.setPrice(200);
		Cart1 cart = new Cart1();
		cart.setTotal(500);
		Set items = new HashSet();
		items.add(item1); items.add(item2);
		cart.setItems(items);

		SessionFactory sessionFactory = null;
		try{
		sessionFactory = HibernateAnnotationUtil.getSessionFactory();
		Session session = sessionFactory.getCurrentSession();
		Transaction tx = session.beginTransaction();
		session.save(cart);
		System.out.println("Before committing transaction");
		tx.commit();
		sessionFactory.close();

		System.out.println("Cart ID="+cart.getId());
		System.out.println("Item1 ID="+item1.getId());
		System.out.println("Item2 ID="+item2.getId());

		}catch(Exception e){
			e.printStackTrace();
		}finally{
			if(sessionFactory != null && !sessionFactory.isClosed()) sessionFactory.close();
		}
	}

}
Khi chúng ta chạy chương trình trên, nó sẽ tạo ra kết quả đầu ra như sau.
Hibernate Annotation Configuration loaded
Hibernate Annotation serviceRegistry created
Hibernate: insert into CART (cart_total) values (?)
Hibernate: insert into ITEM (item_desc, item_price) values (?, ?)
Hibernate: insert into ITEM (item_desc, item_price) values (?, ?)
Before committing transaction
Hibernate: insert into CART_ITEMS (cart_id, item_id) values (?, ?)
Hibernate: insert into CART_ITEMS (cart_id, item_id) values (?, ?)
Cart ID=5
Item1 ID=6
Item2 ID=5
Rõ ràng là khi lưu Cart, dữ liệu cũng được lưu vào bảng Item và Cart_Items. Nếu bạn chỉ lưu thông tin Item, bạn sẽ thấy rằng dữ liệu của Cart và Cart_Items sẽ không được lưu. Trên đây là toàn bộ hướng dẫn ví dụ về Hibernate Many-To-Many Mapping.