Tạo dịch vụ web RESTful sử dụng Spring, JSON, Jackson, và chương trình client
9 phút đọc27/05/2025
Bao Tran
Web Developer
0 lượt xem
0 lượt xem
Reading Time: 9minutes
Spring là một trong những framework Java EE được sử dụng phổ biến nhất. Trước đây, chúng ta đã tìm hiểu cách sử dụng Spring MVC để tạo các ứng dụng web Java. Hôm nay, chúng ta sẽ học cách tạo dịch vụ web RESTful sử dụng Spring MVC, sau đó kiểm tra hoạt động của chúng bằng Rest client. Cuối cùng, chúng ta cũng sẽ tìm hiểu cách gọi dịch vụ web RESTful Spring bằng Spring RestTemplate API.
Spring REST
Chúng ta sẽ sử dụng phiên bản Spring 4.0.0.RELEASE và tích hợp Jackson JSON với Spring để gửi response JSON trong các lệnh gọi REST. Bài hướng dẫn này được tạo trên IDE Spring STS để dễ dàng tạo cấu trúc dự án Spring MVC cơ bản, sau đó được mở rộng để triển khai kiến trúc RESTful.
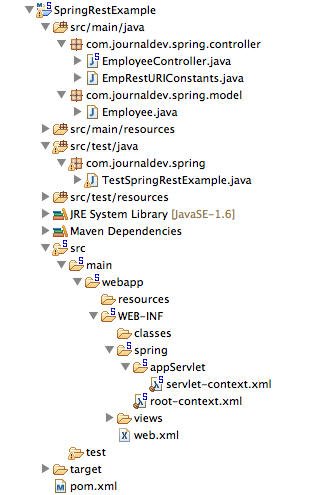
Sau khi tạo một project Spring MVC mới trong STS, project cuối cùng sẽ trông như hình bên dưới. Ta sẽ lần lượt xem xét từng thành phần của nó ở các bước dưới.
Công cụ STS tạo file pom.xml một cách tự động. Tuy nhiên, phiên bản Spring Framework, AspectJ, SLF4J, và Jackson đã được cập nhật lên bản mới nhất tại thời điểm viết bài. Hầu hết các nội dung trong file không có gì đặc biệt, điểm quan trọng cần lưu ý là việc thêm thư viện Jackson JSON vào phần dependency vì chúng ta sẽ dùng chúng để chuyển đổi giữa đối tượng Java và JSON.
File này được tạo tự động và chưa thay đổi gì. Tuy nhiên, nếu bạn muốn thay đổi các file cấu hình context và địa chỉ của chúng, bạn có thể thực hiện trong file web.xml.
File này chứa các tài nguyên dùng chung mà tất cả các web component đều có thể thấy. Chúng ta sẽ tạo một service REST đơn giản, vì vậy chưa thay đổi gì ở đây.
Hầu hết nội dung được tạo tự động và chứa các cấu hình mẫu. Tuy nhiên, cần lưu ý phần để hỗ trợ cấu hình dựa trên annotation và việc thêm MappingJackson2HttpMessageConverter vào messageConverters của RequestMappingHandlerAdapter.
Điều này cho phép Jackson API hoạt động để chuyển đổi giữa JSON và Java Bean. Với cấu hình này, chúng ta sẽ sử dụng JSON trong phần thân request và nhận dữ liệu JSON trong response.
Các lớp model trong Spring REST
Chúng ta hãy viết một lớp POJO đơn giản đóng vai trò là dữ liệu đầu vào và đầu ra cho các method của web service RESTful.
package com.journaldev.spring.model;

import java.io.Serializable;
import java.util.Date;

import com.fasterxml.jackson.databind.annotation.JsonSerialize;
import com.fasterxml.jackson.databind.ser.std.DateSerializer;

public class Employee implements Serializable{

	private static final long serialVersionUID = -7788619177798333712L;

	private int id;
	private String name;
	private Date createdDate;

	public int getId() {
		return id;
	}
	public void setId(int id) {
		this.id = id;
	}
	public String getName() {
		return name;
	}
	public void setName(String name) {
		this.name = name;
	}

	@JsonSerialize(using=DateSerializer.class)
	public Date getCreatedDate() {
		return createdDate;
	}
	public void setCreatedDate(Date createdDate) {
		this.createdDate = createdDate;
	}


}
Điểm quan trọng nhất cần lưu ý là việc sử dụng annotation @JsonSerialize để dùng lớp DateSerializer cho việc chuyển đổi kiểu Date của Java sang định dạng JSON và ngược lại.
Các end point của dịch vụ web RESTful Spring
Chúng ta sẽ có các endpoint của web service REST như sau.
STT
URI
Phương thức HTTP
Chi tiết
1
/rest/emp/dummy
GET
Service kiểm tra “sức khỏe”, chèn dữ liệu mẫu vào kho lưu trữ dữ liệu Employees
2
/rest/emp/{id}
GET
Lấy đối tượng Employee dựa trên id
3
/rest/emps
GET
Lấy danh sách tất cả Employee trong kho dữ liệu
4
/rest/emp/create
POST
Tạo đối tượng Employee và lưu trữ
5
/rest/emp/delete/{id}
PUT
Xóa đối tượng Employee khỏi kho dữ liệu dựa trên id
Chúng ta có một lớp định nghĩa tất cả các URI này dưới dạng hằng số String.
package com.journaldev.spring.controller;

public class EmpRestURIConstants {

	public static final String DUMMY_EMP = "/rest/emp/dummy";
	public static final String GET_EMP = "/rest/emp/{id}";
	public static final String GET_ALL_EMP = "/rest/emps";
	public static final String CREATE_EMP = "/rest/emp/create";
	public static final String DELETE_EMP = "/rest/emp/delete/{id}";
}
Lớp Controller của dịch vụ web RESTful sử dụng Spring
Lớp EmployeeController của chúng ta sẽ cung cấp tất cả các endpoint đã đề cập ở trên. Hãy xem qua code của nó trước, sau đó chúng ta sẽ tìm hiểu kĩ hơn về từng phương thức.
package com.journaldev.spring.controller;

import java.util.ArrayList;
import java.util.Date;
import java.util.HashMap;
import java.util.List;
import java.util.Map;
import java.util.Set;

import org.slf4j.Logger;
import org.slf4j.LoggerFactory;
import org.springframework.stereotype.Controller;
import org.springframework.web.bind.annotation.PathVariable;
import org.springframework.web.bind.annotation.RequestBody;
import org.springframework.web.bind.annotation.RequestMapping;
import org.springframework.web.bind.annotation.RequestMethod;
import org.springframework.web.bind.annotation.ResponseBody;

import com.journaldev.spring.model.Employee;

/**
 * Handles requests for the Employee service.
 */
@Controller
public class EmployeeController {

	private static final Logger logger = LoggerFactory.getLogger(EmployeeController.class);

	//Map to store employees, ideally we should use database
	Map empData = new HashMap();

	@RequestMapping(value = EmpRestURIConstants.DUMMY_EMP, method = RequestMethod.GET)
	public @ResponseBody Employee getDummyEmployee() {
		logger.info("Start getDummyEmployee");
		Employee emp = new Employee();
		emp.setId(9999);
		emp.setName("Dummy");
		emp.setCreatedDate(new Date());
		empData.put(9999, emp);
		return emp;
	}

	@RequestMapping(value = EmpRestURIConstants.GET_EMP, method = RequestMethod.GET)
	public @ResponseBody Employee getEmployee(@PathVariable("id") int empId) {
		logger.info("Start getEmployee. ID="+empId);

		return empData.get(empId);
	}

	@RequestMapping(value = EmpRestURIConstants.GET_ALL_EMP, method = RequestMethod.GET)
	public @ResponseBody List getAllEmployees() {
		logger.info("Start getAllEmployees.");
		List emps = new ArrayList();
		Set empIdKeys = empData.keySet();
		for(Integer i : empIdKeys){
			emps.add(empData.get(i));
		}
		return emps;
	}

	@RequestMapping(value = EmpRestURIConstants.CREATE_EMP, method = RequestMethod.POST)
	public @ResponseBody Employee createEmployee(@RequestBody Employee emp) {
		logger.info("Start createEmployee.");
		emp.setCreatedDate(new Date());
		empData.put(emp.getId(), emp);
		return emp;
	}

	@RequestMapping(value = EmpRestURIConstants.DELETE_EMP, method = RequestMethod.PUT)
	public @ResponseBody Employee deleteEmployee(@PathVariable("id") int empId) {
		logger.info("Start deleteEmployee.");
		Employee emp = empData.get(empId);
		empData.remove(empId);
		return emp;
	}

}
Để đơn giản, ta lưu trữ tất cả dữ liệu employee trong HashMap empData. Annotation @RequestMapping được dùng để map URI của request tới phương thức xử lý (handler method).
Chúng ta cũng có thể chỉ định phương thức HTTP mà client cần sử dụng để gọi phương thức REST. Annotation @ResponseBody được dùng để đưa đối tượng trả về vào phần thân của response. Khi đối tượng response được trả về bởi phương thức xử lý, MappingJackson2HttpMessageConverter sẽ hoạt động để chuyển đổi nó thành response JSON.
Annotation @PathVariable là cách dễ dàng để trích xuất dữ liệu từ URI của REST và map vào tham số của phương thức. Annotation @RequestBody được dùng để map dữ liệu JSON từ request body vào đối tượng Employee, việc này cũng được thực hiện bởi MappingJackson2HttpMessageConverter.
Phần code còn lại khá đơn giản và dễ hiểu. Ứng dụng của chúng ta đã sẵn sàng để kiểm thử và triển khai. Chỉ cần export ra file WAR và sao chép vào thư mục web app của servlet container. Nếu bạn đã cấu hình server trong STS, bạn chỉ cần chạy ứng dụng trên server đó để triển khai.
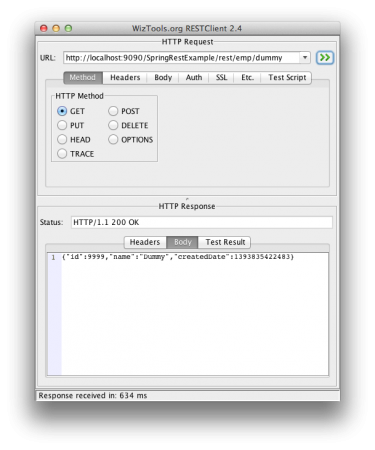
Ở đây ta sử dụng WizTools RestClient để thực hiện các lệnh gọi REST, nhưng bạn cũng có thể dùng extension Postman trên Chrome. Các ảnh chụp màn hình bên dưới minh họa các lệnh gọi khác nhau đến REST API do ứng dụng của chúng ta cung cấp và kết quả trả về.
Kiểm tra Health Check – Lệnh gọi REST lấy Employee mẫu
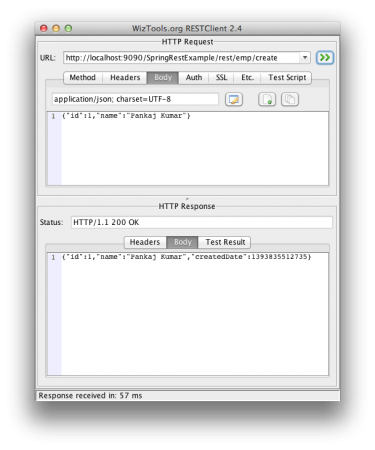
Lệnh gọi REST POST tạo Employee: Đảm bảo Content-Type của request được đặt là “application/json”, nếu không bạn sẽ gặp lỗi HTTP 415.
Lệnh gọi REST lấy Employee
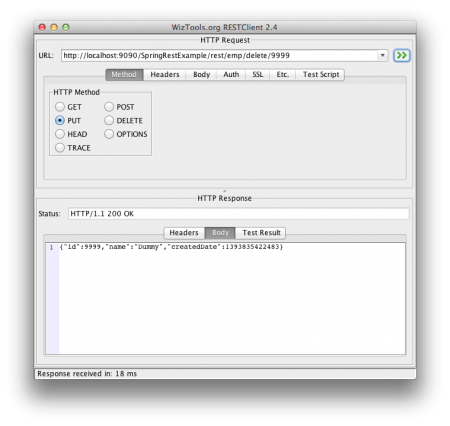
Lệnh gọi REST xóa Employee
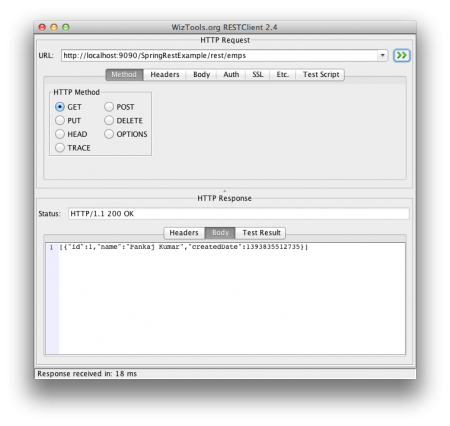
Lệnh gọi REST lấy tất cả Employee
Chương trình Spring Rest Client
Các Rest client rất hữu ích để kiểm thử web service REST. Nhưng trong đa số trường hợp, chúng ta cần gọi các service REST từ chính chương trình của mình.
Chúng ta có thể sử dụng RestTemplate của Spring để dễ dàng gọi các phương thức này. Dưới đây là một chương trình đơn giản gọi các phương thức REST của ứng dụng bằng RestTemplate API.
package com.journaldev.spring;

import java.util.LinkedHashMap;
import java.util.List;

import org.springframework.web.client.RestTemplate;

import com.journaldev.spring.controller.EmpRestURIConstants;
import com.journaldev.spring.model.Employee;

public class TestSpringRestExample {

	public static final String SERVER_URI = "https://localhost:9090/SpringRestExample";

	public static void main(String args[]){

		testGetDummyEmployee();
		System.out.println("*****");
		testCreateEmployee();
		System.out.println("*****");
		testGetEmployee();
		System.out.println("*****");
		testGetAllEmployee();
	}

	private static void testGetAllEmployee() {
		RestTemplate restTemplate = new RestTemplate();
		//we can't get List because JSON convertor doesn't know the type of
		//object in the list and hence convert it to default JSON object type LinkedHashMap
		List emps = restTemplate.getForObject(SERVER_URI+EmpRestURIConstants.GET_ALL_EMP, List.class);
		System.out.println(emps.size());
		for(LinkedHashMap map : emps){
			System.out.println("ID="+map.get("id")+",Name="+map.get("name")+",CreatedDate="+map.get("createdDate"));;
		}
	}

	private static void testCreateEmployee() {
		RestTemplate restTemplate = new RestTemplate();
		Employee emp = new Employee();
		emp.setId(1);emp.setName("Pankaj Kumar");
		Employee response = restTemplate.postForObject(SERVER_URI+EmpRestURIConstants.CREATE_EMP, emp, Employee.class);
		printEmpData(response);
	}

	private static void testGetEmployee() {
		RestTemplate restTemplate = new RestTemplate();
		Employee emp = restTemplate.getForObject(SERVER_URI+"/rest/emp/1", Employee.class);
		printEmpData(emp);
	}

	private static void testGetDummyEmployee() {
		RestTemplate restTemplate = new RestTemplate();
		Employee emp = restTemplate.getForObject(SERVER_URI+EmpRestURIConstants.DUMMY_EMP, Employee.class);
		printEmpData(emp);
	}

	public static void printEmpData(Employee emp){
		System.out.println("ID="+emp.getId()+",Name="+emp.getName()+",CreatedDate="+emp.getCreatedDate());
	}
}
Phần lớn code ở trên đều dễ hiểu. Tuy nhiên, khi gọi phương thức REST để trả về một Collection, chúng ta cần sử dụng LinkedHashMap. Lý do là vì quá trình chuyển đổi JSON sang đối tượng ở trên không biết trước kiểu Employee object cụ thể, nên nó sẽ chuyển đổi thành một Collection chứa các LinkedHashMap.
Chúng ta có thể viết một phương thức để chuyển đổi từ LinkedHashMap sang đối tượng Java Bean mong muốn. Khi chạy chương trình trên, chúng ta sẽ nhận được kết quả sau trong console:
ID=9999,Name=Dummy,CreatedDate=Tue Mar 04 21:02:41 PST 2014
*****
ID=1,Name=Pankaj Kumar,CreatedDate=Tue Mar 04 21:02:41 PST 2014
*****
ID=1,Name=Pankaj Kumar,CreatedDate=Tue Mar 04 21:02:41 PST 2014
*****
2
ID=1,Name=Pankaj Kumar,CreatedDate=1393995761654
ID=9999,Name=Dummy,CreatedDate=1393995761381
Một điểm khác cần lưu ý là các phương thức PUT của RestTemplate thường không có tùy chọn để nhận đối tượng response. Lý do là phương thức PUT được dùng để lưu trữ dữ liệu trên server, và thường chỉ cần trả về mã trạng thái HTTP 200 là đủ.
Tổng kết
Tải project dịch vụ web RESTful với Spring ở trên bằng link này.
Do có nhiều yêu cầu cung cấp ví dụ tương tự hỗ trợ cả XML và JSON, chúng tôi đã mở rộng ứng dụng này từ bài viết Spring REST XML JSON để hỗ trợ cả request và response dạng XML lẫn JSON. Bạn nên đọc qua bài đó để thấy được sự linh hoạt của Spring framework và cách đạt được điều đó dễ như thế nào.
Bạn có thể tải về project hoàn chỉnh từ repo GitHub này.
Về tác giả
Bao TranWeb Developer
I’m passionate about web development and sharing my insights through articles, with over 8 years of experience. I hope these sharings inspire you and help build a strong web development community.
@#@
Tôi đam mê phát triển web và chia sẻ những hiểu biết của mình thông qua các bài viết, với hơn 8 năm kinh nghiệm. Tôi hy vọng những chia sẻ này sẽ truyền cảm hứng cho các bạn và giúp xây dựng một cộng đồng phát triển web mạnh mẽ.
Cập nhật thông tin mới nhấtNhận các thông tin mới nhất về mối đe dọa, báo cáo an ninh mạng từ CyStack về hòm thư điện tử của bạn
Thảo luận (0)
Đăng nhập để thảo luận
Bài viết liên quan
{"success":true,"head":"<title>Tạo dịch vụ web RESTful sử dụng Spring, JSON, Jackson, và chương trình client - CyStack Tutorial</title>\n<meta name=\"description\" content=\"Đọc bài viết này để tìm hiểu cách xây dựng các dịch vụ web RESTful sử dụng Spring một cách đơn giản và kiểm thử chúng với Rest client.\"/>\n<meta name=\"robots\" content=\"index, follow, max-snippet:-1, max-video-preview:-1, max-image-preview:large\"/>\n<link rel=\"canonical\" href=\"https://blog.cystack.org/tutorial/2025/05/27/dich-vu-web-restful-su-dung-spring/\" />\n<meta property=\"og:locale\" content=\"en_US\" />\n<meta property=\"og:type\" content=\"article\" />\n<meta property=\"og:title\" content=\"Tạo dịch vụ web RESTful sử dụng Spring, JSON, Jackson, và chương trình client - CyStack Tutorial\" />\n<meta property=\"og:description\" content=\"Đọc bài viết này để tìm hiểu cách xây dựng các dịch vụ web RESTful sử dụng Spring một cách đơn giản và kiểm thử chúng với Rest client.\" />\n<meta property=\"og:url\" content=\"https://blog.cystack.org/tutorial/2025/05/27/dich-vu-web-restful-su-dung-spring/\" />\n<meta property=\"og:site_name\" content=\"CyStack Tutorial\" />\n<meta property=\"article:tag\" content=\"vi\" />\n<meta property=\"article:section\" content=\"Java\" />\n<meta property=\"og:updated_time\" content=\"2025-06-04T18:09:36+07:00\" />\n<meta property=\"og:image\" content=\"https://s2.cystack.net/tutorial/27142633/dich-vu-web-RESTful-su-dung-Spring-1024x538.png\" />\n<meta property=\"og:image:secure_url\" content=\"https://s2.cystack.net/tutorial/27142633/dich-vu-web-RESTful-su-dung-Spring-1024x538.png\" />\n<meta property=\"og:image:width\" content=\"1024\" />\n<meta property=\"og:image:height\" content=\"538\" />\n<meta property=\"og:image:alt\" content=\"Dịch vụ web RESTful sử dụng Spring\" />\n<meta property=\"og:image:type\" content=\"image/png\" />\n<meta property=\"article:published_time\" content=\"2025-05-27T14:05:09+07:00\" />\n<meta property=\"article:modified_time\" content=\"2025-06-04T18:09:36+07:00\" />\n<meta name=\"twitter:card\" content=\"summary_large_image\" />\n<meta name=\"twitter:title\" content=\"Tạo dịch vụ web RESTful sử dụng Spring, JSON, Jackson, và chương trình client - CyStack Tutorial\" />\n<meta name=\"twitter:description\" content=\"Đọc bài viết này để tìm hiểu cách xây dựng các dịch vụ web RESTful sử dụng Spring một cách đơn giản và kiểm thử chúng với Rest client.\" />\n<meta name=\"twitter:image\" content=\"https://s2.cystack.net/tutorial/27142633/dich-vu-web-RESTful-su-dung-Spring-1024x538.png\" />\n<meta name=\"twitter:label1\" content=\"Written by\" />\n<meta name=\"twitter:data1\" content=\"Bao Tran\" />\n<meta name=\"twitter:label2\" content=\"Time to read\" />\n<meta name=\"twitter:data2\" content=\"17 minutes\" />\n<script type=\"application/ld+json\" class=\"rank-math-schema\">{\"@context\":\"https://schema.org\",\"@graph\":[{\"@type\":[\"Person\",\"Organization\"],\"@id\":\"https://blog.cystack.org/tutorial/#person\",\"name\":\"CyStack Tutorial\"},{\"@type\":\"WebSite\",\"@id\":\"https://blog.cystack.org/tutorial/#website\",\"url\":\"https://blog.cystack.org/tutorial\",\"name\":\"CyStack Tutorial\",\"publisher\":{\"@id\":\"https://blog.cystack.org/tutorial/#person\"},\"inLanguage\":\"en-US\"},{\"@type\":\"ImageObject\",\"@id\":\"https://s2.cystack.net/tutorial/27142633/dich-vu-web-RESTful-su-dung-Spring.png\",\"url\":\"https://s2.cystack.net/tutorial/27142633/dich-vu-web-RESTful-su-dung-Spring.png\",\"width\":\"2400\",\"height\":\"1260\",\"caption\":\"D\\u1ecbch v\\u1ee5 web RESTful s\\u1eed d\\u1ee5ng Spring\",\"inLanguage\":\"en-US\"},{\"@type\":\"BreadcrumbList\",\"@id\":\"https://blog.cystack.org/tutorial/2025/05/27/dich-vu-web-restful-su-dung-spring/#breadcrumb\",\"itemListElement\":[{\"@type\":\"ListItem\",\"position\":\"1\",\"item\":{\"@id\":\"https://blog.cystack.org/tutorial\",\"name\":\"Home\"}},{\"@type\":\"ListItem\",\"position\":\"2\",\"item\":{\"@id\":\"https://blog.cystack.org/tutorial/category/java/\",\"name\":\"Java\"}},{\"@type\":\"ListItem\",\"position\":\"3\",\"item\":{\"@id\":\"https://blog.cystack.org/tutorial/2025/05/27/dich-vu-web-restful-su-dung-spring/\",\"name\":\"T\\u1ea1o d\\u1ecbch v\\u1ee5 web RESTful s\\u1eed d\\u1ee5ng Spring, JSON, Jackson, v\\u00e0 ch\\u01b0\\u01a1ng tr\\u00ecnh client\"}}]},{\"@type\":\"WebPage\",\"@id\":\"https://blog.cystack.org/tutorial/2025/05/27/dich-vu-web-restful-su-dung-spring/#webpage\",\"url\":\"https://blog.cystack.org/tutorial/2025/05/27/dich-vu-web-restful-su-dung-spring/\",\"name\":\"T\\u1ea1o d\\u1ecbch v\\u1ee5 web RESTful s\\u1eed d\\u1ee5ng Spring, JSON, Jackson, v\\u00e0 ch\\u01b0\\u01a1ng tr\\u00ecnh client - CyStack Tutorial\",\"datePublished\":\"2025-05-27T14:05:09+07:00\",\"dateModified\":\"2025-06-04T18:09:36+07:00\",\"isPartOf\":{\"@id\":\"https://blog.cystack.org/tutorial/#website\"},\"primaryImageOfPage\":{\"@id\":\"https://s2.cystack.net/tutorial/27142633/dich-vu-web-RESTful-su-dung-Spring.png\"},\"inLanguage\":\"en-US\",\"breadcrumb\":{\"@id\":\"https://blog.cystack.org/tutorial/2025/05/27/dich-vu-web-restful-su-dung-spring/#breadcrumb\"}},{\"@type\":\"Person\",\"@id\":\"https://blog.cystack.org/tutorial/author/baotran/\",\"name\":\"Bao Tran\",\"url\":\"https://blog.cystack.org/tutorial/author/baotran/\",\"image\":{\"@type\":\"ImageObject\",\"@id\":\"https://secure.gravatar.com/avatar/0cdd33c02ec4a531fcf557b9c1ccc276df0c69031b2382c959bcf335248e840c?s=96&d=mm&r=g\",\"url\":\"https://secure.gravatar.com/avatar/0cdd33c02ec4a531fcf557b9c1ccc276df0c69031b2382c959bcf335248e840c?s=96&d=mm&r=g\",\"caption\":\"Bao Tran\",\"inLanguage\":\"en-US\"}},{\"@type\":\"BlogPosting\",\"headline\":\"T\\u1ea1o d\\u1ecbch v\\u1ee5 web RESTful s\\u1eed d\\u1ee5ng Spring, JSON, Jackson, v\\u00e0 ch\\u01b0\\u01a1ng tr\\u00ecnh client - CyStack Tutorial\",\"keywords\":\"d\\u1ecbch v\\u1ee5 web RESTful s\\u1eed d\\u1ee5ng Spring\",\"datePublished\":\"2025-05-27T14:05:09+07:00\",\"dateModified\":\"2025-06-04T18:09:36+07:00\",\"articleSection\":\"Java\",\"author\":{\"@id\":\"https://blog.cystack.org/tutorial/author/baotran/\",\"name\":\"Bao Tran\"},\"publisher\":{\"@id\":\"https://blog.cystack.org/tutorial/#person\"},\"description\":\"\\u0110\\u1ecdc b\\u00e0i vi\\u1ebft n\\u00e0y \\u0111\\u1ec3 t\\u00ecm hi\\u1ec3u c\\u00e1ch x\\u00e2y d\\u1ef1ng c\\u00e1c d\\u1ecbch v\\u1ee5 web RESTful s\\u1eed d\\u1ee5ng Spring m\\u1ed9t c\\u00e1ch \\u0111\\u01a1n gi\\u1ea3n v\\u00e0 ki\\u1ec3m th\\u1eed ch\\u00fang v\\u1edbi Rest client.\",\"name\":\"T\\u1ea1o d\\u1ecbch v\\u1ee5 web RESTful s\\u1eed d\\u1ee5ng Spring, JSON, Jackson, v\\u00e0 ch\\u01b0\\u01a1ng tr\\u00ecnh client - CyStack Tutorial\",\"@id\":\"https://blog.cystack.org/tutorial/2025/05/27/dich-vu-web-restful-su-dung-spring/#richSnippet\",\"isPartOf\":{\"@id\":\"https://blog.cystack.org/tutorial/2025/05/27/dich-vu-web-restful-su-dung-spring/#webpage\"},\"image\":{\"@id\":\"https://s2.cystack.net/tutorial/27142633/dich-vu-web-RESTful-su-dung-Spring.png\"},\"inLanguage\":\"en-US\",\"mainEntityOfPage\":{\"@id\":\"https://blog.cystack.org/tutorial/2025/05/27/dich-vu-web-restful-su-dung-spring/#webpage\"}}]}</script>\n"}