
Trong hướng dẫn này, chúng ta sẽ thảo luận về Calendar Widget bằng cách sử dụng lớp CalendarView trong Android.
Android Calendar View
Như tên gọi, Calendar View được dùng để hiển thị và chọn các ngày trong Lịch. Để thêm một CalendarView vào XML Layout, hãy làm như sau:
Trình chỉnh sửa Layout Design trông sẽ như thế này:
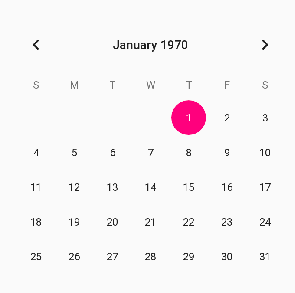
Khi chạy ứng dụng trên thiết bị, nó sẽ hiển thị ngày hiện tại. Mặc định, Calendar hiển thị ngày 1 tháng 1 năm 1970. android:maxDate và android:minDate được dùng để đặt khoảng thời gian tùy chỉnh cho lịch. Ngày được chỉ định theo định dạng MM/dd/yyyy. Để thực hiện điều này trong Java, ta dùng các phương thức setMaxDate() và setMinDate() với tham số truyền vào là một giá trị long. Các phương thức getter tương ứng cũng có sẵn. Để đặt ngày hiện tại, ta gọi setDate(long date) trên đối tượng CalendarView. Phương thức setDate còn có một dạng khác: setDate(long date, boolean animate, boolean center). Tham số thứ hai và thứ ba mặc định có giá trị true. Khi chọn một ngày mới, lịch sẽ tự động cuộn đến ngày đó với hiệu ứng. Để thay đổi kiểu văn bản của ngày và tuần, ta dùng các thuộc tính android:dateTextAppearance và android:weekTextAppearancehoặc các setter tương ứng trong Java.

CalendarView bao gồm listener sau:
calendarView.setOnDateChangeListener(new CalendarView.OnDateChangeListener() {
            @Override
            public void onSelectedDayChange(@NonNull CalendarView calendarView, int i, int i1, int i2) {
            }
        });
Điều này sẽ được kích hoạt bất cứ khi nào người dùng thay đổi ngày.
i = năm
i1 = tháng
i2 = ngày
Trong phần tiếp theo, chúng ta sẽ tạo một ứng dụng Android với giao diện tùy chỉnh (custom theme) và thêm một khoảng ngày tùy chỉnh (custom range) cho CalendarView, đồng thời hiển thị sự khác biệt giữa thay đổi ngày có hiệu ứng animation và không có animation.
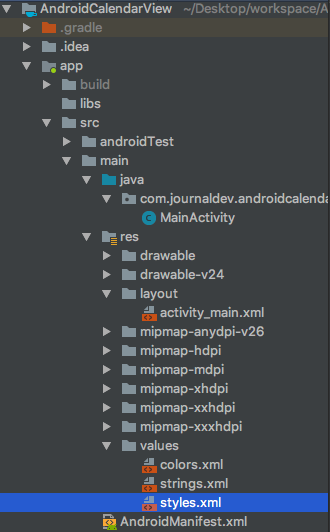
Cấu trúc dự án
Thêm ba style sau trong file styles.xml:
android:textColorPrimary mặc định là màu trắng. Màu này được áp dụng cho ngày của tháng và các biểu tượng điều hướng trái, phải. Mã nguồn cho file activity_main.xml được trình bày dưới đây:
Chúng ta đã thêm tất cả các style tùy chỉnh vào layout ở trên. Ba button được liên kết theo chuỗi trong ConstraintLayout. Mã nguồn cho MainActivity.java được trình bày dưới đây:
package com.journaldev.androidcalendarview;

import android.support.annotation.NonNull;
import android.support.v7.app.AppCompatActivity;
import android.os.Bundle;
import android.view.View;
import android.widget.Button;
import android.widget.CalendarView;
import android.widget.Toast;

import java.text.SimpleDateFormat;
import java.util.Calendar;
import java.util.Date;

public class MainActivity extends AppCompatActivity implements View.OnClickListener {
    Calendar calendar;
    CalendarView calendarView;

    @Override
    protected void onCreate(Bundle savedInstanceState) {
        super.onCreate(savedInstanceState);
        setContentView(R.layout.activity_main);

        calendar = Calendar.getInstance();

        calendar.set(Calendar.MONTH, Calendar.NOVEMBER);
        calendar.set(Calendar.DAY_OF_MONTH, 9);
        calendar.set(Calendar.YEAR, 2012);

        calendar.add(Calendar.DAY_OF_MONTH, 1);
        calendar.add(Calendar.YEAR, 1);

        calendarView = findViewById(R.id.calendarView);

        Button btnRange = findViewById(R.id.btnRange);
        btnRange.setOnClickListener(this);

        Button btnWithoutAnim = findViewById(R.id.btnWithoutAnim);
        btnWithoutAnim.setOnClickListener(this);

        Button btnWithAnim = findViewById(R.id.btnWithAnim);
        btnWithAnim.setOnClickListener(this);

        calendarView.setOnDateChangeListener(new CalendarView.OnDateChangeListener() {
            @Override
            public void onSelectedDayChange(@NonNull CalendarView calendarView, int i, int i1, int i2) {

                String msg = "Selected date Day: " + i2 + " Month : " + (i1 + 1) + " Year " + i;
                Toast.makeText(getApplicationContext(), msg, Toast.LENGTH_SHORT).show();

            }
        });

    }

    @Override
    public void onClick(View view) {

        switch (view.getId()) {
            case R.id.btnWithAnim:
                calendarView.setDate(calendar.getTimeInMillis(), true, true);
                break;

            case R.id.btnWithoutAnim:
                calendar.set(Calendar.DAY_OF_MONTH, 12);
                calendar.set(Calendar.YEAR, 2016);
                calendar.add(Calendar.MONTH, Calendar.MARCH);
                calendarView.setDate(calendar.getTimeInMillis(), false, false);
                break;

            case R.id.btnRange:

                Calendar calendar = Calendar.getInstance();
                calendar.set(Calendar.DATE, calendar.getActualMaximum(Calendar.DATE));
                long endOfMonth = calendar.getTimeInMillis();
                calendar = Calendar.getInstance();
                calendar.set(Calendar.DATE, 1);
                calendar.set(Calendar.HOUR_OF_DAY, 0);
                long startOfMonth = calendar.getTimeInMillis();
                calendarView.setMaxDate(endOfMonth);
                calendarView.setMinDate(startOfMonth);

                String minDateString = new SimpleDateFormat("MM/dd/yyyy").format(new Date(calendarView.getMinDate()));
                String maxDateString = new SimpleDateFormat("MM/dd/yyyy").format(new Date(calendarView.getMaxDate()));

                Toast.makeText(getApplicationContext(), "MMDDYYYY Min date - " + minDateString + " Max Date is " + maxDateString, Toast.LENGTH_LONG).show();

                break;

        }
    }
}
calendar.getActualMaximum(Calendar.DATE) lấy ngày cuối cùng của tháng hiện tại. Chúng ta đã sử dụng SimpleDateFormat để chuyển đổi ngày sang định dạng tùy chỉnh. Kết quả khi chạy ứng dụng được hiển thị như sau:
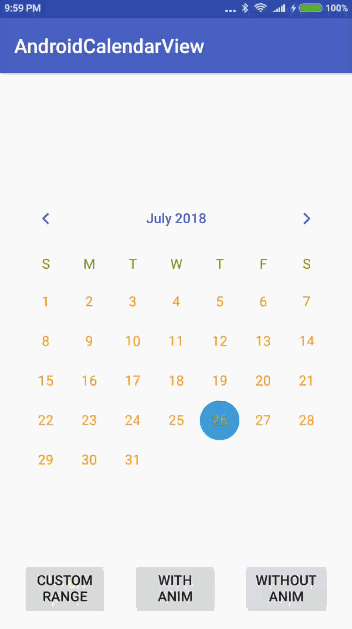
Trong trường hợp đầu tiên, chúng ta chuyển sang ngày khác có hiệu ứng animation. Ở trường hợp cuối cùng, khoảng ngày tùy chỉnh chỉ hiển thị tháng Bảy, các biểu tượng điều hướng bị vô hiệu hóa.