 8 phút để đọc

Spring là một trong những framework Java EE được sử dụng rộng rãi nhất, và Hibernate là framework ORM phổ biến nhất. Đó là lý do tại sao sự kết hợp giữa Spring và Hibernate được ứng dụng rất nhiều trong các doanh nghiệp. Với nhiều bài hướng dẫn về Spring và Hibernate mà tôi đã viết gần đây, tôi nhận thấy rằng nhiều bạn đang mong đợi một bài viết chuyên sâu hơn về cách tích hợp hai framework này.

Hướng dẫn Spring Hibernate
Trong hướng dẫn này, chúng ta sẽ sử dụng Spring 4 và tích hợp nó với Hibernate 3, sau đó nâng cấp dự án để sử dụng Hibernate 4. Vì có rất nhiều phiên bản cho cả Spring và Hibernate, và artifact Spring ORM hỗ trợ cả Hibernate 3 và Hibernate 4, nên tôi nghĩ sẽ hữu ích khi liệt kê tất cả các dependency mà tôi đã sử dụng trong dự án của mình.
Lưu ý rằng không phải tất cả các phiên bản Spring và Hibernate đều tương thích với nhau. Các phiên bản dưới đây hoạt động tốt theo kinh nghiệm riêng của tôi, vì vậy tôi nghĩ chúng tương thích. Nếu bạn đang sử dụng các phiên bản khác và nhận được java.lang.NoClassDefFoundError, điều đó có nghĩa là chúng không tương thích. Nguyên nhân chủ yếu là do các lớp Hibernate đã được di chuyển từ packagenày sang package khác, gây ra lỗi này. Ví dụ, lớp org.hibernate.engine.FilterDefinition đã được chuyển sang org.hibernate.engine.spi.FilterDefinition trong các phiên bản Hibernate mới nhất.
- Phiên bản Spring Framework:
4.0.3.RELEASE - Phiên bản Hibernate Core và Hibernate EntityManager:
3.6.9.Finalvà4.3.5.Final - Phiên bản Spring ORM:
4.0.3.RELEASE
Thiết lập cơ sở dữ liệu
Tôi đang sử dụng cơ sở dữ liệu MySQL cho dự án của mình, vì vậy tập lệnh setup.sql dưới đây sẽ tạo bảng cần thiết cho ví dụ này.
CREATE TABLE Person ( idint(11) unsigned NOT NULL AUTO_INCREMENT, namevarchar(20) NOT NULL DEFAULT '', country varchar(20) DEFAULT NULL, PRIMARY KEY (id) ) ENGINE=InnoDB AUTO_INCREMENT=5 DEFAULT CHARSET=utf8; [cite: 142] commit; [cite: 142]
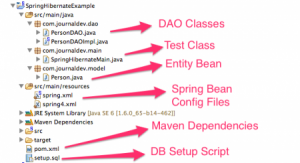
Cấu trúc dự án ví dụ tích hợp Spring Hibernate
Hình ảnh dưới đây minh họa cấu trúc dự án hoàn chỉnh. Chúng ta sẽ xem xét từng thành phần một.
Maven dependencies
Đầu tiên, chúng ta sẽ xem xét tệp pom.xml để biết tất cả các dependency và phiên bản cần thiết của chúng.
<project xmlns="<https://maven.apache.org/POM/4.0.0>" xmlns:xsi="<https://www.w3.org/2001/XMLSchema-instance>"
	xsi:schemaLocation="<https://maven.apache.org/POM/4.0.0> <https://maven.apache.org/xsd/maven-4.0.0.xsd>">
	<modelVersion>4.0.0</modelVersion>
	<groupId>org.springframework.samples</groupId>
	<artifactId>SpringHibernateExample</artifactId>
	<version>0.0.1-SNAPSHOT</version>

	<properties>

		<!-- Generic properties -->
		<java.version>1.6</java.version>
		<project.build.sourceEncoding>UTF-8</project.build.sourceEncoding>
		<project.reporting.outputEncoding>UTF-8</project.reporting.outputEncoding>

		<!-- Spring -->
		<spring-framework.version>4.0.3.RELEASE</spring-framework.version>

		<!-- Hibernate / JPA -->
		<!-- <hibernate.version>4.3.5.Final</hibernate.version> -->
		<hibernate.version>3.6.9.Final</hibernate.version>

		<!-- Logging -->
		<logback.version>1.0.13</logback.version>
		<slf4j.version>1.7.5</slf4j.version>

	</properties>

	<dependencies>
		<!-- Spring and Transactions -->
		<dependency>
			<groupId>org.springframework</groupId>
			<artifactId>spring-context</artifactId>
			<version>${spring-framework.version}</version>
		</dependency>
		<dependency>
			<groupId>org.springframework</groupId>
			<artifactId>spring-tx</artifactId>
			<version>${spring-framework.version}</version>
		</dependency>

		<!-- Spring ORM support -->
		<dependency>
			<groupId>org.springframework</groupId>
			<artifactId>spring-orm</artifactId>
			<version>${spring-framework.version}</version>
		</dependency>

		<!-- Logging with SLF4J & LogBack -->
		<dependency>
			<groupId>org.slf4j</groupId>
			<artifactId>slf4j-api</artifactId>
			<version>${slf4j.version}</version>
			<scope>compile</scope>
		</dependency>
		<dependency>
			<groupId>ch.qos.logback</groupId>
			<artifactId>logback-classic</artifactId>
			<version>${logback.version}</version>
			<scope>runtime</scope>
		</dependency>

		<!-- Hibernate -->
		<dependency>
			<groupId>org.hibernate</groupId>
			<artifactId>hibernate-entitymanager</artifactId>
			<version>${hibernate.version}</version>
		</dependency>
		<dependency>
			<groupId>org.hibernate</groupId>
			<artifactId>hibernate-core</artifactId>
			<version>${hibernate.version}</version>
		</dependency>

		<dependency>
			<groupId>mysql</groupId>
			<artifactId>mysql-connector-java</artifactId>
			<version>5.1.9</version>
		</dependency>
		<dependency>
			<groupId>commons-dbcp</groupId>
			<artifactId>commons-dbcp</artifactId>
			<version>1.4</version>
		</dependency>
	</dependencies>
</project>
Các dependency quan trọng cho dự án tích hợp Spring và Hibernate là:
spring-contextvàspring-txcho các chức năng cốt lõi của Spring. Lưu ý rằng tôi đang sử dụng phiên bản4.0.3.RELEASE.spring-ormđể hỗ trợ Spring ORM, cần thiết cho việc tích hợp hibernate trong dự án spring.hibernate-entitymanagervàhibernate-corecho framework Hibernate. Lưu ý rằng phiên bản là3.6.9.Final; để sử dụng Hibernate 4, tất cả những gì chúng ta cần là thay đổi nó thành4.3.5.Finalnhư đã được chú thích trong tệppom.xmlở trên.mysql-connector-javacho trình điều khiển MySQL để kết nối cơ sở dữ liệu.
Lớp Model hoặc Entity Bean
Chúng ta có thể sử dụng ánh xạ (mapping) dựa trên XML của Hibernate cũng như ánh xạ dựa trên annotation JPA. Ở đây, tôi đang sử dụng các annotation JPA để ánh xạ vì hibernate cung cấp triển khai JPA.
package com.journaldev.model;

import javax.persistence.Column;
import javax.persistence.Entity;
import javax.persistence.GeneratedValue;
import javax.persistence.GenerationType;
import javax.persistence.Id;
import javax.persistence.Table;

/**
 * Entity bean with JPA annotations
 * Hibernate provides JPA implementation
 * @author pankaj
 *
 */
@Entity
@Table(name="Person")
public class Person {

	@Id
	@Column(name="id")
	@GeneratedValue(strategy=GenerationType.IDENTITY)
	private int id;

	private String name;

	private String country;

	public int getId() {
		return id;
	}

	public void setId(int id) {
		this.id = id;
	}

	public String getName() {
		return name;
	}

	public void setName(String name) {
		this.name = name;
	}

	public String getCountry() {
		return country;
	}

	public void setCountry(String country) {
		this.country = country;
	}

	@Override
	public String toString(){
		return "id="+id+", name="+name+", country="+country;
	}
}
Lớp DAO
Chúng ta sẽ triển khai hai phương thức trong các lớp DAO của mình: thứ nhất để lưu đối tượng Person vào bảng, thứ hai để lấy tất cả các bản ghi từ bảng và trả về danh sách các đối tượng Person.
`package com.journaldev.dao;
import java.util.List; [cite: 163] import com.journaldev.model.Person; [cite: 163]
public interface PersonDAO { [cite: 163]
public void save(Person p); [cite: 164]
public List<Person> list(); [cite: 164]
}`
Việc triển khai lớp DAO trên sẽ như dưới đây.
`package com.journaldev.dao;
import java.util.List; import org.hibernate.Session; import org.hibernate.SessionFactory; import org.hibernate.Transaction; [cite: 165] import com.journaldev.model.Person; [cite: 165]
public class PersonDAOImpl implements PersonDAO { [cite: 165]
private SessionFactory sessionFactory; [cite: 165]

public void setSessionFactory(SessionFactory sessionFactory) { [cite: 166]
    this.sessionFactory = sessionFactory; [cite: 166]
}

@Override [cite: 166]
public void save(Person p) { [cite: 166]
    Session session = this.sessionFactory.openSession(); [cite: 166]
    Transaction tx = session.beginTransaction(); [cite: 166]
    session.persist(p); [cite: 166]
    tx.commit(); [cite: 166]
    session.close(); [cite: 166]
}

@SuppressWarnings("unchecked") [cite: 167]
@Override [cite: 167]
public List<Person> list() { [cite: 167]`
    `Session session = this.sessionFactory.openSession(); [cite: 169]
    List<Person> personList = session.createQuery("from Person").list(); [cite: 169]
    session.close(); [cite: 169]
    return personList; [cite: 169]
}
}`
Lưu ý rằng đây là nơi duy nhất chúng ta sử dụng các lớp liên quan đến Hibernate. Mẫu thiết kế này làm cho việc triển khai của chúng ta linh hoạt và dễ dàng di chuyển từ công nghệ này sang công nghệ khác. Ví dụ, nếu chúng ta muốn sử dụng framework ORM iBatis, tất cả những gì chúng ta cần làm là cung cấp một triển khai DAO cho iBatis và sau đó thay đổi tệp cấu hình Spring bean. Trong ví dụ trên, tôi đang sử dụng quản lý giao dịch phiên Hibernate. Tuy nhiên, chúng ta cũng có thể sử dụng quản lý giao dịch khai báo của Spring bằng annotation @Transactional.
Tệp cấu hình Spring Bean cho tích hợp Hibernate 3
Hãy cùng xem các cấu hình Spring bean mà chúng ta cần cho tích hợp Hibernate 3 trước, chúng ta sẽ xem xét chi tiết sau.
<?xml version="1.0" encoding="UTF-8"?> [cite: 175] <beans xmlns="http://www.springframework.org/schema/beans" [cite: 175] xmlns:xsi="http://www.w3.org/2001/XMLSchema-instance" [cite: 175] xmlns:aop="http://www.springframework.org/schema/aop" [cite: 175] xmlns:tx="http://www.springframework.org/schema/tx" [cite: 175] xsi:schemaLocation="http://www.springframework.org/schema/beans [cite: 175] http://www.springframework.org/schema/beans/spring-beans-4.0.xsd [cite: 175] http://www.springframework.org/schema/aop [cite: 175] http://www.springframework.org/schema/aop/spring-aop-4.0.xsd [cite: 175] http://www.springframework.org/schema/tx [cite: 175] http://www.springframework.org/schema/tx/spring-tx-4.0.xsd"> [cite: 175]
<bean id="dataSource" class="org.apache.commons.dbcp.BasicDataSource" [cite: 175]
    destroy-method="close"> [cite: 175]
    <property name="driverClassName" value="com.mysql.jdbc.Driver" /> [cite: 175]
    <property name="url" value="jdbc:mysql://localhost:3306/TestDB" /> [cite: 175]
    <property name="username" value="pankaj" /> [cite: 175]
    <property name="password" value="pankaj123" /> [cite: 175]
</bean> [cite: 175]

[cite: 175]
[cite: 177]

[cite: 177]
<bean id="hibernate3AnnotatedSessionFactory" [cite: 177]
    class="org.springframework.orm.hibernate3.annotation.AnnotationSessionFactoryBean"> [cite: 177]
    <property name="dataSource" ref="dataSource" /> [cite: 177]
    <property name="annotatedClasses"> [cite: 177]
        <list> [cite: 177]
            <value>com.journaldev.model.Person</value> [cite: 177]
        </list> [cite: 177]
    </property> [cite: 177]
    <property name="hibernateProperties"> [cite: 177]
        <props> [cite: 177]
            <prop key="hibernate.dialect">org.hibernate.dialect.MySQLDialect</prop> [cite: 177]
            <prop key="hibernate.current_session_context_class">thread</prop> [cite: 177]
            <prop key="hibernate.show_sql">false</prop> [cite: 177]
        </props> [cite: 177]
    </property> [cite: 177]
</bean> [cite: 177]

<bean id="personDAO" class="com.journaldev.dao.PersonDAOImpl"> [cite: 177]
    <property name="sessionFactory" ref="hibernate3AnnotatedSessionFactory" /> [cite: 177]
</bean> [cite: 177]
</beans> [cite: 177]`
Có hai cách chúng ta có thể cung cấp chi tiết kết nối cơ sở dữ liệu cho Hibernate: thứ nhất là truyền mọi thứ trong hibernateProperties, và thứ hai là tạo một DataSource và sau đó truyền nó cho hibernate. Tôi ưa chuộng cách tiếp cận thứ hai, đó là lý do tại sao chúng ta có dependency Apache Commons DBCP để tạo một BasicDataSource bằng cách thiết lập các thuộc tính kết nối cơ sở dữ liệu. Đối với tích hợp Spring và Hibernate 3, Spring ORM cung cấp hai lớp: org.springframework.orm.hibernate3.LocalSessionFactoryBean khi ánh xạ hibernate dựa trên XML, và org.springframework.orm.hibernate3.annotation.AnnotationSessionFactoryBean cho ánh xạ dựa trên annotation. Tôi đã cung cấp cấu hình bean đơn giản của LocalSessionFactoryBean trong phần diễn giải, nếu bạn đang sử dụng ánh xạ dựa trên XML. AnnotationSessionFactoryBean mở rộng lớp LocalSessionFactoryBean. Vì vậy, nó đã có sẵn các thuộc tính cơ bản để tích hợp Hibernate. Các thuộc tính này khá dễ hiểu và chủ yếu liên quan đến Hibernate, nên tôi sẽ không đi sâu vào chi tiết. Tuy nhiên, nếu bạn tò mò về hibernateProperties hay annotatedClasses, hãy xem thêm code của lớp bean. Điểm đáng lưu ý ở đây là định nghĩa bean của personDAO. Đúng như tôi đã đề cập, việc chuyển đổi sang một framework ORM khác sẽ đơn giản hơn rất nhiều: chỉ cần thay đổi lớp triển khai và cấu hình thêm các thuộc tính cần thiết là xong.
Chương trình kiểm thử Spring 4 Hibernate 3
Thiết lập của chúng ta đã sẵn sàng, hãy viết một chương trình đơn giản để kiểm tra ứng dụng.
`package com.journaldev.main;
import java.util.List; [cite: 189] import org.springframework.context.support.ClassPathXmlApplicationContext; [cite: 189] import com.journaldev.dao.PersonDAO; [cite: 189] import com.journaldev.model.Person; [cite: 189]
public class SpringHibernateMain { [cite: 189]
public static void main(String[] args) { [cite: 189]

    ClassPathXmlApplicationContext context = new ClassPathXmlApplicationContext("spring.xml"); [cite: 190]

    PersonDAO personDAO = context.getBean(PersonDAO.class); [cite: 190]

    Person person = new Person(); [cite: 190]
    person.setName("Pankaj"); [cite: 190]
    person.setCountry("India"); [cite: 190]

    personDAO.save(person); [cite: 190]
    System.out.println("Person:: "+person); [cite: 190]

    List<Person> list = personDAO.list(); [cite: 190]

    for(Person p : list){ [cite: 190]
        System.out.println("Person List:: "+p); [cite: 191]
    }
    //close resources
    context.close(); [cite: 191]
}
}`
Khi chạy chương trình trên, chúng ta nhận được rất nhiều output liên quan đến Hibernate vì tôi chưa thiết lập logging đúng cách, nhưng điều đó nằm ngoài phạm vi của hướng dẫn này. Tuy nhiên, chúng ta nhận được output sau từ chương trình:
Person::id=3, name=Pankaj, country=India [cite: 193] Person List::id=1, name=Pankaj, country=India [cite: 193] Person List::id=2, name=Pankaj, country=India [cite: 193] Person List::id=3, name=Pankaj, country=India [cite: 193]
Thay đổi tích hợp Spring 4 Hibernate 4
Bây giờ, hãy thay đổi ứng dụng của chúng ta để sử dụng Hibernate 4 thay vì Hibernate 3. Để thực hiện thay đổi này, chúng ta chỉ cần thực hiện các điều chỉnh về cấu hình như sau:
- Thay đổi phiên bản hibernate thành
4.3.5.Finaltrong tệppom.xml, như đã hiển thị trong các chú thích ở trên. - Thay đổi tệp cấu hình Spring bean; cho đến bây giờ, bạn chắc hẳn đã nhận ra rằng tệp cấu hình Spring bean là chìa khóa để tích hợp Spring và framework Hibernate. Tệp cấu hình Spring bean dưới đây sẽ hoạt động cho các phiên bản Spring 4 và Hibernate 4.
<?xml version="1.0" encoding="UTF-8"?> [cite: 197] <beans xmlns="http://www.springframework.org/schema/beans" [cite: 197] xmlns:xsi="http://www.w3.org/2001/XMLSchema-instance" [cite: 197] xmlns:aop="http://www.springframework.org/schema/aop" [cite: 197] xmlns:tx="http://www.springframework.org/schema/tx" [cite: 197] xsi:schemaLocation="http://www.springframework.org/schema/beans [cite: 197] http://www.springframework.org/schema/beans/spring-beans-4.0.xsd [cite: 197] http://www.springframework.org/schema/aop [cite: 197] http://www.springframework.org/schema/aop/spring-aop-4.0.xsd [cite: 197] http://www.springframework.org/schema/tx [cite: 197] http://www.springframework.org/schema/tx/spring-tx-4.0.xsd"> [cite: 197]
<bean id="dataSource" class="org.apache.commons.dbcp.BasicDataSource" [cite: 197]
    destroy-method="close"> [cite: 197]
    <property name="driverClassName" value="com.mysql.jdbc.Driver" /> [cite: 197]
    <property name="url" value="jdbc:mysql://localhost:3306/TestDB" /> [cite: 197]
    <property name="username" value="pankaj" /> [cite: 197]
    <property name="password" value="pankaj123" /> [cite: 197]
</bean> [cite: 197]

[cite: 197]
<bean id="hibernate4AnnotatedSessionFactory" [cite: 197]
    class="org.springframework.orm.hibernate4.LocalSessionFactoryBean"> [cite: 197]
    <property name="dataSource" ref="dataSource" /> [cite: 197]
    <property name="annotatedClasses"> [cite: 197]
        <list> [cite: 197]
            <value>com.journaldev.model.Person</value> [cite: 197]
        </list> [cite: 197]
    </property> [cite: 197]
    <property name="hibernateProperties"> [cite: 197]
        <props> [cite: 199]
            <prop key="hibernate.dialect">org.hibernate.dialect.MySQLDialect</prop> [cite: 199]
            <prop key="hibernate.current_session_context_class">thread</prop> [cite: 199]
            <prop key="hibernate.show_sql">false</prop> [cite: 199]
        </props> [cite: 199]
    </property> [cite: 199]
</bean> [cite: 199]

<bean id="personDAO" class="com.journaldev.dao.PersonDAOImpl"> [cite: 199]
    <property name="sessionFactory" ref="hibernate4AnnotatedSessionFactory" /> [cite: 199]
</bean> [cite: 199]
</beans> [cite: 199]`
Đối với hibernate 4, chúng ta cần sử dụng org.springframework.orm.hibernate4.LocalSessionFactoryBean cho bean SessionFactory. Spring ORM đã hợp nhất cả hai lớp cho Hibernate 3 và hiện chỉ có một lớp duy nhất. Đây là một điều tốt để tránh nhầm lẫn. Tất cả các cấu hình khác đều giống như trước.
Vậy là xong, dự án của chúng ta đã được di chuyển thành công sang Hibernate 4. Thật gọn gàng phải không? Chỉ cần thay đổi lớp SpringHibernateMain để sử dụng spring4.xml cho cấu hình beans. Cách này hoạt động tốt và bạn sẽ nhận được cùng một output như trước.
Hãy thử nghiệm và khám phá thêm các tính năng tuyệt vời mà Spring và Hibernate mang lại. Chúc bạn thành công!
