 8 phút để đọc

Tính năng quét mã QR trên Android được tích hợp trong nhiều ứng dụng nhằm đọc và xử lý các dữ liệu hữu ích. Trong hướng dẫn này, chúng ta sẽ tìm hiểu và triển khai API Barcode thuộc Google Mobile Vision API.
Quét mã QR trên Android
Với sự ra đời của Google Vision API, việc tích hợp mã vạch vào ứng dụng đã trở nên dễ dàng hơn nhiều đối với lập trình viên. Dưới đây là các định dạng chính mà Vision API hỗ trợ.
- Mã vạch 1D: EAN-13, EAN-8, UPC-A, UPC-E, Code-39, Code-93, Code-128, ITF, Codabar
- Mã vạch 2D: QR Code, Data Matrix, PDF-417, AZTEC
Mã vạch có thể chứa nhiều loại dữ liệu khác nhau như URL, thông tin liên hệ, vị trí địa lý, WIFI, giấy phép lái xe… QR Code là định dạng phổ biến hơn và thường thấy trong nhiều ứng dụng. Dưới đây, chúng ta sẽ phát triển một ứng dụng có khả năng quét mã QR từ ảnh bitmap cũng như nhận diện mã QR qua camera và thực hiện các thao tác tương ứng.
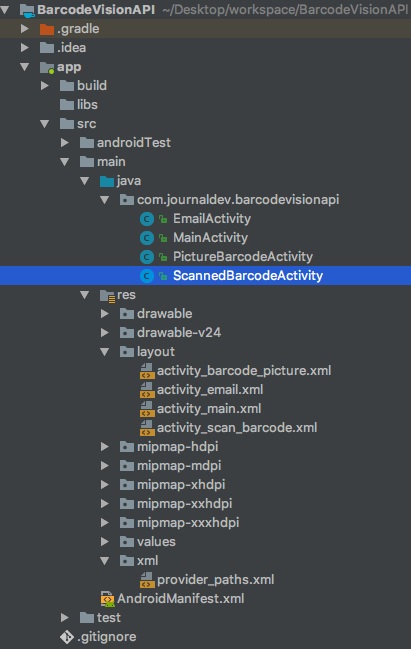
Cấu trúc dự án quét mã QR trên Android
Cấu hình Android Studio cho thư viện Barcode
Thêm dòng sau vào tệp build.gradle.
implementation 'com.google.android.gms:play-services-vision:11.8.0'
Thêm phần sau vào thẻ <application> trong tệp AndroidManifest.xml để kích hoạt tính năng quét mã vạch trong ứng dụng:
<meta-data
    android:name="com.google.android.gms.vision.DEPENDENCIES"
    android:value="barcode" />
Quét mã QR từ ảnh
Dưới đây là mã cho tệp giao diện activity_main.xml.
<RelativeLayout xmlns:android="<https://schemas.android.com/apk/res/android>"
    android:layout_width="match_parent"
    android:layout_height="match_parent"
    android:paddingBottom="@dimen/activity_vertical_margin"
    android:paddingLeft="@dimen/activity_horizontal_margin"
    android:paddingRight="@dimen/activity_horizontal_margin"
    android:paddingTop="@dimen/activity_vertical_margin">

    <Button
        android:id="@+id/btnTakePicture"
        android:layout_width="wrap_content"
        android:layout_height="wrap_content"
        android:layout_centerHorizontal="true"
        android:layout_centerVertical="true"
        android:text="@string/take_barcode_picture" />

    <Button
        android:id="@+id/btnScanBarcode"
        android:layout_width="wrap_content"
        android:layout_height="wrap_content"
        android:layout_below="@+id/btnTakePicture"
        android:layout_centerHorizontal="true"
        android:layout_marginTop="@dimen/activity_horizontal_margin"
        android:text="@string/scan_barcode" />
</RelativeLayout>
Mã cho tệp MainActivity.java được trình bày dưới đây.
package com.journaldev.barcodevisionapi;

import android.content.Intent;
import android.support.v7.app.AppCompatActivity;
import android.os.Bundle;
import android.view.View;
import android.widget.Button;

public class MainActivity extends AppCompatActivity implements View.OnClickListener {

    Button btnTakePicture, btnScanBarcode;

    @Override
    protected void onCreate(Bundle savedInstanceState) {
        super.onCreate(savedInstanceState);
        setContentView(R.layout.activity_main);
        initViews();
    }

    private void initViews() {
        btnTakePicture = findViewById(R.id.btnTakePicture);
        btnScanBarcode = findViewById(R.id.btnScanBarcode);
        btnTakePicture.setOnClickListener(this);
        btnScanBarcode.setOnClickListener(this);
    }

    @Override
    public void onClick(View v) {
        switch (v.getId()) {
            case R.id.btnTakePicture:
                startActivity(new Intent(MainActivity.this, PictureBarcodeActivity.class));
                break;
            case R.id.btnScanBarcode:
                startActivity(new Intent(MainActivity.this, ScannedBarcodeActivity.class));
                break;
        }
    }
}
Lớp MainActivity.java chứa hai nút.
- Nút đầu tiên mở một Activity dùng để quét mã QR từ ảnh bitmap chụp từ camera và trả về dữ liệu chứa trong mã QR (nếu có).
- Nút thứ hai thực hiện việc quét mã QR theo thời gian thực.
Trước khi triển khai phần xử lý chính của ứng dụng, cần thêm các quyền sau vào tệp AndroidManifest.xml:
<uses-feature
    android:name="android.hardware.camera"
    android:required="true" />

<uses-permission android:name="android.permission.CAMERA" />
<uses-feature android:name="android.hardware.camera.autofocus" />
<uses-permission android:name="android.permission.WRITE_EXTERNAL_STORAGE" />
<uses-permission android:name="android.permission.INTERNET" />
Để chia sẻ và truy cập tệp do ứng dụng khác tạo ra, cần thêm đoạn mã sau vào trong thẻ <application> của AndroidManifest.xml:
<provider
    android:name="android.support.v4.content.FileProvider"
    android:authorities="${applicationId}.provider"
    android:exported="false"
    android:grantUriPermissions="true">
    <meta-data
        android:name="android.support.FILE_PROVIDER_PATHS"
        android:resource="@xml/provider_paths" />
</provider>
Thành phần này cần thiết để truy xuất ảnh được chụp từ camera trong ứng dụng quét mã QR. Chúng ta sẽ bắt đầu với phần đầu tiên, cụ thể là lớp PictureBarcodeActivity.java. Dưới đây là mã giao diện của activity_barcode_picture.xml.
<?xml version="1.0" encoding="utf-8"?>
<RelativeLayout xmlns:android="<https://schemas.android.com/apk/res/android>"
    xmlns:tools="<https://schemas.android.com/tools>"
    android:layout_width="match_parent"
    android:layout_height="match_parent"
    android:paddingBottom="@dimen/activity_vertical_margin"
    android:paddingLeft="@dimen/activity_horizontal_margin"
    android:paddingRight="@dimen/activity_horizontal_margin"
    android:paddingTop="@dimen/activity_vertical_margin">

    <ImageView
        android:id="@+id/imageView"
        android:layout_width="150dp"
        android:layout_height="150dp"
        android:layout_centerHorizontal="true"
        android:src="@mipmap/journaldev_logo" />

    <TextView
        android:id="@+id/txtResultsHeader"
        android:layout_width="wrap_content"
        android:layout_height="wrap_content"
        android:layout_below="@+id/imageView"
        android:layout_centerHorizontal="true"
        android:text="Results"
        android:textSize="18sp"
        android:textStyle="bold" />

    <TextView
        android:id="@+id/txtResultsBody"
        android:layout_width="match_parent"
        android:layout_height="wrap_content"
        android:layout_below="@+id/txtResultsHeader"
        android:layout_centerHorizontal="true"
        android:layout_marginTop="@dimen/activity_horizontal_margin"
        android:gravity="center" />

    <Button
        android:id="@+id/btnOpenCamera"
        android:layout_width="wrap_content"
        android:layout_height="wrap_content"
        android:layout_alignParentBottom="true"
        android:layout_centerHorizontal="true"
        android:layout_marginBottom="@dimen/activity_horizontal_margin"
        android:layout_marginTop="@dimen/activity_horizontal_margin"
        android:text="@string/open_camera" />
</RelativeLayout
Mã nguồn cho lớp PictureCodeActivity.java được trình bày dưới đây.
package com.journaldev.barcodevisionapi;

import android.Manifest;
import android.content.Context;
import android.content.Intent;
import android.content.pm.PackageManager;
import android.graphics.Bitmap;
import android.graphics.BitmapFactory;
import android.net.Uri;
import android.os.Bundle;
import android.os.Environment;
import android.provider.MediaStore;
import android.support.annotation.NonNull;
import android.support.v4.app.ActivityCompat;
import android.support.v4.content.FileProvider;
import android.support.v7.app.AppCompatActivity;
import android.util.Log;
import android.util.SparseArray;
import android.view.View;
import android.widget.Button;
import android.widget.TextView;
import android.widget.Toast;

import com.google.android.gms.vision.Frame;
import com.google.android.gms.vision.barcode.Barcode;
import com.google.android.gms.vision.barcode.BarcodeDetector;

import java.io.File;
import java.io.FileNotFoundException;

public class PictureBarcodeActivity extends AppCompatActivity implements View.OnClickListener {

    Button btnOpenCamera;
    TextView txtResultBody;

    private BarcodeDetector detector;
    private Uri imageUri;
    private static final int REQUEST_CAMERA_PERMISSION = 200;
    private static final int CAMERA_REQUEST = 101;
    private static final String TAG = "API123";
    private static final String SAVED_INSTANCE_URI = "uri";
    private static final String SAVED_INSTANCE_RESULT = "result";

    @Override
    protected void onCreate(Bundle savedInstanceState) {
        super.onCreate(savedInstanceState);
        setContentView(R.layout.activity_barcode_picture);

        initViews();

        if (savedInstanceState != null) {
            if (imageUri != null) {
                imageUri = Uri.parse(savedInstanceState.getString(SAVED_INSTANCE_URI));
                txtResultBody.setText(savedInstanceState.getString(SAVED_INSTANCE_RESULT));
            }
        }

        detector = new BarcodeDetector.Builder(getApplicationContext())
                .setBarcodeFormats(Barcode.DATA_MATRIX | Barcode.QR_CODE)
                .build();

        if (!detector.isOperational()) {
            txtResultBody.setText("Detector initialisation failed");
            return;
        }
    }

    private void initViews() {
        txtResultBody = findViewById(R.id.txtResultsBody);
        btnOpenCamera = findViewById(R.id.btnTakePicture);
        txtResultBody = findViewById(R.id.txtResultsBody);
        btnOpenCamera.setOnClickListener(this);
    }

    @Override
    public void onClick(View v) {

        switch (v.getId()) {
            case R.id.btnTakePicture:
                ActivityCompat.requestPermissions(PictureBarcodeActivity.this, new
                        String[]{Manifest.permission.WRITE_EXTERNAL_STORAGE, Manifest.permission.CAMERA}, REQUEST_CAMERA_PERMISSION);
                break;
        }

    }

    @Override
    public void onRequestPermissionsResult(int requestCode, @NonNull String[] permissions, @NonNull int[] grantResults) {
        super.onRequestPermissionsResult(requestCode, permissions, grantResults);
        switch (requestCode) {
            case REQUEST_CAMERA_PERMISSION:
                if (grantResults.length > 0 && grantResults[0] == PackageManager.PERMISSION_GRANTED && grantResults[1] == PackageManager.PERMISSION_GRANTED) {
                    takeBarcodePicture();
                } else {
                    Toast.makeText(getApplicationContext(), "Permission Denied!", Toast.LENGTH_SHORT).show();
                }
        }
    }

    @Override
    protected void onActivityResult(int requestCode, int resultCode, Intent data) {
        if (requestCode == CAMERA_REQUEST && resultCode == RESULT_OK) {
            launchMediaScanIntent();
            try {

                Bitmap bitmap = decodeBitmapUri(this, imageUri);
                if (detector.isOperational() && bitmap != null) {
                    Frame frame = new Frame.Builder().setBitmap(bitmap).build();
                    SparseArray<Barcode> barcodes = detector.detect(frame);
                    for (int index = 0; index < barcodes.size(); index++) {
                        Barcode code = barcodes.valueAt(index);
                        txtResultBody.setText(txtResultBody.getText() + "\\n" + code.displayValue + "\\n");

                        int type = barcodes.valueAt(index).valueFormat;
                        switch (type) {
                            case Barcode.CONTACT_INFO:
                                Log.i(TAG, code.contactInfo.title);
                                break;
                            case Barcode.EMAIL:
                                Log.i(TAG, code.displayValue);
                                break;
                            case Barcode.ISBN:
                                Log.i(TAG, code.rawValue);
                                break;
                            case Barcode.PHONE:
                                Log.i(TAG, code.phone.number);
                                break;
                            case Barcode.PRODUCT:
                                Log.i(TAG, code.rawValue);
                                break;
                            case Barcode.SMS:
                                Log.i(TAG, code.sms.message);
                                break;
                            case Barcode.TEXT:
                                Log.i(TAG, code.displayValue);
                                break;
                            case Barcode.URL:
                                Log.i(TAG, "url: " + code.displayValue);
                                break;
                            case Barcode.WIFI:
                                Log.i(TAG, code.wifi.ssid);
                                break;
                            case Barcode.GEO:
                                Log.i(TAG, code.geoPoint.lat + ":" + code.geoPoint.lng);
                                break;
                            case Barcode.CALENDAR_EVENT:
                                Log.i(TAG, code.calendarEvent.description);
                                break;
                            case Barcode.DRIVER_LICENSE:
                                Log.i(TAG, code.driverLicense.licenseNumber);
                                break;
                            default:
                                Log.i(TAG, code.rawValue);
                                break;
                        }
                    }
                    if (barcodes.size() == 0) {
                        txtResultBody.setText("No barcode could be detected. Please try again.");
                    }
                } else {
                    txtResultBody.setText("Detector initialisation failed");
                }
            } catch (Exception e) {
                Toast.makeText(getApplicationContext(), "Failed to load Image", Toast.LENGTH_SHORT)
                        .show();
                Log.e(TAG, e.toString());
            }
        }
    }

    private void takeBarcodePicture() {
        Intent intent = new Intent(MediaStore.ACTION_IMAGE_CAPTURE);
        File photo = new File(Environment.getExternalStorageDirectory(), "pic.jpg");
        imageUri = FileProvider.getUriForFile(PictureBarcodeActivity.this,
                BuildConfig.APPLICATION_ID + ".provider", photo);
        intent.putExtra(MediaStore.EXTRA_OUTPUT, imageUri);
        startActivityForResult(intent, CAMERA_REQUEST);
    }

    @Override
    protected void onSaveInstanceState(Bundle outState) {
        if (imageUri != null) {
            outState.putString(SAVED_INSTANCE_URI, imageUri.toString());
            outState.putString(SAVED_INSTANCE_RESULT, txtResultBody.getText().toString());
        }
        super.onSaveInstanceState(outState);
    }

    private void launchMediaScanIntent() {
        Intent mediaScanIntent = new Intent(Intent.ACTION_MEDIA_SCANNER_SCAN_FILE);
        mediaScanIntent.setData(imageUri);
        this.sendBroadcast(mediaScanIntent);
    }

    private Bitmap decodeBitmapUri(Context ctx, Uri uri) throws FileNotFoundException {
        int targetW = 600;
        int targetH = 600;
        BitmapFactory.Options bmOptions = new BitmapFactory.Options();
        bmOptions.inJustDecodeBounds = true;
        BitmapFactory.decodeStream(ctx.getContentResolver().openInputStream(uri), null, bmOptions);
        int photoW = bmOptions.outWidth;
        int photoH = bmOptions.outHeight;

        int scaleFactor = Math.min(photoW / targetW, photoH / targetH);
        bmOptions.inJustDecodeBounds = false;
        bmOptions.inSampleSize = scaleFactor;

        return BitmapFactory.decodeStream(ctx.getContentResolver()
                .openInputStream(uri), null, bmOptions);
    }
}
Một số suy luận rút ra từ đoạn mã trên được trình bày như sau.
Đoạn mã sau đây tạo một đối tượng Barcode Detector:
detector = new BarcodeDetector.Builder(getApplicationContext())
           .setBarcodeFormats(Barcode.DATA_MATRIX | Barcode.QR_CODE)
           .build();
Các định dạng mã cần quét được thiết lập trong phương thức setBarcodeFormats().
Hàm takeBarcodePicture() là nơi khởi chạy camera. Để truy xuất hình ảnh, chúng ta sử dụng launchMediaScanIntent(), đây là phương thức gửi một Intent dạng broadcast nhằm tìm kiếm hình ảnh thông qua URI của ảnh.
Một đối tượng Frame.Builder được dùng để tạo một khung hình từ ảnh Bitmap. Trên khung hình này, Barcode Detector sẽ quét để tìm các mã QR có thể có. Dòng mã sau đây tạo một Frame từ đối tượng Bitmap:
Frame frame = new Frame.Builder().setBitmap(bitmap).build();
Chúng ta tạo một đối tượng SparseArray để chứa tất cả các mã QR có thể có trong ảnh bằng cách gọi phương thức detect() trên đối tượng Barcode Detector:
SparseArray<Barcode> barcodes = detector.detect(frame);
Để lấy định dạng của mã QR, trường valueFormat sẽ được truy xuất từ đối tượng Barcode, như sau:
barcodes.valueAt(index).valueFormat
Để lấy giá trị hiển thị và giá trị thô, có thể sử dụng các lệnh sau:
barcodes.valueAt(index).displayValue
barcodes.valueAt(index).rawValue
Giá trị tương ứng được trả về sẽ hiển thị trong một TextView. Với trường hợp có nhiều mã Barcode trong một ảnh Bitmap, các giá trị sẽ được nối thêm vào nội dung hiện có của TextView.
Lớp ScannedBarcodeActivity.java sẽ quét mã Barcode thông qua camera. Chúng tôi đã tạo hai mã QR tùy chỉnh riêng của mình từ đây. Mã nguồn của tệp giao diện activity_scan_barcode.xml được trình bày dưới đây.
<?xml version="1.0" encoding="utf-8"?>
<RelativeLayout xmlns:android="<https://schemas.android.com/apk/res/android>"
    android:layout_width="match_parent"
    android:layout_height="match_parent"
    android:padding="@dimen/activity_horizontal_margin">

    <SurfaceView
        android:id="@+id/surfaceView"
        android:layout_width="match_parent"
        android:layout_height="match_parent"
        android:layout_above="@+id/btnAction"
        android:layout_alignParentLeft="true"
        android:layout_alignParentStart="true"
        android:layout_centerVertical="true" />

    <TextView
        android:id="@+id/txtBarcodeValue"
        android:layout_width="wrap_content"
        android:layout_height="wrap_content"
        android:layout_alignParentTop="true"
        android:layout_marginLeft="@dimen/activity_horizontal_margin"
        android:layout_marginStart="@dimen/activity_horizontal_margin"
        android:text="No Barcode Detected"
        android:textColor="@android:color/white"
        android:textSize="20sp" />

    <Button
        android:id="@+id/btnAction"
        android:layout_width="match_parent"
        android:layout_height="wrap_content"
        android:layout_alignParentBottom="true"
        android:text="ADD CONTENT IN THE MAIL" />

</RelativeLayout>
Trình quét mã vạch cho Android sử dụng Camera
Mã nguồn cho lớp ScannedBarcodeActivity.java được trình bày dưới đây.
package com.journaldev.barcodevisionapi;

import android.Manifest;
import android.content.Intent;
import android.content.pm.PackageManager;
import android.net.Uri;
import android.os.Bundle;
import android.support.v4.app.ActivityCompat;
import android.support.v7.app.AppCompatActivity;
import android.util.SparseArray;
import android.view.SurfaceHolder;
import android.view.SurfaceView;
import android.view.View;
import android.widget.Button;
import android.widget.TextView;
import android.widget.Toast;

import com.google.android.gms.vision.CameraSource;
import com.google.android.gms.vision.Detector;
import com.google.android.gms.vision.barcode.Barcode;
import com.google.android.gms.vision.barcode.BarcodeDetector;

import java.io.IOException;

public class ScannedBarcodeActivity extends AppCompatActivity {

    SurfaceView surfaceView;
    TextView txtBarcodeValue;
    private BarcodeDetector barcodeDetector;
    private CameraSource cameraSource;
    private static final int REQUEST_CAMERA_PERMISSION = 201;
    Button btnAction;
    String intentData = "";
    boolean isEmail = false;

    @Override
    protected void onCreate(Bundle savedInstanceState) {
        super.onCreate(savedInstanceState);
        setContentView(R.layout.activity_scan_barcode);

        initViews();
    }

    private void initViews() {
        txtBarcodeValue = findViewById(R.id.txtBarcodeValue);
        surfaceView = findViewById(R.id.surfaceView);
        btnAction = findViewById(R.id.btnAction);

        btnAction.setOnClickListener(new View.OnClickListener() {
            @Override
            public void onClick(View v) {

                if (intentData.length() > 0) {
                    if (isEmail)
                        startActivity(new Intent(ScannedBarcodeActivity.this, EmailActivity.class).putExtra("email_address", intentData));
                    else {
                        startActivity(new Intent(Intent.ACTION_VIEW, Uri.parse(intentData)));
                    }
                }

            }
        });
    }

    private void initialiseDetectorsAndSources() {

        Toast.makeText(getApplicationContext(), "Barcode scanner started", Toast.LENGTH_SHORT).show();

        barcodeDetector = new BarcodeDetector.Builder(this)
                .setBarcodeFormats(Barcode.ALL_FORMATS)
                .build();

        cameraSource = new CameraSource.Builder(this, barcodeDetector)
                .setRequestedPreviewSize(1920, 1080)
                .setAutoFocusEnabled(true) //you should add this feature
                .build();

        surfaceView.getHolder().addCallback(new SurfaceHolder.Callback() {
            @Override
            public void surfaceCreated(SurfaceHolder holder) {
                try {
                    if (ActivityCompat.checkSelfPermission(ScannedBarcodeActivity.this, Manifest.permission.CAMERA) == PackageManager.PERMISSION_GRANTED) {
                        cameraSource.start(surfaceView.getHolder());
                    } else {
                        ActivityCompat.requestPermissions(ScannedBarcodeActivity.this, new
                                String[]{Manifest.permission.CAMERA}, REQUEST_CAMERA_PERMISSION);
                    }

                } catch (IOException e) {
                    e.printStackTrace();
                }

            }

            @Override
            public void surfaceChanged(SurfaceHolder holder, int format, int width, int height) {
            }

            @Override
            public void surfaceDestroyed(SurfaceHolder holder) {
                cameraSource.stop();
            }
        });

        barcodeDetector.setProcessor(new Detector.Processor<Barcode>() {
            @Override
            public void release() {
                Toast.makeText(getApplicationContext(), "To prevent memory leaks barcode scanner has been stopped", Toast.LENGTH_SHORT).show();
            }

            @Override
            public void receiveDetections(Detector.Detections<Barcode> detections) {
                final SparseArray<Barcode> barcodes = detections.getDetectedItems();
                if (barcodes.size() != 0) {

                    txtBarcodeValue.post(new Runnable() {

                        @Override
                        public void run() {

                            if (barcodes.valueAt(0).email != null) {
                                txtBarcodeValue.removeCallbacks(null);
                                intentData = barcodes.valueAt(0).email.address;
                                txtBarcodeValue.setText(intentData);
                                isEmail = true;
                                btnAction.setText("ADD CONTENT TO THE MAIL");
                            } else {
                                isEmail = false;
                                btnAction.setText("LAUNCH URL");
                                intentData = barcodes.valueAt(0).displayValue;
                                txtBarcodeValue.setText(intentData);

                            }
                        }
                    });

                }
            }
        });
    }

    @Override
    protected void onPause() {
        super.onPause();
        cameraSource.release();
    }

    @Override
    protected void onResume() {
        super.onResume();
        initialiseDetectorsAndSources();
    }
}
Một số suy luận rút ra từ đoạn mã trên được trình bày như sau.
SurfaceView là thành phần thích hợp để hiển thị ảnh xem trước từ camera nhờ khả năng kết xuất giao diện nhanh. Giao diện SurfaceHolder.Callback được sử dụng để tiếp nhận thông tin về các thay đổi xảy ra trên surface (trong trường hợp này là ảnh xem trước từ camera). SurfaceHolder.Callback triển khai ba phương thức:
surfaceChanged: Phương thức này được gọi khi kích thước hoặc định dạng của surface thay đổi.surfaceCreated: Phương thức này được gọi khi surface được tạo lần đầu tiên.surfaceDestroyed: Phương thức này được gọi khi surface bị hủy.
CameraSource quản lý camera phối hợp với một detector bên dưới. Trong trường hợp này, SurfaceView đóng vai trò là surface mà detector sử dụng. Phương thức CameraSource.start() sẽ mở camera và bắt đầu gửi các khung hình xem trước đến SurfaceView. CameraSource được khởi tạo theo cách sau:
cameraSource = new CameraSource.Builder(this, barcodeDetector)
                .setRequestedPreviewSize(1920, 1080)
                .setAutoFocusEnabled(true) // nên bật tính năng này
                .build();
Chúng ta đã gán một processor cho BarcodeDetector thông qua phương thức setProcessor(). Giao diện này cung cấp callback đến phương thức receiveDetections(), nơi nhận các mã QR từ ảnh xem trước của camera và lưu trữ chúng trong SparseArray.
Giá trị của mã QR được hiển thị trong TextView thông qua một đối tượng Runnable do quá trình phát hiện mã QR được thực hiện trên một luồng nền.
Trong ví dụ này, chúng tôi đã tạo hai mã QR bằng trình tạo mã. Một mã chứa địa chỉ URL, mã còn lại chứa địa chỉ email. Khi người dùng nhấn nút, tùy thuộc vào giá trị của mã QR được nhận diện, ứng dụng sẽ hoặc mở URL, hoặc mở giao diện gửi email với địa chỉ tương ứng lấy từ mã QR.
Kết quả đầu ra của lớp PictureBarcodeActivity.java được hiển thị bên dưới.
Kết quả đầu ra của hoạt động ScannedBarcodeActivity.java khi vận hành được trình bày bên dưới.

Đó là toàn bộ nội dung của dự án quét mã QR trên Android sử dụng Mobile Vision API. Chúng ta đã thêm các mã QR mẫu vào mã nguồn. Bạn có thể tải xuống toàn bộ dự án Android QR Code Scanner/Barcode Scanner từ liên kết bên dưới và thử nghiệm với nhiều mã QR khác nhau.
Tải xuống dự án mẫu QR Code, Barcode Scanner
