Trong quá trình phát triển các ứng dụng web Java, upload và download file thông qua Servlet là một trong những tác vụ phổ biến và gần như không thể thiếu – đặc biệt trong các hệ thống cần xử lý dữ liệu từ phía người dùng như quản lý tài liệu, upload ảnh, hay xuất báo cáo.

Với kinh nghiệm làm việc quen thuộc với Java Servlet, từ các thao tác cơ bản cho đến cấu hình nâng cao, tôi nhận ra rằng việc xử lý file bằng Servlet thường gây ra không ít khó khăn cho những bạn mới tiếp cận. Vì vậy, bài viết này sẽ chia sẻ một ví dụ cụ thể để minh họa toàn bộ quy trình trên: từ việc tải tệp servlet lên máy chủ và sau đó tải về lại phía người dùng.
Upload file bằng Servlet
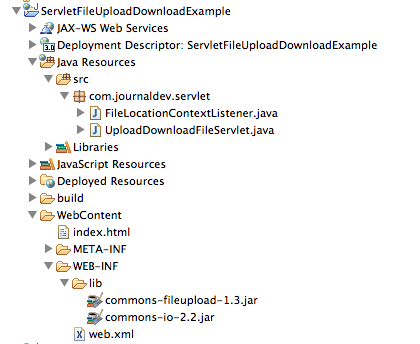
Bài toán đặt ra là việc cung cấp một trang HTML đơn giản, tại đó máy khách có thể chọn một tệp cục bộ để tải lên máy chủ. Khi người dùng gửi yêu cầu tải tệp lên, chương trình servlet sẽ tiếp nhận file, lưu vào thư mục định sẵn trên server, và sau đó cung cấp một URL để người dùng có thể tải về file vừa upload. Vì lý do bảo mật, người dùng sẽ không được cung cấp URL trực tiếp để tải tệp xuống, thay vào đó, họ sẽ được cung cấp một liên kết đến servlet, nơi xử lý yêu cầu và trả file về. Cấu trúc dự án web dạng Eclipse giống như hình minh họa bên dưới.

Hãy nhìn vào các thành phần của ứng dụng web và tìm hiểu cách triển khai.
Trang HTML cho phép Java tải tệp lên máy chủ
Chúng ta có thể tải một file lên máy chủ bằng cách gửi yêu cầu đăng lên servlet và gửi biểu mẫu nhưng không thể sử dụng phương thức GET để tải file lên. Một điểm cần lưu ý nữa là kiểu mã hoá của biểu mẫu phải là multipart/form-data. Để chọn một file từ hệ thống file của người dùng, chúng ta cần sử dụng phần tử input với type là file. Từ đó có một trang HTML đơn giản – index.html để tải file lên như sau:
<html>
<head></head>
<body>
<form action="UploadDownloadFileServlet" method="post" enctype="multipart/form-data">
Select File to Upload:<input type="file" name="fileName">
<br>
<input type="submit" value="Upload">
</form>
</body>
</html>
Cấu hình lưu file trên server
Chúng ta cần lưu trữ tệp vào một số thư mục tại máy chủ, để sau đó có thể mã hóa cứng thư mục này trong chương trình. Nhưng để linh hoạt hơn, thay vì hard-code thư mục lưu file, ta cấu hình đường dẫn lưu trong deployment descriptor (file web.xml) thông qua context-param. Đồng thời, khai báo trang index.html là welcome file.
<?xml version="1.0" encoding="UTF-8"?>
<web-app xmlns:xsi="<https://www.w3.org/2001/XMLSchema-instance>" xmlns="<https://java.sun.com/xml/ns/javaee>" xsi:schemaLocation="<https://java.sun.com/xml/ns/javaee> <https://java.sun.com/xml/ns/javaee/web-app_3_0.xsd>" version="3.0">
  <display-name>ServletFileUploadDownloadExample</display-name>
  <welcome-file-list>
    <welcome-file>index.html</welcome-file>
  </welcome-file-list>
  <context-param>
    <param-name>tempfile.dir</param-name>
    <param-value>tmpfiles</param-value>
  </context-param>
</web-app>
Tạo ServletContextListener để đọc đường dẫn lưu file
Chúng ta cần đọc tham số cấu hình context để lấy đường dẫn lưu file và tạo đối tượng File đại diện. Ta sẽ thực hiện điều này khi ứng dụng được khởi tạo, thông qua một ServletContextListener. Mã triển khai ServletContextListener như bên dưới.
package com.journaldev.servlet;

import java.io.File;

import javax.servlet.ServletContext;
import javax.servlet.ServletContextEvent;
import javax.servlet.ServletContextListener;
import javax.servlet.annotation.WebListener;

@WebListener
public class FileLocationContextListener implements ServletContextListener {

    public void contextInitialized(ServletContextEvent servletContextEvent) {
    	String rootPath = System.getProperty("catalina.home");
    	ServletContext ctx = servletContextEvent.getServletContext();
    	String relativePath = ctx.getInitParameter("tempfile.dir");
    	File file = new File(rootPath + File.separator + relativePath);
    	if(!file.exists()) file.mkdirs();
    	System.out.println("File Directory created to be used for storing files");
    	ctx.setAttribute("FILES_DIR_FILE", file);
    	ctx.setAttribute("FILES_DIR", rootPath + File.separator + relativePath);
    }

	public void contextDestroyed(ServletContextEvent servletContextEvent) {
		//do cleanup if needed
	}

}
Servlet xử lý Upload và Download file
Upload
Servlet 3 đã hỗ trợ upload file trong API, vì vậy sẽ không cần sử dụng bất kỳ API của bên thứ ba nào. Hãy tìm hiểu qua về Servlet 3 Upload File. Trong ví dụ này ta vẫn sử dụng thư viện bên ngoài Apache Commons FileUpload (phiên bản 1.3) và Commons IO để xử lý việc upload file. Chúng ta cần đặt cả hai trong thư mục lib của dự án, như bạn có thể thấy trong hình ảnh biết cấu trúc dự án phía trên.
Sử dụng DiskFileItemFactory để phân tích cú pháp đối tượng HttpServletRequest và lấy danh sách FileItem. Từ đó, ta có thể trích xuất thông tin như tên tệp, tên trường trong biểu mẫu, kích thước và chi tiết loại nội dung của tệp cần được tải lên. Để ghi tệp vào thư mục, tất cả những gì cần làm là tạo File đại diện cho file đích và gọi fileItem.write(file) là xong.
Vì toàn bộ mục đích của servlet là tải tệp lên, ta ghi đè phương thức init() để khởi tạo thể hiện đối tượng DiskFileItemFactory của servlet. Sau đó sử dụng đối tượng này trong triển khai phương thức doPost() để tải tệp lên thư mục máy chủ. Khi tệp được tải lên thành công, phản hồi sẽ được gửi đến máy khách với URL để tải tệp xuống, vì liên kết HTML sử dụng phương thức GET, ta cần thêm tham số cho tên tệp vào URL và có thể sử dụng cùng phương thức doGet() của servlet để triển khai quy trình tải tệp xuống.
Download
Để triển khai tải xuống tệp, trước tiên mở InputStream cho tệp và sử dụng phương thức ServletContext.getMimeType()để xác định loại MIME và đặt nó làm nội dung phản hồi. Sau đó, thiết lập độ dài nội dung (Content-Length) và tiêu đề “Content-Disposition” với giá trị là “attachment; filename=“fileName” để yêu cầu trình duyệt tải file về.
Sau khi hoàn tất việc thiết lập cấu hình phản hồi, đọc nội dung tệp từ InputStream và ghi vào ServletOutputStream và đẩy đầu ra tới máy khách. Kết quả UploadDownloadFileServlet cuối cùng trông như bên dưới.
package com.journaldev.servlet;

import java.io.File;
import java.io.FileInputStream;
import java.io.IOException;
import java.io.InputStream;
import java.io.PrintWriter;
import java.util.Iterator;
import java.util.List;

import javax.servlet.ServletContext;
import javax.servlet.ServletException;
import javax.servlet.ServletOutputStream;
import javax.servlet.annotation.WebServlet;
import javax.servlet.http.HttpServlet;
import javax.servlet.http.HttpServletRequest;
import javax.servlet.http.HttpServletResponse;

import org.apache.commons.fileupload.FileItem;
import org.apache.commons.fileupload.FileUploadException;
import org.apache.commons.fileupload.disk.DiskFileItemFactory;
import org.apache.commons.fileupload.servlet.ServletFileUpload;

@WebServlet("/UploadDownloadFileServlet")
public class UploadDownloadFileServlet extends HttpServlet {
	private static final long serialVersionUID = 1L;
    private ServletFileUpload uploader = null;
	@Override
	public void init() throws ServletException{
		DiskFileItemFactory fileFactory = new DiskFileItemFactory();
		File filesDir = (File) getServletContext().getAttribute("FILES_DIR_FILE");
		fileFactory.setRepository(filesDir);
		this.uploader = new ServletFileUpload(fileFactory);
	}
	protected void doGet(HttpServletRequest request, HttpServletResponse response) throws ServletException, IOException {
		String fileName = request.getParameter("fileName");
		if(fileName == null || fileName.equals("")){
			throw new ServletException("File Name can't be null or empty");
		}
		File file = new File(request.getServletContext().getAttribute("FILES_DIR")+File.separator+fileName);
		if(!file.exists()){
			throw new ServletException("File doesn't exists on server.");
		}
		System.out.println("File location on server::"+file.getAbsolutePath());
		ServletContext ctx = getServletContext();
		InputStream fis = new FileInputStream(file);
		String mimeType = ctx.getMimeType(file.getAbsolutePath());
		response.setContentType(mimeType != null? mimeType:"application/octet-stream");
		response.setContentLength((int) file.length());
		response.setHeader("Content-Disposition", "attachment; filename=\\"" + fileName + "\\"");

		ServletOutputStream os = response.getOutputStream();
		byte[] bufferData = new byte[1024];
		int read=0;
		while((read = fis.read(bufferData))!= -1){
			os.write(bufferData, 0, read);
		}
		os.flush();
		os.close();
		fis.close();
		System.out.println("File downloaded at client successfully");
	}

	protected void doPost(HttpServletRequest request, HttpServletResponse response) throws ServletException, IOException {
		if(!ServletFileUpload.isMultipartContent(request)){
			throw new ServletException("Content type is not multipart/form-data");
		}

		response.setContentType("text/html");
		PrintWriter out = response.getWriter();
		out.write("<html><head></head><body>");
		try {
			List<FileItem> fileItemsList = uploader.parseRequest(request);
			Iterator<FileItem> fileItemsIterator = fileItemsList.iterator();
			while(fileItemsIterator.hasNext()){
				FileItem fileItem = fileItemsIterator.next();
				System.out.println("FieldName="+fileItem.getFieldName());
				System.out.println("FileName="+fileItem.getName());
				System.out.println("ContentType="+fileItem.getContentType());
				System.out.println("Size in bytes="+fileItem.getSize());

				File file = new File(request.getServletContext().getAttribute("FILES_DIR")+File.separator+fileItem.getName());
				System.out.println("Absolute Path at server="+file.getAbsolutePath());
				fileItem.write(file);
				out.write("File "+fileItem.getName()+ " uploaded successfully.");
				out.write("<br>");
				out.write("<a href=\\"UploadDownloadFileServlet?fileName="+fileItem.getName()+"\\">Download "+fileItem.getName()+"</a>");
			}
		} catch (FileUploadException e) {
			out.write("Exception in uploading file.");
		} catch (Exception e) {
			out.write("Exception in uploading file.");
		}
		out.write("</body></html>");
	}

}
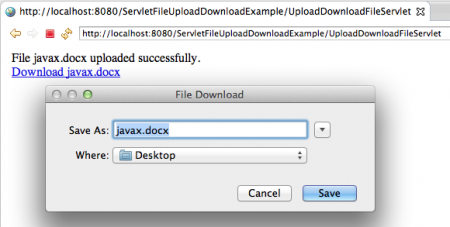
Mẫu thực hiện của dự án được thể hiện ở hình ảnh bên dưới.


Tổng kết
Ứng dụng mẫu này không chỉ minh họa một cách trực quan cách xử lý upload và download file qua servlet, mà còn cho thấy cách tiếp cận rõ ràng, có tổ chức và đảm bảo tính bảo mật trong quá trình triển khai. Việc tách biệt xử lý upload và download thành các servlet riêng, kết hợp cùng cấu hình linh hoạt thông qua context-param và listener, giúp cho ứng dụng không những dễ đọc, dễ hiểu mà còn dễ bảo trì và mở rộng về sau.
Hy vọng qua ví dụ này, bạn không chỉ học được cách “làm thế nào để xử lý file”, mà còn hiểu sâu hơn về tư duy tổ chức mã nguồn, cách tận dụng cấu hình ứng dụng đúng cách, cũng như những nguyên tắc giúp bạn xây dựng một ứng dụng web Java an toàn, hiệu quả và dễ mở rộng.
 6 phút để đọc
