
- Sản phẩm & Dịch vụSản phẩm & Dịch vụ
- Giải phápGiải pháp
- Bảng giáBảng giá
- Công tyCông ty
- Tài liệuTài liệu

vi
vi
Chuyên mục với các bài viết hướng dẫn, nghiên cứu và phân tích chi tiết về kỹ thuật, các xu hướng công nghệ mới nhất dành cho lập trình viên.

Technical Writer

I have over 5 years of experience writing technical documentation for tech products, making them accessible and user-friendly. My focus is always on providing clear and precise information. @#@ Tôi đã có hơn 5 năm kinh nghiệm viết tài liệu kỹ thuật cho các sản phẩm công nghệ, giúp người dùng dễ dàng tiếp cận và sử dụng. Tôi luôn tập trung vào việc cung cấp thông tin chính xác và dễ hiểu.
Thảo luận (0)
Đăng nhập để thảo luận
Hôm nay, chúng ta sẽ tìm hiểu về vòng đời của Fragment trong Android (Fragment lifecycle Android) và cách triển khai một class Activity (class đại diện cho một cửa sổ tương tác với người dùng) đơn giản chứa hai fragment trong một ứng dụng Android.

Class Fragment trong Android được dùng để xây dựng các giao diện người dùng (UI) động. Fragment nên được sử dụng bên trong Activity. Ưu điểm lớn nhất của fragment là giúp đơn giản hóa việc tạo UI cho nhiều kích thước màn hình khác nhau. Một Activity có thể chứa không giới hạn số lượng fragment.
Một fragment trong Android không phải là subclass (class con) trực tiếp của View như hầu hết các thành phần UI khác. Thay vào đó, một fragment chứa một view bên trong nó. Chính view này sẽ được hiển thị trong activity chứa fragment đó.
Vì fragment không phải là một view, việc thêm nó vào activity sẽ hơi khác so với việc thêm một view (ví dụ như TextView). Fragment được thêm vào một ViewGroup bên trong activity, và view của fragment sẽ được hiển thị trong ViewGroup này.
Sơ đồ sau đây mô tả quá trình một fragment được thêm vào một activity:
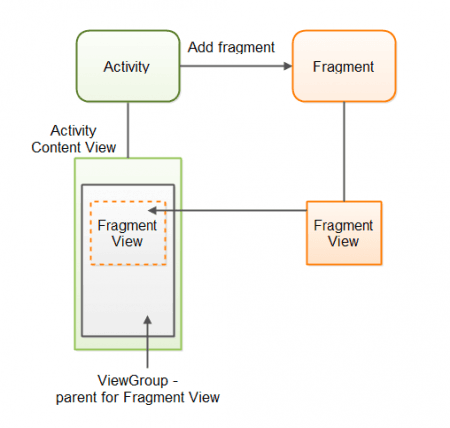
Đầu tiên, activity lấy tham chiếu đến fragment. Sau đó, nó lấy tham chiếu đến ViewGroup nơi mà view của fragment sẽ được hiển thị. Tiếp theo, activity thêm fragment vào. Fragment sau đó sẽ tạo ra view của nó và trả về cho activity. Cuối cùng, view này được chèn vào ViewGroup cha, và fragment bắt đầu đi vào hoạt động.
Vòng đời của một fragment trong Android được minh họa trong hình dưới đây.

Đây là danh sách các phương thức trong vòng đời của fragment.
onAttach() là phương thức này sẽ được gọi đầu tiên, ngay cả trước onCreate(), để cho chúng ta biết rằng fragment đã được gắn vào một activity. Phương thức này nhận tham số là Activity sẽ chứa fragment của bạn.onCreateView() là callback hệ thống gọi khi đến lúc fragment vẽ UI của nó lần đầu tiên. Để vẽ UI cho fragment, ta phải trả về một thành phần View từ phương thức này, đây chính là root (thành tử gốc) của layout của fragment. Ta có thể trả về null nếu fragment không cung cấp UI.onViewCreated() sẽ được gọi sau onCreateView(). Phương thức này đặc biệt hữu ích khi ta kế thừa lại việc triển khai onCreateView() nhưng cần cấu hình các view sau khi chúng được tạo (như với ListFragment khi cần thiết lập một adapter).onActivityCreated() sẽ được gọi sau onCreate() và onCreateView() để báo hiệu rằng phương thức onCreate() của activity đã hoàn tất. Nếu có bất kỳ thứ gì cần được khởi tạo trong fragment mà phụ thuộc vào việc onCreate() của activity đã chạy xong, ta có thể dùng onActivityCreated() để thực hiện công việc khởi tạo đó.onStart() là Phương thức onStart() được gọi khi fragment bắt đầu được hiển thị với người dùng.onPause() được gọi bởi hệ thống để tạo dấu hiệu đầu tiên cho thấy người dùng đang rời khỏi fragment. Đây thường là nơi bạn nên lưu lại (commit) bất kỳ thay đổi nào cần được duy trì sau phiên làm việc hiện tại của người dùng.onStop() được gọi khi dừng fragment.onDestroyView() được gọi trước onDestroy(). Đây là phương thức đối ngược với onCreateView() (nơi ta thiết lập UI). Nếu có những thứ liên quan đến UI cần được dọn dẹp, chúng có thể được đặt trong onDestroyView().onDestroy() được gọi để thực hiện việc dọn dẹp cuối cùng trạng thái của fragment. Lưu ý nó không được đảm bảo sẽ luôn được gọi bởi Android.onDetach() được gọi sau onDestroy() để thông báo rằng fragment đã được tách khỏi activity chứa nó.Fragment được thêm vào Android API từ phiên bản Honeycomb (API 11).
Khi sử dụng thư viện tương thích (compatibility package) do Google cung cấp, các class sau sẽ được dùng để triển khai:
Dưới đây là một ví dụ về fragment triển khai bằng onCreateView():
public class SampleFragment extends Fragment {
@Override
public View onCreateView(LayoutInflater inflater, ViewGroup parentViewGroup,
                         Bundle savedInstanceState) {

    View rootView = inflater.inflate(R.layout.fragment_sample, parentViewGroup, false);
    return rootView;
}

}
Phương thức onCreateView() nhận các tham số là LayoutInflater, ViewGroup, và Bundle. LayoutInflater là một component có thể tạo ra các thực thể của View dựa trên các file XML layout. Như bạn thấy trong ví dụ, nó thực hiện điều này bằng cách gọi inflater.inflate().
Phương thức inflate() nhận ba tham số: ID của một file XML layout (bên trong R.layout), một ViewGroup cha nơi View của fragment sẽ được chèn vào, và một giá trị boolean thứ ba cho biết liệu View của fragment được tạo từ file XML layout có nên được chèn vào ViewGroup cha hay không.
Trong trường hợp này, ta truyền giá trị false vì View sẽ được gắn vào ViewGroup cha ở một nơi khác (bởi một đoạn code khác của Android chúng ta đã gọi). Khi bạn truyền false làm tham số cuối cùng cho inflate(), ViewGroup cha vẫn được sử dụng để tính toán layout cho View được tạo ra, vì vậy bạn không thể truyền null cho tham số ViewGroup cha.
Tham số ViewGroup của onCreateView() là ViewGroup cha nơi View của fragment sẽ được chèn vào. Đây là một ViewGroup bên trong activity sẽ chứa (host) fragment.
Tham số Bundle của onCreateView() là một đối tượng Bundle mà fragment có thể dùng để lưu trữ dữ liệu, tương tự như trong một Activity.
Đây là cấu trúc một ví dụ sử dụng fragment trong Android. Nó bao gồm một activity duy nhất chứa hai fragment là TextFragment và MenuFragment.
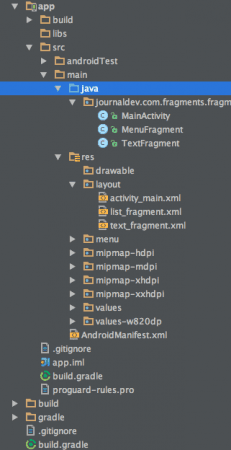
MainActivity chứa hai fragment là TextFragment và MenuFragment. Hãy bắt đầu bằng cách định nghĩa các fragment trong layout XML với file activity_main.xml.
<LinearLayout xmlns:android="<https://schemas.android.com/apk/res/android>"
android:layout_width="match_parent"
android:layout_height="match_parent"
android:orientation="horizontal"
android:weightSum="1.0">
<fragment
android:layout_height="match_parent"
android:layout_width="match_parent"
class="journaldev.com.fragments.fragments.MenuFragment"
android:id="@+id/fragment"
android:layout_weight="0.5"/>
<fragment
android:layout_width="match_parent"
android:layout_height="match_parent"
class="journaldev.com.fragments.fragments.TextFragment"
android:id="@+id/fragment2"
android:layout_weight="0.5"/>
</LinearLayout>
Như ta thấy, các file class của fragment thuộc activity này được định nghĩa là class=“journaldev.com.fragments.fragments.TextFragment”. Các class fragment và layout của chúng được định nghĩa như trong các đoạn code dưới đây.
package journaldev.com.fragments.fragments;import android.app.Fragment; import android.os.Bundle; import android.view.LayoutInflater; import android.view.View; import android.view.ViewGroup; import android.widget.TextView;
import journaldev.com.fragments.R; public class TextFragment extends Fragment { TextView text,vers;
@Override public View onCreateView(LayoutInflater inflater,ViewGroup container, Bundle savedInstanceState) { View view = inflater.inflate(R.layout.text_fragment, container, false); text= (TextView) view.findViewById(R.id.AndroidOs); vers= (TextView)view.findViewById(R.id.Version); return view; } public void change(String txt, String txt1){ text.setText(txt); vers.setText(txt1); }}
text_fragment.xml
<?xml version="1.0" encoding="utf-8"?><LinearLayout xmlns:android="<https://schemas.android.com/apk/res/android>" android:orientation="vertical" android:layout_width="match_parent" android:gravity="center" android:background="#5ba4e5" android:layout_height="match_parent">
<TextView android:layout_width="wrap_content" android:layout_height="wrap_content" android:textSize="40px" android:textColor="#ffffff" android:layout_gravity="center" android:id="@+id/AndroidOs"/> <TextView android:layout_width="wrap_content" android:layout_height="wrap_content" android:layout_gravity="center" android:textColor="#ffffff" android:textSize="30px" android:id="@+id/Version"/></LinearLayout>
TextFragment bao gồm các TextView chứa tên và số hiệu phiên bản Android.
package journaldev.com.fragments.fragments;import android.app.ListFragment; import android.os.Bundle; import android.view.LayoutInflater; import android.view.View; import android.view.ViewGroup; import android.widget.ArrayAdapter; import android.widget.ListView;
import journaldev.com.fragments.R; public class MenuFragment extends ListFragment { String[] AndroidOS = new String[] { "Cupcake","Donut","Eclair","Froyo","Gingerbread","Honeycomb","Ice Cream SandWich","Jelly Bean","KitKat" }; String[] Version = new String[]{"1.5","1.6","2.0-2.1","2.2","2.3","3.0-3.2","4.0","4.1-4.3","4.4"}; @Override
public View onCreateView(LayoutInflater inflater,ViewGroup container, Bundle savedInstanceState) { View view =inflater.inflate(R.layout.list_fragment, container, false); ArrayAdapter<String> adapter = new ArrayAdapter<String>(getActivity(), android.R.layout.simple_list_item_1, AndroidOS); setListAdapter(adapter); return view; } @Override public void onListItemClick(ListView l, View v, int position, long id) { TextFragment txt = (TextFragment)getFragmentManager().findFragmentById(R.id.fragment2); txt.change(AndroidOS[position],"Version : "+Version[position]); getListView().setSelector(android.R.color.holo_blue_dark); }}
list_fragment.xml
<?xml version="1.0" encoding="utf-8"?><LinearLayout xmlns:android="<https://schemas.android.com/apk/res/android>" android:orientation="vertical" android:layout_width="match_parent" android:layout_height="match_parent"> <ListView android:layout_width="match_parent" android:layout_height="wrap_content" android:id="@android:id/list" /> </LinearLayout>
MenuFragment hiển thị một ListView. Ở đây, layout của ListView là layout mặc định simple_list_item_1, khác với layout tùy chỉnh mà chúng ta đã tạo cho ListView trong bài viết trước. MainActivity chỉ có gọi setContentView từ phương thức onCreate. Các fragment được gọi từ file XML.
Ngoài ra, chúng ta có thể thêm các fragment từ class activity bằng cách sử dụng FragmentManager như trong đoạn code dưới đây:
getFragmentManager()
                  .beginTransaction()
                  .add(R.id.fragmentParentViewGroup, new MyFragment())
                  .commit();
Ở đây, ID fragmentParentViewGroup thuộc về FrameLayout như bên dưới:
<FrameLayout xmlns:android="<https://schemas.android.com/apk/res/android>"
             xmlns:tools="<https://schemas.android.com/tools>"
             android:id="@+id/fragmentParentViewGroup"
             android:layout_width="match_parent"
             android:layout_height="match_parent"
             tools:context=".MyActivity"
             tools:ignore="MergeRootFrame" />
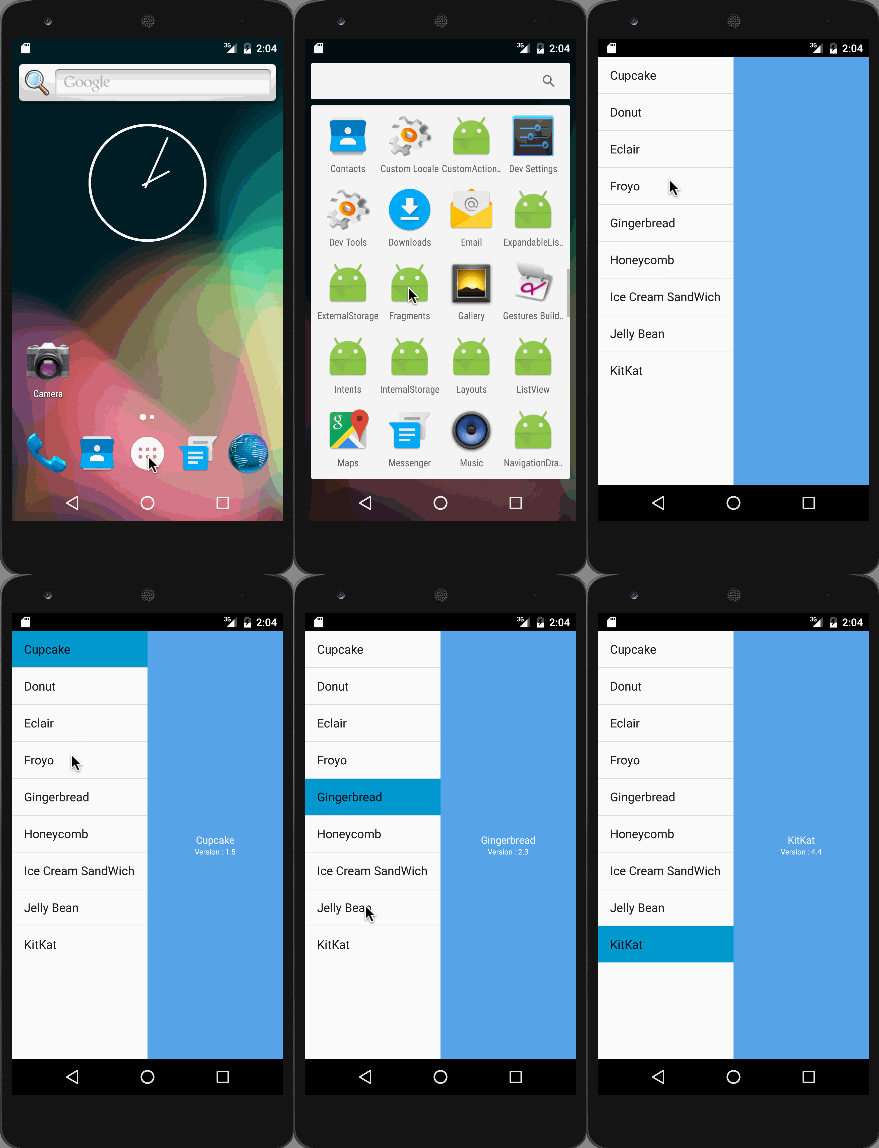
Bên dưới là ứng dụng cuối cùng. Bạn có thể thấy có hai fragment. Khi bạn chọn một mục trong fragment bên trái, dữ liệu tương ứng sẽ được hiển thị ở fragment bên phải.
Bạn có thể tải xuống toàn bộ ví dụ mẫu ở trên từ liên kết này.