Khi xây dựng REST API, JSON thường là định dạng mặc định. Nhưng trong trường hợp một client yêu cầu định dạng XML thì sao? Bài viết này sẽ hướng dẫn bạn cách cấu hình Spring REST API để trả về XML và JSON theo yêu cầu của client.

Hỗ trợ song song XML và JSON trong Spring REST API
Vì chúng ta sẽ chỉnh sửa dựa trên một project có sẵn, đầu tiên bạn cần tải nó về từ liên kết này.
Sau đây, ta sẽ thực hiện các thay đổi sau trong file cấu hình Spring bean.
- Định nghĩa một bean có kiểu là
Jaxb2RootElementHttpMessageConverter.
<beans:bean id="xmlMessageConverter" class="org.springframework.http.converter.xml.Jaxb2RootElementHttpMessageConverter">
</beans:bean>
- Thêm bean vừa được cấu hình ở trên vào thuộc tính
messageConverterscủaRequestMappingHandlerAdapter.
<beans:bean class="org.springframework.web.servlet.mvc.method.annotation.RequestMappingHandlerAdapter">
<beans:property name="messageConverters">
	<beans:list>
		<beans:ref bean="jsonMessageConverter"/>
		<beans:ref bean="xmlMessageConverter"/>
	</beans:list>
</beans:property>
</beans:bean>
Sau các thay đổi trên, file cấu hình Spring bean servlet-context.xml hoàn chỉnh của chúng ta sẽ có dạng như sau:
<?xml version="1.0" encoding="UTF-8"?>
<beans:beans xmlns="<https://www.springframework.org/schema/mvc>"
	xmlns:xsi="<https://www.w3.org/2001/XMLSchema-instance>"
	xmlns:beans="<https://www.springframework.org/schema/beans>"
	xmlns:context="<https://www.springframework.org/schema/context>"
	xsi:schemaLocation="<https://www.springframework.org/schema/mvc> <https://www.springframework.org/schema/mvc/spring-mvc.xsd>
		<https://www.springframework.org/schema/beans> <https://www.springframework.org/schema/beans/spring-beans.xsd>
		<https://www.springframework.org/schema/context> <https://www.springframework.org/schema/context/spring-context.xsd>">

	<!-- DispatcherServlet Context: defines this servlet's request-processing infrastructure -->

	<!-- Enables the Spring MVC @Controller programming model -->
	<annotation-driven />

	<!-- Handles HTTP GET requests for /resources/** by efficiently serving up static resources in the ${webappRoot}/resources directory -->
	<resources mapping="/resources/**" location="/resources/" />

	<!-- Resolves views selected for rendering by @Controllers to .jsp resources in the /WEB-INF/views directory -->
	<beans:bean class="org.springframework.web.servlet.view.InternalResourceViewResolver">
		<beans:property name="prefix" value="/WEB-INF/views/" />
		<beans:property name="suffix" value=".jsp" />
	</beans:bean>

	<!-- Configure to plugin JSON as request and response in method handler -->
	<beans:bean class="org.springframework.web.servlet.mvc.method.annotation.RequestMappingHandlerAdapter">
		<beans:property name="messageConverters">
			<beans:list>
				<beans:ref bean="jsonMessageConverter"/>
				<beans:ref bean="xmlMessageConverter"/>
			</beans:list>
		</beans:property>
	</beans:bean>

	<!-- Configure bean to convert JSON to POJO and vice versa -->
	<beans:bean id="jsonMessageConverter" class="org.springframework.http.converter.json.MappingJackson2HttpMessageConverter">
	</beans:bean>

	<beans:bean id="xmlMessageConverter" class="org.springframework.http.converter.xml.Jaxb2RootElementHttpMessageConverter">
	</beans:bean>

	<context:component-scan base-package="com.journaldev.spring.controller" />

</beans:beans>
Chúng ta đã biết để hỗ trợ việc marshal (chuyển đổi một Java object thành XML) với JAXB cho một class, ta cần thêm annotation @XmlRootElement cho class đó. Vì vậy, hãy thêm annotation này vào model class trong Employee.java.
@XmlRootElement
public class Employee implements Serializable{

//no change in code
}
Ứng dụng Spring của chúng ta giờ đây sẽ hỗ trợ cả JSON lẫn XML. Nó thậm chí còn hỗ trợ request XML đi kèm response JSON và ngược lại.
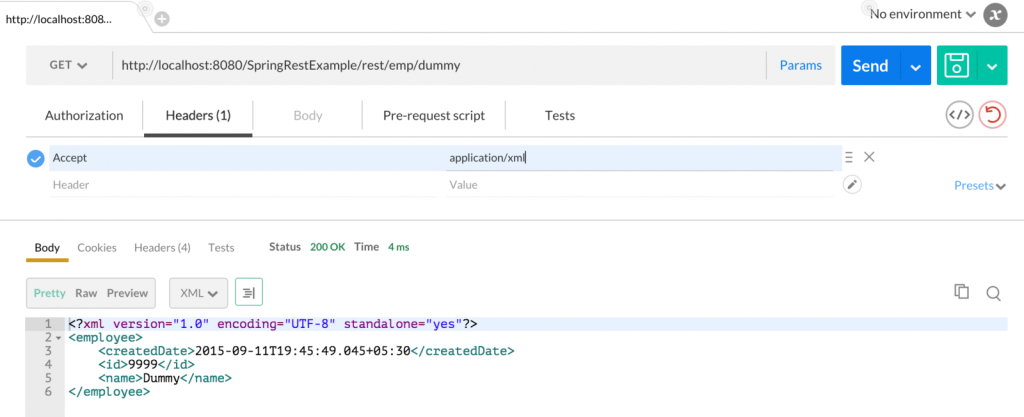
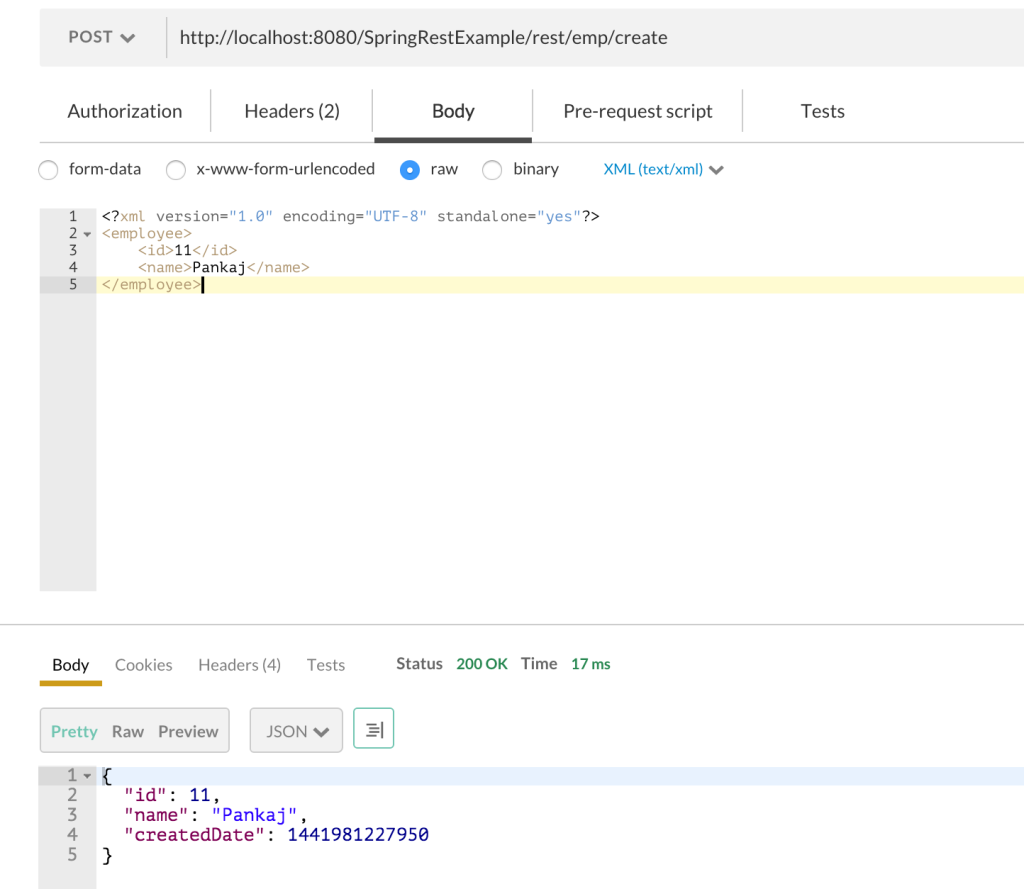
Dưới đây là một vài hình minh họa cho kết quả thực tế. Lưu ý là bài này sử dụng ứng dụng Postman trong Chrome, nhưng bạn có thể dùng bất kỳ REST client nào để kiểm thử.
Response dạng XML: Cần đảm bảo truyền header Accept là “application/xml”.

Response dạng JSON: Cần đảm bảo truyền header Accept là “application/json”.

Request XML với Response JSON: Cần đảm bảo header Accept là “application/json” và header Content-Type là “text/xml” như trong các hình dưới đây.


Tổng kết
Như vậy, chỉ với vài thay đổi nhỏ trong cấu hình và một annotation, ứng dụng Spring REST của bạn đã có thể linh hoạt phục vụ cả định dạng XML lẫn JSON. Điều này một lần nữa cho thấy sức mạnh và sự tiện lợi của Spring Framework trong việc xây dựng các web API hiện đại để đáp ứng tốt hơn các yêu cầu đa dạng từ phía client.
 3 phút để đọc
