Hôm nay, chúng ta sẽ tìm hiểu về đăng nhập và đăng xuất với Spring Security. Trước khi làm theo ví dụ này, đầu tiên bạn nên xem qua bài viết trước của chúng tôi về framework này để nắm được các kiến thức cơ bản.
Ví dụ về đăng nhập và đăng xuất với Spring Security
Trong bài viết này, chúng ta sẽ phát triển một ứng dụng web Spring 4 MVC Security với tính năng đăng nhập và đăng xuất bằng cách sử dụng tùy chọn In-Memory. Ví dụ này sử dụng Spring Java Config cùng với các Spring Annotation. Điều này có nghĩa là ta sẽ không cần dùng đến file web.xml và cấu hình Spring bằng XML như cách cũ.
Spring 4 Security Module hỗ trợ các tùy chọn sau để lưu trữ và quản lý thông tin xác thực người dùng (user credential):
In-Memory Store (lưu trữ trong bộ nhớ)
Cơ sở dữ liệu quan hệ (RDBMS)
Kho dữ liệu NoSQL
LDAP
Trong ví dụ này, ta sẽ sử dụng tùy chọn In-Memory Store. Các tùy chọn khác sẽ được đề cập trong những bài viết sau. Trong ví dụ này, chúng ta sẽ sử dụng Spring 4.0.2.RELEASE, Spring STS 3.7 Suite IDE, Spring TC Server 3.1 với Java 1.8 và công cụ build Maven.
Ví dụ đăng nhập với Spring Security
Chúng ta sẽ phát triển logic đăng nhập và đăng xuất bằng các tính năng của Spring 4 Security. Mục tiêu chính của ứng dụng này là phát triển một ứng dụng mà không cần sử dụng web.xml và không cần viết một dòng cấu hình Spring Bean bằng XML nào. Điều này có nghĩa là chúng ta sẽ sử dụng tính năng Spring Java Config với các Spring Annotation.
Ứng dụng sẽ có các tính năng sau:
Trang Chào mừng (Welcome Page)
Trang Đăng nhập (Login Page)
Trang Chủ (Home Page)
Tính năng Đăng xuất (Logout)
Hãy làm theo các bước sau để phát triển và tìm hiểu tính năng đăng nhập đơn giản trong Spring 4 Security.
Tạo một project “Simple Spring Web Maven” trong Spring STS Suite với các thông tin sau
Chúng ta đã định nghĩa hai phương thức trong LoginSecurityConfig ở file trên để lưu trữ, quản lý thông tin xác thực người dùng và xử lý các tính năng bảo mật đăng nhập và đăng xuất.
Annotation @EnableWebSecurity được dùng để kích hoạt tính năng bảo mật web trong bất kỳ ứng dụng web nào.
Annotation @EnableWebMVCSecurity được dùng để kích hoạt tính năng bảo mật web trong ứng dụng web dựa trên Spring MVC. LƯU Ý:@EnableWebSecurity = @EnableWebMVCSecurity + các tính năng bổ sung. Đó là lý do tại sao Annotation @EnableWebMVCSecurity chuẩn bị bị loại bỏ trong Spring Framework 4.x. Class LoginSecurityConfig (hoặc bất kỳ class nào được chỉ định để cấu hình Spring Security) nên kế thừa từ class WebSecurityConfigurerAdapter hoặc triển khai interface liên quan.
Phương thức configureGlobal() được sử dụng để lưu trữ và quản lý thông tin xác thực người dùng.
Trong phương thức configureGlobal(), ta có thể sử dụng phương thức authorities() để định nghĩa các role của ứng dụng như “ROLE_USER”. Ta cũng có thể sử dụng phương thức roles() cho cùng mục đích.
Sự khác biệt giữa phương thức authorities() và roles(): authorities() cần một tên role hoàn chỉnh như “ROLE_USER”, trong khi roles() chỉ cần tên role như “USER”. Nó sẽ tự động thêm tiền tố “ROLE_” vào tên role “USER”. LƯU Ý: Chúng ta sẽ phát triển một ví dụ khác để minh họa các role như “USER”, “ADMIN” trong các bài viết sắp tới.
Phương thức quan trọng để xử lý bảo mật Đăng nhập và Đăng xuất là configure(HttpSecurity http).
Đoạn code sau được sử dụng để ngăn chặn truy cập trái phép vào /homePage. Nếu cố gắng truy cập trang này, bạn sẽ tự động được chuyển hướng đến trang /loginPage.
Nếu ta bỏ đi lời gọi phương thức access(“hasRole(‘ROLE_USER’)”), thì ta có thể truy cập trang này mà không cần đăng nhập vào ứng dụng. Chúng ta đã cấu hình các tính năng đăng nhập và đăng xuất bằng các phương thức formLogin() và logout().
Kích hoạt cấu hình Spring MVC với file LoginApplicationConfig.java:
Ở đây ta sử dụng class LoginApplicationConfig để định nghĩa các View Resolver (thành phần xác định view nào sẽ render dữ liệu từ controller) của Spring MVC và tránh việc phải viết file web.xml.
Annotation @EnableWebMvc được dùng để kích hoạt các tính năng của ứng dụng Spring Web MVC trong Spring Framework.
Annotation @Import được dùng để import class cấu hình Spring Security vào class này.
Annotation @ComponentScan được dùng để quét các thành phần trong package đã chỉ định. Nó tương đương với trong cấu hình Spring XML.
Khởi tạo Spring Security với đoạn code sau:
package com.journaldev.spring.secuity.config.core;

import org.springframework.security.web.context.AbstractSecurityWebApplicationInitializer;

public class SpringSecurityInitializer extends AbstractSecurityWebApplicationInitializer {

}
SpringSecurityInitializer được dùng để đăng ký springSecurityFilterChain. Điều này giúp không cần phải viết cấu hình Filter trong file web.xml.
Khởi tạo ứng dụng Spring MVC trong file SpringMVCWebAppInitializer.java dưới đây. Class SpringMVCWebAppInitializer được sử dụng để khởi tạo DispatcherServlet mà không cần file web.xml khi cấu hình dựa trên Annotation.
Khi chúng ta truy cập ứng dụng, theo mặc định, phương thức getServletMappings() của SpringMVCWebAppInitializer sẽ cho phép truy cập URL gốc: /. Chúng ta có thể ghi đè phương thức này để chuyển hướng đến một URL khác.
Đội ngũ team Spring (Pivotal) đang xử lý vấn đề này để giảm bớt lượng code Java cần thiết bằng cách giới thiệu một annotation mới.
Chạy ví dụ đăng nhập và đăng xuất với Spring Security MVC
Để chạy ứng dụng Spring Web này, chúng ta cần một Web Container bất kỳ hỗ trợ môi trường Spring 4 và Java 8 với Servlet 3.1.0 Container.
Deploy và chạy trên server Spring TC trong Spring STS Suite. Nó sẽ tự động truy cập trang chào mừng như bên dưới.
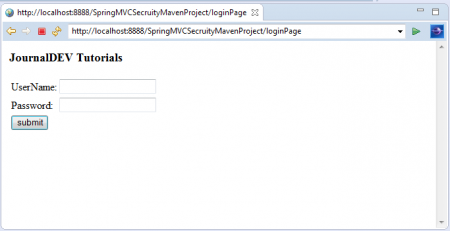
Nhấn vào liên kết Login to JournalDEV để truy cập trang đăng nhập.
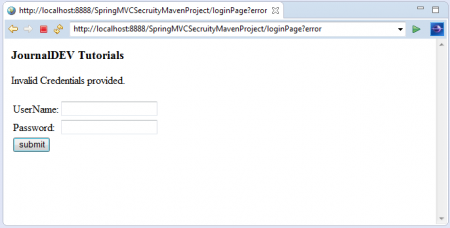
Bây giờ, hãy thử nhập thông tin đăng nhập sai và nhấn nút Login.
Ta sẽ thấy thông báo lỗi: “Invalid Credentials provided.” Nhập lại thông tin đăng nhập chính xác đã được cấu hình trong class LoginSecurityConfig.
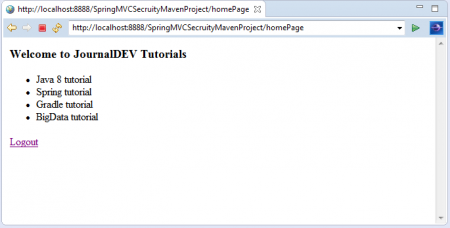
Khi đăng nhập thành công, ta sẽ thấy trang chủ của ứng dụng cùng với link Logout. Nhấn vào link Logout để đăng xuất khỏi ứng dụng.
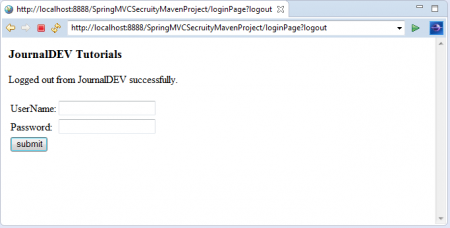
Ta sẽ thấy ứng dụng đã đăng xuất thành công kèm theo thông báo và chuyển hướng về lại trang đăng nhập.
LƯU Ý: Nếu để ý, bạn sẽ thấy ví dụ này ta không sử dụng file web.xml. Vì đây là một ứng dụng web, Maven sẽ tìm kiếm file web.xml và báo lỗi nếu không tìm thấy nó trong ứng dụng. Để tránh các vấn đề liên quan đến Maven, chúng ta cần cấu hình cờ trong file pom.xml.
Tổng kết
Trên đây là toàn bộ nội dung về cách tạo một ví dụ về đơn giản đăng nhập và đăng xuất với Spring Security. Trong các bài viết tiếp theo, chúng ta sẽ tìm hiểu thêm một số ví dụ khác không kém thực tế và hữu ích như quản lý Role, tính năng Remember-Me, và WebSocket Security.
Về tác giả
Bao TranWeb Developer
I’m passionate about web development and sharing my insights through articles, with over 8 years of experience. I hope these sharings inspire you and help build a strong web development community.
@#@
Tôi đam mê phát triển web và chia sẻ những hiểu biết của mình thông qua các bài viết, với hơn 8 năm kinh nghiệm. Tôi hy vọng những chia sẻ này sẽ truyền cảm hứng cho các bạn và giúp xây dựng một cộng đồng phát triển web mạnh mẽ.
Cập nhật thông tin mới nhấtNhận các thông tin mới nhất về mối đe dọa, báo cáo an ninh mạng từ CyStack về hòm thư điện tử của bạn
Thảo luận (0)
Đăng nhập để thảo luận
Bài viết liên quan
{"success":true,"head":"<title>Đăng nhập và đăng xuất với Spring Security - CyStack Tutorial</title>\n<meta name=\"description\" content=\"Đọc bài viết này để biết cách tạo lập quy trình đăng nhập và đăng xuất với Spring Security, những bước đầu tiên để triển khai chức năng quản lý phiên người dùng cho ứng dụng web của bạn.\"/>\n<meta name=\"robots\" content=\"index, follow, max-snippet:-1, max-video-preview:-1, max-image-preview:large\"/>\n<link rel=\"canonical\" href=\"https://blog.cystack.org/tutorial/2025/07/07/dang-nhap-va-dang-xuat-voi-spring-security/\" />\n<meta property=\"og:locale\" content=\"en_US\" />\n<meta property=\"og:type\" content=\"article\" />\n<meta property=\"og:title\" content=\"Đăng nhập và đăng xuất với Spring Security - CyStack Tutorial\" />\n<meta property=\"og:description\" content=\"Đọc bài viết này để biết cách tạo lập quy trình đăng nhập và đăng xuất với Spring Security, những bước đầu tiên để triển khai chức năng quản lý phiên người dùng cho ứng dụng web của bạn.\" />\n<meta property=\"og:url\" content=\"https://blog.cystack.org/tutorial/2025/07/07/dang-nhap-va-dang-xuat-voi-spring-security/\" />\n<meta property=\"og:site_name\" content=\"CyStack Tutorial\" />\n<meta property=\"article:tag\" content=\"vi\" />\n<meta property=\"article:section\" content=\"Java\" />\n<meta property=\"og:image\" content=\"https://s2.cystack.net/tutorial/07173310/dang-nhap-va-dang-xuat-voi-spring-security-1024x538.jpg\" />\n<meta property=\"og:image:secure_url\" content=\"https://s2.cystack.net/tutorial/07173310/dang-nhap-va-dang-xuat-voi-spring-security-1024x538.jpg\" />\n<meta property=\"og:image:width\" content=\"1024\" />\n<meta property=\"og:image:height\" content=\"538\" />\n<meta property=\"og:image:alt\" content=\"Đăng nhập và đăng xuất với Spring security\" />\n<meta property=\"og:image:type\" content=\"image/jpeg\" />\n<meta property=\"article:published_time\" content=\"2025-07-07T17:34:27+07:00\" />\n<meta name=\"twitter:card\" content=\"summary_large_image\" />\n<meta name=\"twitter:title\" content=\"Đăng nhập và đăng xuất với Spring Security - CyStack Tutorial\" />\n<meta name=\"twitter:description\" content=\"Đọc bài viết này để biết cách tạo lập quy trình đăng nhập và đăng xuất với Spring Security, những bước đầu tiên để triển khai chức năng quản lý phiên người dùng cho ứng dụng web của bạn.\" />\n<meta name=\"twitter:image\" content=\"https://s2.cystack.net/tutorial/07173310/dang-nhap-va-dang-xuat-voi-spring-security-1024x538.jpg\" />\n<meta name=\"twitter:label1\" content=\"Written by\" />\n<meta name=\"twitter:data1\" content=\"Bao Tran\" />\n<meta name=\"twitter:label2\" content=\"Time to read\" />\n<meta name=\"twitter:data2\" content=\"13 minutes\" />\n<script type=\"application/ld+json\" class=\"rank-math-schema\">{\"@context\":\"https://schema.org\",\"@graph\":[{\"@type\":[\"Person\",\"Organization\"],\"@id\":\"https://blog.cystack.org/tutorial/#person\",\"name\":\"CyStack Tutorial\"},{\"@type\":\"WebSite\",\"@id\":\"https://blog.cystack.org/tutorial/#website\",\"url\":\"https://blog.cystack.org/tutorial\",\"name\":\"CyStack Tutorial\",\"publisher\":{\"@id\":\"https://blog.cystack.org/tutorial/#person\"},\"inLanguage\":\"en-US\"},{\"@type\":\"ImageObject\",\"@id\":\"https://s2.cystack.net/tutorial/07173310/dang-nhap-va-dang-xuat-voi-spring-security.jpg\",\"url\":\"https://s2.cystack.net/tutorial/07173310/dang-nhap-va-dang-xuat-voi-spring-security.jpg\",\"width\":\"2400\",\"height\":\"1260\",\"caption\":\"\\u0110\\u0103ng nh\\u1eadp v\\u00e0 \\u0111\\u0103ng xu\\u1ea5t v\\u1edbi Spring security\",\"inLanguage\":\"en-US\"},{\"@type\":\"BreadcrumbList\",\"@id\":\"https://blog.cystack.org/tutorial/2025/07/07/dang-nhap-va-dang-xuat-voi-spring-security/#breadcrumb\",\"itemListElement\":[{\"@type\":\"ListItem\",\"position\":\"1\",\"item\":{\"@id\":\"https://blog.cystack.org/tutorial\",\"name\":\"Home\"}},{\"@type\":\"ListItem\",\"position\":\"2\",\"item\":{\"@id\":\"https://blog.cystack.org/tutorial/category/java/\",\"name\":\"Java\"}},{\"@type\":\"ListItem\",\"position\":\"3\",\"item\":{\"@id\":\"https://blog.cystack.org/tutorial/2025/07/07/dang-nhap-va-dang-xuat-voi-spring-security/\",\"name\":\"\\u0110\\u0103ng nh\\u1eadp v\\u00e0 \\u0111\\u0103ng xu\\u1ea5t v\\u1edbi Spring Security\"}}]},{\"@type\":\"WebPage\",\"@id\":\"https://blog.cystack.org/tutorial/2025/07/07/dang-nhap-va-dang-xuat-voi-spring-security/#webpage\",\"url\":\"https://blog.cystack.org/tutorial/2025/07/07/dang-nhap-va-dang-xuat-voi-spring-security/\",\"name\":\"\\u0110\\u0103ng nh\\u1eadp v\\u00e0 \\u0111\\u0103ng xu\\u1ea5t v\\u1edbi Spring Security - CyStack Tutorial\",\"datePublished\":\"2025-07-07T17:34:27+07:00\",\"dateModified\":\"2025-07-07T17:34:27+07:00\",\"isPartOf\":{\"@id\":\"https://blog.cystack.org/tutorial/#website\"},\"primaryImageOfPage\":{\"@id\":\"https://s2.cystack.net/tutorial/07173310/dang-nhap-va-dang-xuat-voi-spring-security.jpg\"},\"inLanguage\":\"en-US\",\"breadcrumb\":{\"@id\":\"https://blog.cystack.org/tutorial/2025/07/07/dang-nhap-va-dang-xuat-voi-spring-security/#breadcrumb\"}},{\"@type\":\"Person\",\"@id\":\"https://blog.cystack.org/tutorial/author/baotran/\",\"name\":\"Bao Tran\",\"url\":\"https://blog.cystack.org/tutorial/author/baotran/\",\"image\":{\"@type\":\"ImageObject\",\"@id\":\"https://secure.gravatar.com/avatar/0cdd33c02ec4a531fcf557b9c1ccc276df0c69031b2382c959bcf335248e840c?s=96&d=mm&r=g\",\"url\":\"https://secure.gravatar.com/avatar/0cdd33c02ec4a531fcf557b9c1ccc276df0c69031b2382c959bcf335248e840c?s=96&d=mm&r=g\",\"caption\":\"Bao Tran\",\"inLanguage\":\"en-US\"}},{\"@type\":\"BlogPosting\",\"headline\":\"\\u0110\\u0103ng nh\\u1eadp v\\u00e0 \\u0111\\u0103ng xu\\u1ea5t v\\u1edbi Spring Security - CyStack Tutorial\",\"keywords\":\"\\u0111\\u0103ng nh\\u1eadp v\\u00e0 \\u0111\\u0103ng xu\\u1ea5t v\\u1edbi Spring Security\",\"datePublished\":\"2025-07-07T17:34:27+07:00\",\"dateModified\":\"2025-07-07T17:34:27+07:00\",\"articleSection\":\"Java\",\"author\":{\"@id\":\"https://blog.cystack.org/tutorial/author/baotran/\",\"name\":\"Bao Tran\"},\"publisher\":{\"@id\":\"https://blog.cystack.org/tutorial/#person\"},\"description\":\"\\u0110\\u1ecdc b\\u00e0i vi\\u1ebft n\\u00e0y \\u0111\\u1ec3 bi\\u1ebft c\\u00e1ch t\\u1ea1o l\\u1eadp quy tr\\u00ecnh \\u0111\\u0103ng nh\\u1eadp v\\u00e0 \\u0111\\u0103ng xu\\u1ea5t v\\u1edbi Spring Security, nh\\u1eefng b\\u01b0\\u1edbc \\u0111\\u1ea7u ti\\u00ean \\u0111\\u1ec3 tri\\u1ec3n khai ch\\u1ee9c n\\u0103ng qu\\u1ea3n l\\u00fd phi\\u00ean ng\\u01b0\\u1eddi d\\u00f9ng cho \\u1ee9ng d\\u1ee5ng web c\\u1ee7a b\\u1ea1n.\",\"name\":\"\\u0110\\u0103ng nh\\u1eadp v\\u00e0 \\u0111\\u0103ng xu\\u1ea5t v\\u1edbi Spring Security - CyStack Tutorial\",\"@id\":\"https://blog.cystack.org/tutorial/2025/07/07/dang-nhap-va-dang-xuat-voi-spring-security/#richSnippet\",\"isPartOf\":{\"@id\":\"https://blog.cystack.org/tutorial/2025/07/07/dang-nhap-va-dang-xuat-voi-spring-security/#webpage\"},\"image\":{\"@id\":\"https://s2.cystack.net/tutorial/07173310/dang-nhap-va-dang-xuat-voi-spring-security.jpg\"},\"inLanguage\":\"en-US\",\"mainEntityOfPage\":{\"@id\":\"https://blog.cystack.org/tutorial/2025/07/07/dang-nhap-va-dang-xuat-voi-spring-security/#webpage\"}}]}</script>\n"}