
Việc tải lên tệp là một tính năng không thể thiếu trong hầu hết các ứng dụng web hiện đại. Từ việc tải lên ảnh đại diện, tài liệu, đến các tệp media, khả năng này đóng vai trò cực kỳ quan trọng trong trải nghiệm người dùng và chức năng của ứng dụng. Trước đây, chúng ta đã tìm hiểu qua cách xử lý tải tệp trong Servlet thuần và Struts2.

Hôm nay, tôi sẽ dẫn bạn đi sâu vào cách triển khai tính năng này trong Spring Framework, cụ thể là Spring MVC File Upload, cho cả tệp đơn và nhiều tệp.
Upload file trong Spring MVC
Framework Spring MVC hỗ trợ mạnh mẽ việc tải lên tệp bằng cách tích hợp API Apache Commons FileUpload. Quy trình triển khai rất đơn giản, chỉ yêu cầu một vài cấu hình cơ bản. Chúng ta sẽ xây dựng một dự án Spring MVC mẫu và tập trung vào những thay đổi cốt lõi cần thiết để tận dụng khả năng tích hợp tải tệp của Spring.
1. Maven Dependencies cho Apache Commons FileUpload
Đầu tiên, chúng ta cần thêm các dependency của Apache Commons FileUpload vào tệp pom.xml của dự án. Điều này đảm bảo rằng các tệp JAR cần thiết sẽ có mặt trong ứng dụng web của chúng ta. Dưới đây là đoạn mã dependency từ tệp pom.xml của tôi:
	commons-fileupload
	commons-fileupload
	1.3.1


	commons-io
	commons-io
	2.4
Dependency commons-fileupload cung cấp các lớp cốt lõi để xử lý dữ liệu tệp được tải lên (multipart requests), trong khi commons-io hỗ trợ các thao tác vào/ra (I/O) hiệu quả, giúp chúng ta dễ dàng đọc và ghi tệp.
2. Spring File Upload Form Views
Tiếp theo, chúng ta sẽ tạo hai trang JSP đơn giản để cho phép người dùng tải lên một tệp hoặc nhiều tệp trong ứng dụng web Spring.
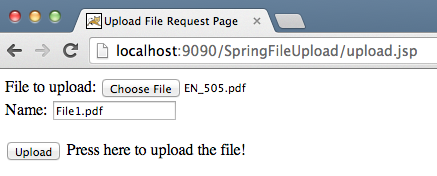
Mã JSP cho upload.jsp (tải lên tệp đơn):
<%@ taglib uri="" prefix="c" %>
<%@ page session="false" %>
Upload File Request Page
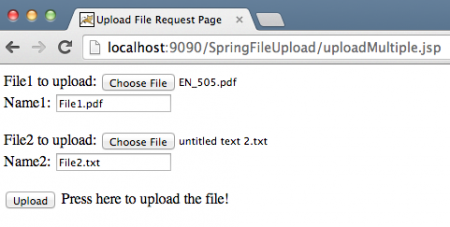
Mã JSP cho uploadMultiple.jsp (tải lên nhiều tệp):
<%@ taglib uri="" prefix="c" %>
<%@ page session="false" %>
Upload Multiple File Request Page
Hãy chú ý, các tệp này là các tệp HTML đơn giản tôi không sử dụng bất kỳ thẻ JSP hay Spring phức tạp nào để giữ cho ví dụ dễ hiểu. Điểm quan trọng cần lưu ý là thuộc tính enctype của form phải là multipart/form-data. Điều này giúp ứng dụng web Spring nhận biết rằng yêu cầu chứa dữ liệu tệp và cần được xử lý đặc biệt.
Ngoài ra, đối với việc tải lên nhiều tệp, các trường form name và file trong các thẻ input đều có cùng tên (name="file" và name="name"). Điều này giúp dữ liệu được gửi dưới dạng mảng (array) đến server, và chúng ta sẽ dễ dàng xử lý các tệp theo cặp tên-tệp trên server.
3. Cấu Hình Spring MVC Multipart
Để Spring sử dụng Apache Commons FileUpload xử lý các request multipart, chúng ta chỉ cần cấu hình một bean multipartResolver với class là org.springframework.web.multipart.commons.CommonsMultipartResolver. Tệp cấu hình Spring cuối cùng của chúng ta (ví dụ: servlet-context.xml) sẽ trông như sau:
Trong cấu hình này, tôi đã thiết lập giới hạn kích thước tải lên tối đa (maxUploadSize) là 100000 byte (khoảng 100KB) cho bean multipartResolver. Bạn có thể điều chỉnh giá trị này tùy theo nhu cầu của ứng dụng.
Nếu bạn xem mã nguồn của lớp DispatcherServlet, bạn sẽ thấy một biến MultipartResolver với tên multipartResolver được định nghĩa và khởi tạo trong phương thức initMultipartResolver:
private void initMultipartResolver(ApplicationContext context)
  {
    try
    {
      this.multipartResolver = ((MultipartResolver)context.getBean("multipartResolver", MultipartResolver.class));
      if (this.logger.isDebugEnabled()) {
        this.logger.debug("Using MultipartResolver [" + this.multipartResolver + "]");
      }
    }
    catch (NoSuchBeanDefinitionException ex)
    {
      this.multipartResolver = null;
      if (this.logger.isDebugEnabled())
        this.logger.debug("Unable to locate MultipartResolver with name 'multipartResolver': no multipart request handling provided");
    }
  }
Với cấu hình này, bất kỳ request nào có enctype là multipart/form-data sẽ được multipartResolver xử lý và phân tích trước khi chuyển đến lớp Controller của chúng ta.
4. Spring File Upload Controller Class
Lớp Controller của chúng ta khá đơn giản. Chúng ta cần định nghĩa các phương thức xử lý (handler methods) cho các URI /uploadFile và /uploadMultipleFile.
Mã FileUploadController.java:
package com.journaldev.spring.controller;
import java.io.BufferedOutputStream;
import java.io.File;
import java.io.FileOutputStream;
import org.slf4j.Logger;
import org.slf4j.LoggerFactory;
import org.springframework.stereotype.Controller;
import org.springframework.web.bind.annotation.RequestMapping;
import org.springframework.web.bind.annotation.RequestMethod;
import org.springframework.web.bind.annotation.RequestParam;
import org.springframework.web.bind.annotation.ResponseBody;
import org.springframework.web.multipart.MultipartFile;
/**
* Handles requests for the application file upload requests
*/
@Controller
public class FileUploadController {
private static final Logger logger = LoggerFactory
.getLogger(FileUploadController.class);
/**
* Upload single file using Spring Controller
*/
@RequestMapping(value = "/uploadFile", method = RequestMethod.POST)
public @ResponseBody
String uploadFileHandler(@RequestParam("name") String name,
@RequestParam("file") MultipartFile file) {
if (!file.isEmpty()) {
try {
byte[] bytes = file.getBytes();
// Creating the directory to store file
String rootPath = System.getProperty("catalina.home");
File dir = new File(rootPath + File.separator + "tmpFiles");
if (!dir.exists())
dir.mkdirs();
// Create the file on server
File serverFile = new File(dir.getAbsolutePath()
+ File.separator + name);
BufferedOutputStream stream = new BufferedOutputStream(
new FileOutputStream(serverFile));
stream.write(bytes);
stream.close();
logger.info("Server File Location="
+ serverFile.getAbsolutePath());
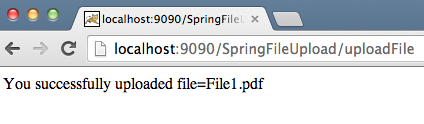
return "You successfully uploaded file=" + name;
} catch (Exception e) {
return "You failed to upload " + name + " => " + e.getMessage();
}
} else {
return "You failed to upload " + name
+ " because the file was empty.";
}
}
/**
* Upload multiple file using Spring Controller
*/
@RequestMapping(value = "/uploadMultipleFile", method = RequestMethod.POST)
public @ResponseBody
String uploadMultipleFileHandler(@RequestParam("name") String[] names,
@RequestParam("file") MultipartFile[] files) {
if (files.length != names.length)
return "Mandatory information missing";
String message = "";
for (int i = 0; i < files.length; i++) {
MultipartFile file = files[i];
String name = names[i];
try {
byte[] bytes = file.getBytes();
// Creating the directory to store file
String rootPath = System.getProperty("catalina.home");
File dir = new File(rootPath + File.separator + "tmpFiles");
if (!dir.exists())
dir.mkdirs();
// Create the file on server
File serverFile = new File(dir.getAbsolutePath()
+ File.separator + name);
BufferedOutputStream stream = new BufferedOutputStream(
new FileOutputStream(serverFile));
stream.write(bytes);
stream.close();
logger.info("Server File Location="
+ serverFile.getAbsolutePath());
message = message + "You successfully uploaded file=" + name
+ "
";
} catch (Exception e) {
return "You failed to upload " + name + " => " + e.getMessage();
}
}
return message;
}
}
Hãy lưu ý cách chúng ta sử dụng các annotation của Spring như @Controller, @RequestMapping, @RequestParam, và @ResponseBody. Những annotation này giúp cuộc sống của lập trình viên dễ dàng hơn và mã nguồn trở nên dễ đọc hơn nhiều.
- Phương thức
uploadFileHandlerxử lý kịch bản tải lên tệp đơn. - Phương thức
uploadMultipleFileHandlerxử lý kịch bản tải lên nhiều tệp. @ResponseBodychỉ ra rằng giá trị trả về của phương thức sẽ được ghi trực tiếp vào phản hồi HTTP body, thay vì phân giải thành một view.
Trên thực tế, bạn có thể tổ chức code một cách linh hoạt hơn, thậm chí có thể sử dụng một phương thức duy nhất để xử lý cả hai kịch bản tải lên tệp đơn và nhiều tệp bằng cách kiểm tra số lượng tệp nhận được.
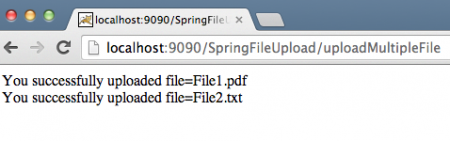
5. Triển Khai và Kiểm Tra
Kết Luận
Tóm lại, việc triển khai tính năng tải lên tệp trong Spring MVC đòi hỏi chúng ta phải cấu hình đúng các dependency Maven (commons-fileupload, commons-io), thiết lập enctype="multipart/form-data" cho form HTML, định nghĩa bean multipartResolver trong cấu hình Spring với lớp CommonsMultipartResolver, và viết logic xử lý tệp trong Controller bằng cách sử dụng đối tượng MultipartFile và các phương thức lưu tệp vào hệ thống. Với những bước cơ bản nhưng mạnh mẽ này, bạn đã sẵn sàng tích hợp khả năng tải lên tệp một cách hiệu quả vào các dự án Spring của mình.