
- Sản phẩm & Dịch vụSản phẩm & Dịch vụ
- Giải phápGiải pháp
- Bảng giáBảng giá
- Công tyCông ty
- Tài liệuTài liệu

vi
vi
Chuyên mục với các bài viết hướng dẫn, nghiên cứu và phân tích chi tiết về kỹ thuật, các xu hướng công nghệ mới nhất dành cho lập trình viên.

Web Developer

I’m passionate about web development and sharing my insights through articles, with over 8 years of experience. I hope these sharings inspire you and help build a strong web development community. @#@ Tôi đam mê phát triển web và chia sẻ những hiểu biết của mình thông qua các bài viết, với hơn 8 năm kinh nghiệm. Tôi hy vọng những chia sẻ này sẽ truyền cảm hứng cho các bạn và giúp xây dựng một cộng đồng phát triển web mạnh mẽ.
Thảo luận (0)
Đăng nhập để thảo luận
Chào mừng bạn đến với hướng dẫn lập trình RESTful Web Service với Jersey. Gần đây, tôi bắt đầu làm việc với một dự án web service Restful sử dụng framework JAX-RS Jersey.
1. Đối tượng sử dụng hướng dẫn này
Hướng dẫn này dành cho các lập trình viên Java quan tâm đến việc phát triển và triển khai các Restful Web Services sử dụng API JAX-RS và JAXB.
2. Điều kiện tiên quyết
Phạm vi của hướng dẫn này là sử dụng API Jersey để tạo các web service Restful và gọi web service bằng chương trình client Java cũng như kiểm thử web service bằng công cụ. Việc có hiểu biết cơ bản về Java, Web Services, XML, Maven và bất kỳ application server nào (JBoss/Tomcat) là cần thiết để dễ dàng nắm bắt hướng dẫn.
1.8.0_1313.5.310.13.48.5.16Oxygen 4.7.3
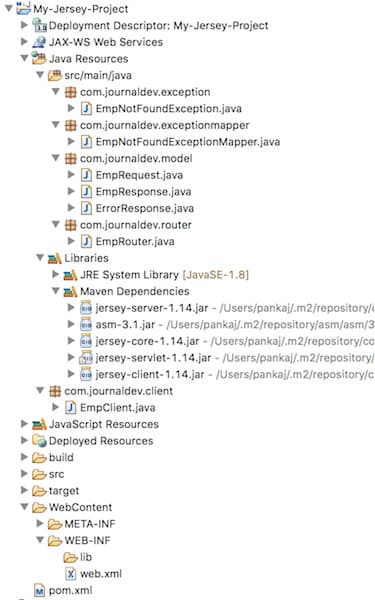
Tạo một “Dynamic Web Project” trong Eclipse rồi sau đó chuyển đổi nó sang dự án Maven. Việc này sẽ cung cấp cho chúng ta một dự án ứng dụng web cơ bản dựa trên Maven. Tôi đã đặt GroupId là com.journaldev.jersey và ArtifactId là my-jersey-project, nhưng bạn có thể đặt bất cứ thứ gì bạn muốn. Khi chúng ta hoàn tất việc phát triển dự án, cấu trúc dự án sẽ trông giống như hình bên dưới.
pom.xml: Chi tiết cấu hình của dự án – lưu ý các dependency của Jersey được khai báo, các thông tin còn lại là phần cấu hình chung của bất kỳ project Maven tương tự nào.<project xmlns="<https://maven.apache.org/POM/4.0.0>" xmlns:xsi="<https://www.w3.org/2001/XMLSchema-instance>" xsi:schemaLocation="<https://maven.apache.org/POM/4.0.0> <https://maven.apache.org/xsd/maven-4.0.0.xsd>"> <modelVersion>4.0.0</modelVersion> <groupId>com.journaldev.jersey</groupId> <artifactId>my-jersey-project</artifactId> <version>0.0.1-SNAPSHOT</version> <packaging>war</packaging><dependencies> <dependency> <groupId>com.sun.jersey</groupId> <artifactId>jersey-server</artifactId> <version>1.14</version> </dependency> <dependency> <groupId>com.sun.jersey</groupId> <artifactId>jersey-servlet</artifactId> <version>1.14</version> </dependency> <dependency> <groupId>com.sun.jersey</groupId> <artifactId>jersey-client</artifactId> <version>1.14</version> </dependency> </dependencies> <build> <finalName>My-Jersey-Project</finalName> <plugins> <plugin> <artifactId>maven-compiler-plugin</artifactId> <version>3.7.0</version> <configuration> <source>1.8</source> <target>1.8</target> </configuration> </plugin> <plugin> <artifactId>maven-war-plugin</artifactId> <version>3.0.0</version> <configuration> <warSourceDirectory>WebContent</warSourceDirectory> </configuration> </plugin> </plugins> </build></project>
@XmlRootElement để ánh xạ lớp này tới một phần tử XML.package com.journaldev.model;import javax.xml.bind.annotation.XmlRootElement;
@XmlRootElement(name = "empRequest") public class EmpRequest { private int id; private String name;
public int getId() { return id; } public void setId(int id) { this.id = id; } public String getName() { return name; } public void setName(String name) { this.name = name; }}
package com.journaldev.model;import javax.xml.bind.annotation.XmlRootElement;
@XmlRootElement(name = "empResponse") public class EmpResponse { private int id; private String name;
public int getId() { return id; } public void setId(int id) { this.id = id; } public String getName() { return name; } public void setName(String name) { this.name = name; }}
package com.journaldev.model;import javax.xml.bind.annotation.XmlRootElement;
@XmlRootElement(name = "empResponse") public class EmpResponse { private int id; private String name;
public int getId() { return id; } public void setId(int id) { this.id = id; } public String getName() { return name; } public void setName(String name) { this.name = name; }}
package com.journaldev.exception;public class EmpNotFoundException extends Exception {
private static final long serialVersionUID = 4351720088030656859L; private int errorId; public int getErrorId() { return errorId; } public EmpNotFoundException(String msg, int errorId) { super(msg); this.errorId = errorId; } public EmpNotFoundException(String msg, Throwable cause) { super(msg, cause); }}
https://<HOST>:<PORT>/My-Jersey-Project/rest/* sẽ được xử lý bởi servlet Jersey ServletContainer. Giá trị init-param được truyền cho "com.sun.jersey.config.property.packages" định nghĩa gói mà Jersey sẽ tìm kiếm các lớp web service. Thuộc tính này phải trỏ đến các resources classes (lớp tài nguyên) của bạn. Nó cũng tìm kiếm các lớp tài nguyên trong các sub-packages (gói con).<?xml version="1.0" encoding="UTF-8"?> <web-app xmlns:xsi="<https://www.w3.org/2001/XMLSchema-instance>" xmlns="<https://java.sun.com/xml/ns/javaee>" xsi:schemaLocation="<https://java.sun.com/xml/ns/javaee> <https://java.sun.com/xml/ns/javaee/web-app_3_0.xsd>" id="WebApp_ID" version="3.0"> <display-name>My Jersey Project</display-name><!-- Jersey Servlet configurations --> <servlet> <servlet-name>Jersey REST Service</servlet-name> <servlet-class>com.sun.jersey.spi.container.servlet.ServletContainer</servlet-class> <init-param> <param-name>com.sun.jersey.config.property.packages</param-name> <param-value>com.journaldev</param-value> </init-param> <load-on-startup>1</load-on-startup> </servlet> <servlet-mapping> <servlet-name>Jersey REST Service</servlet-name> <url-pattern>/rest/*</url-pattern> </servlet-mapping> <!-- Jersey Servlet configurations --></web-app>
@Path(“/emp”): Tất cả các yêu cầu với URI https://<HOST>:<PORT>/My-Jersey-Project/rest/emp/ sẽ được xử lý bởi lớp resource này.@Path(“/getEmp”): Tất cả các yêu cầu với URI https://<HOST>:<PORT>/My-Jersey-Project/rest/emp/getEmp sẽ được xử lý bởi phương thức này.@POST: Annotation này định nghĩa rằng phương thức HTTP được sử dụng phải là POST. Một số giá trị khả dĩ khác là @GET, @PUT, @DELETE.@Consumes(MediaType.APPLICATION_XML): Phương thức chấp nhận phần tử XML.@Produces(MediaType.APPLICATION_XML): Phương thức trả về phần tử XML.package com.journaldev.router;import com.journaldev.exception.EmpNotFoundException; import com.journaldev.model.*;
import javax.ws.rs.Consumes; import javax.ws.rs.POST; import javax.ws.rs.Path; import javax.ws.rs.Produces; import javax.ws.rs.core.MediaType; import javax.ws.rs.core.Response; import javax.xml.bind.JAXBElement;
@Path("/emp") public class EmpRouter {
@POST @Path("/getEmp") @Consumes(MediaType.APPLICATION_XML) @Produces(MediaType.APPLICATION_XML) public Response getEmp(JAXBElement<EmpRequest> empRequest) throws EmpNotFoundException { EmpResponse empResponse = new EmpResponse(); if (empRequest.getValue().getId() == 1) { empResponse.setId(empRequest.getValue().getId()); empResponse.setName(empRequest.getValue().getName()); } else { throw new EmpNotFoundException("Wrong ID", empRequest.getValue() .getId()); } return Response.ok(empResponse).build(); }}
EmpNotFoundExceptionMapper.java: Lớp Exception Mapper dùng để ánh xạ EmpNotFoundException sang một đối tượng Response. Lớp này cần có annotation @Provider. Nó cũng cần nằm trong package được khai báo cho resource classes trong web.xml. Việc triển khai phương thức toResponse() sẽ tạo ra một đối tượng ErrorResponse và thiết lập nó làm entity trong đối tượng Response với status là INTERNAL_SERVER_ERRORpackage com.journaldev.exceptionmapper;import javax.ws.rs.core.MediaType; import javax.ws.rs.core.Response; import javax.ws.rs.ext.ExceptionMapper; import javax.ws.rs.ext.Provider;
import com.journaldev.exception.EmpNotFoundException; import com.journaldev.model.ErrorResponse;
@Provider public class EmpNotFoundExceptionMapper implements ExceptionMapper<EmpNotFoundException> {
public EmpNotFoundExceptionMapper() { } public Response toResponse( EmpNotFoundException empNotFoundException) { ErrorResponse errorResponse = new ErrorResponse(); errorResponse.setErrorId(empNotFoundException.getErrorId()); errorResponse.setErrorCode(empNotFoundException.getMessage()); return Response.status(Response.Status.INTERNAL_SERVER_ERROR).entity( errorResponse).type( MediaType.APPLICATION_XML).build(); }}
Web service của chúng ta đã sẵn sàng, chỉ cần build nó để tạo tệp WAR và deploy lên application server.
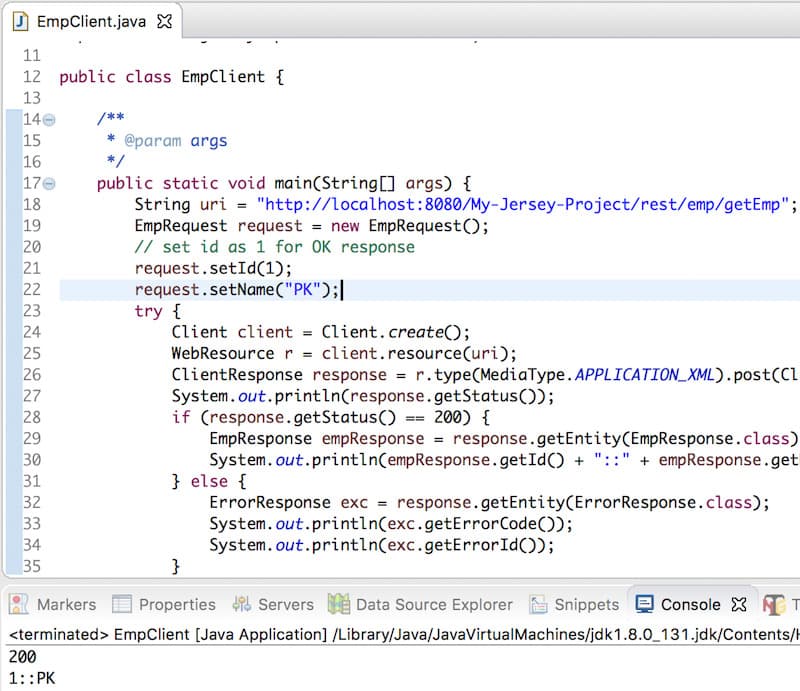
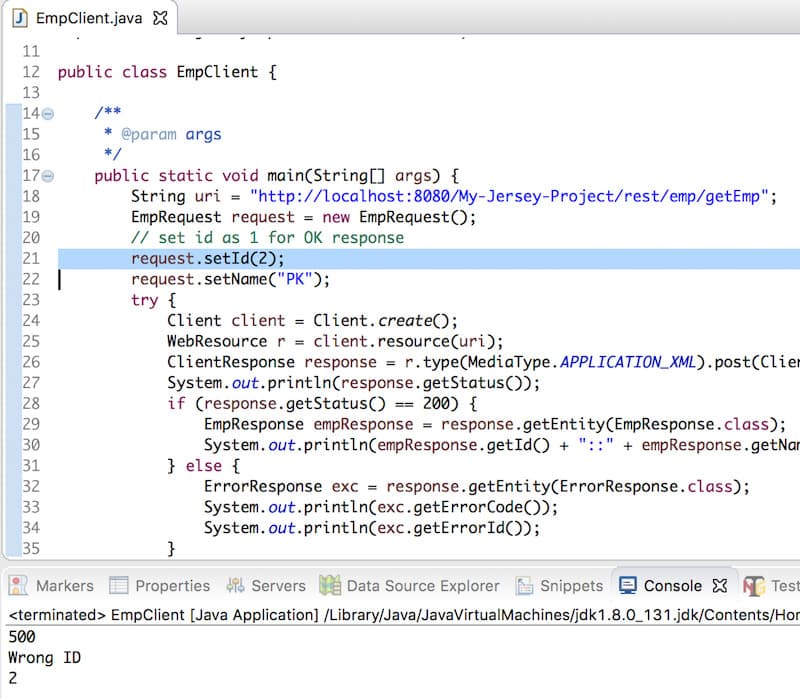
Chúng ta có thể sử dụng Jersey Client để gọi đến web service và nhận phản hồi một cách lập trình. EmpClient.java: Đây là một chương trình Java mẫu dùng để gọi web service của chúng ta. Chúng ta sử dụng Jersey Client API để gọi service, và dựa vào response status, chúng ta phân tích dữ liệu trả về thành lớp EmpResponse hoặc ErrorResponse.
package com.journaldev.client;import javax.ws.rs.core.MediaType;
import com.journaldev.model.EmpRequest; import com.journaldev.model.EmpResponse; import com.journaldev.model.ErrorResponse; import com.sun.jersey.api.client.Client; import com.sun.jersey.api.client.ClientResponse; import com.sun.jersey.api.client.WebResource;
public class EmpClient {
/** * @param args */ public static void main(String[] args) { String uri = "<https://localhost:8080/My-Jersey-Project/rest/emp/getEmp>"; EmpRequest request = new EmpRequest(); // set id as 1 for OK response request.setId(2); request.setName("PK"); try { Client client = Client.create(); WebResource r = client.resource(uri); ClientResponse response = r.type(MediaType.APPLICATION_XML).post(ClientResponse.class, request); System.out.println(response.getStatus()); if (response.getStatus() == 200) { EmpResponse empResponse = response.getEntity(EmpResponse.class); System.out.println(empResponse.getId() + "::" + empResponse.getName()); } else { ErrorResponse exc = response.getEntity(ErrorResponse.class); System.out.println(exc.getErrorCode()); System.out.println(exc.getErrorId()); } } catch (Exception e) { System.out.println(e.getMessage()); } }}
Phản hồi thành công
Phản hồi lỗi
Trong bài đăng này, chúng ta đã tìm hiểu cách tạo một REST web service sử dụng Jersey API. Chúng ta cũng đã xem xét Jersey Client để gọi các REST API của mình thông qua chương trình Java.