
- Sản phẩm & Dịch vụSản phẩm & Dịch vụ
- Giải phápGiải pháp
- Bảng giáBảng giá
- Công tyCông ty
- Tài liệuTài liệu

vi
vi
Chuyên mục với các bài viết hướng dẫn, nghiên cứu và phân tích chi tiết về kỹ thuật, các xu hướng công nghệ mới nhất dành cho lập trình viên.

Technical Writer

I have over 5 years of experience writing technical documentation for tech products, making them accessible and user-friendly. My focus is always on providing clear and precise information. @#@ Tôi đã có hơn 5 năm kinh nghiệm viết tài liệu kỹ thuật cho các sản phẩm công nghệ, giúp người dùng dễ dàng tiếp cận và sử dụng. Tôi luôn tập trung vào việc cung cấp thông tin chính xác và dễ hiểu.
Thảo luận (0)
Đăng nhập để thảo luận
Trong bài viết này, chúng ta sẽ xây dựng một ứng dụng Spring Boot mẫu và tích hợp Redis cache vào đó. Redis là một kho lưu trữ cấu trúc dữ liệu trong bộ nhớ (in-memory) mã nguồn mở, thường được dùng làm database, cache và message broker (trình trung gian truyền thông điệp). Trong khuôn khổ bài này, ta sẽ chỉ tập trung vào việc tích hợp cache.

Chúng ta sẽ dùng công cụ Spring Initializr để khởi tạo nhanh dự án. Ta sẽ cần 3 dependency như hình bên dưới:
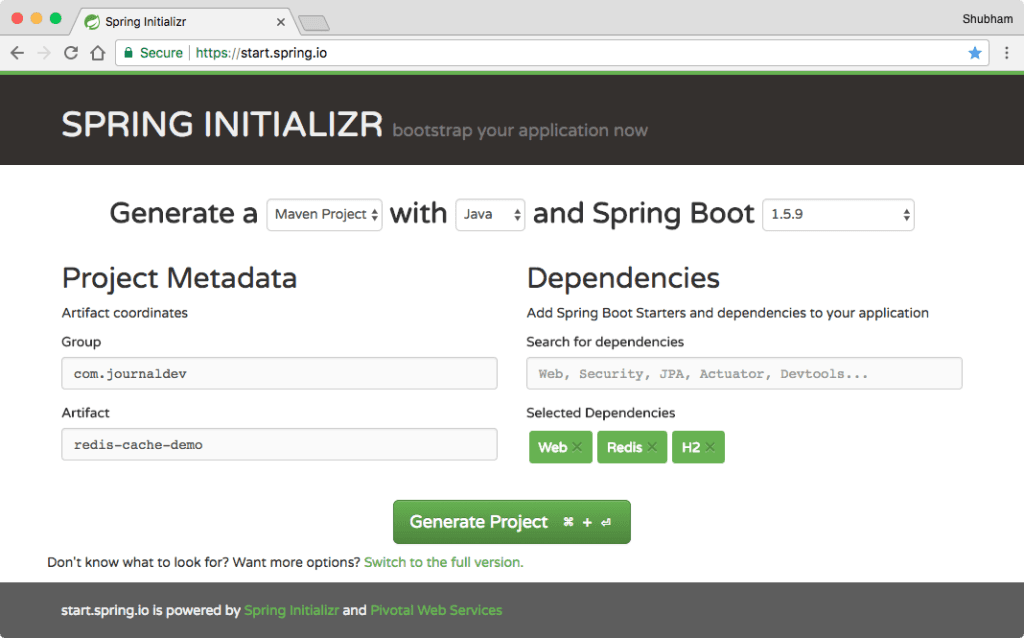
Tải dự án về và giải nén. Ta dùng dependency của H2 Database vì chúng ta sẽ sử dụng một database nhúng, vốn sẽ mất toàn bộ dữ liệu mỗi khi ứng dụng dừng lại.
Mặc dù chúng ta đã hoàn tất việc thiết lập bằng công cụ trên, nếu bạn muốn thiết lập thủ công, chúng ta sẽ sử dụng hệ thống build Maven cho dự án này. Đây là các dependency cần dùng:
<parent>
  <groupId>org.springframework.boot</groupId>
  <artifactId>spring-boot-starter-parent</artifactId>
  <version>1.5.9.RELEASE</version>
  <relativePath/> <!-- lookup parent from repository -->
</parent>
<properties>
  <project.build.sourceEncoding>UTF-8</project.build.sourceEncoding>
  <project.reporting.outputEncoding>UTF-8</project.reporting.outputEncoding>
  <java.version>1.8</java.version>
</properties>
<dependencies>
  <dependency>
     <groupId>org.springframework.boot</groupId>
     <artifactId>spring-boot-starter-data-redis</artifactId>
  </dependency>
<dependency>
<groupId>org.springframework.boot</groupId>
<artifactId>spring-boot-starter-web</artifactId>
</dependency>
<dependency>
<groupId>org.springframework.boot</groupId>
<artifactId>spring-boot-starter-test</artifactId>
<scope>test</scope>
</dependency>
<!-- for JPA support -->
<dependency>
<groupId>org.springframework.boot</groupId>
<artifactId>spring-boot-starter-data-jpa</artifactId>
</dependency>
<!-- for embedded database support -->
<dependency>
<groupId>com.h2database</groupId>
<artifactId>h2</artifactId>
<scope>runtime</scope>
</dependency>
</dependencies>
<build>
<plugins>
<plugin>
<groupId>org.springframework.boot</groupId>
<artifactId>spring-boot-maven-plugin</artifactId>
</plugin>
</plugins>
</build>
Đảm bảo rằng bạn sử dụng phiên bản ổn định (stable version) của Spring Boot từ Maven Central.
Để lưu một đối tượng vào Redis, chúng ta cần định nghĩa một đối tượng model Person với các trường cơ bản:
package com.journaldev.rediscachedemo;import javax.persistence.*; import java.io.Serializable;
@Entity public class User implements Serializable {
private static final long serialVersionUID = 7156526077883281623L; @Id @SequenceGenerator(name = "SEQ_GEN", sequenceName = "SEQ_USER", allocationSize = 1) @GeneratedValue(strategy = GenerationType.SEQUENCE, generator = "SEQ_GEN") private Long id; private String name; private long followers; public User() { } public User(String name, long followers) { this.name = name; this.followers = followers; } //standard getters and setters @Override public String toString() { return String.format("User{id=%d, name='%s', followers=%d}", id, name, followers); }}
Đây là một POJO tiêu chuẩn với các phương thức getter và setter (các phương thức lấy và thiết lập thuộc tính).
Khi Spring Boot và các dependency cần thiết đã được thêm vào Maven, ta có thể cấu hình một thực thể Redis cục bộ chỉ với ba dòng sau trong file application.properties:
# Redis Config
spring.cache.type=redis
spring.redis.host=localhost
spring.redis.port=6379
Ngoài ra, hãy thêm annotation @EnableCaching vào class chính của Spring Boot:
package com.journaldev.rediscachedemo;import org.slf4j.Logger; import org.slf4j.LoggerFactory; import org.springframework.beans.factory.annotation.Autowired; import org.springframework.boot.CommandLineRunner; import org.springframework.boot.SpringApplication; import org.springframework.boot.autoconfigure.SpringBootApplication; import org.springframework.cache.annotation.EnableCaching;
@SpringBootApplication @EnableCaching public class Application implements CommandLineRunner {
private final Logger LOG = LoggerFactory.getLogger(getClass()); private final UserRepository userRepository;
@Autowired public Application(UserRepository userRepository) { this.userRepository = userRepository; }
public static void main(String[] args) { SpringApplication.run(Application.class, args); }
@Override public void run(String... strings) { //Populating embedded database here LOG.info("Saving users. Current user count is {}.", userRepository.count()); User shubham = new User("Shubham", 2000); User pankaj = new User("Pankaj", 29000); User lewis = new User("Lewis", 550);
userRepository.save(shubham); userRepository.save(pankaj); userRepository.save(lewis); LOG.info("Done saving users. Data: {}.", userRepository.findAll());} }
Ta thêm một CommandLineRunner để khởi tạo một vài dữ liệu mẫu trong dữ liệu H2 nhúng.
Trước khi trình bày cách Redis hoạt động, chúng ta sẽ định nghĩa một repository (kho lưu trữ) cho các chức năng liên quan đến JPA:
package com.journaldev.rediscachedemo;import org.springframework.data.jpa.repository.JpaRepository; import org.springframework.stereotype.Repository;
@Repository public interface UserRepository extends JpaRepository { }
Hiện tại nó không có phương thức nào vì chúng ta chưa cần đến.
Controller là nơi mà Redis cache được gọi để thực thi. Trên thực tế, đây là nơi tốt nhất để làm điều đó vì khi cache được liên kết trực tiếp với controller, request thậm chí sẽ không cần đi vào đến tầng service để chờ kết quả được cache.
Dưới đây là code cơ bản của controller:
package com.journaldev.rediscachedemo;import org.slf4j.Logger; import org.slf4j.LoggerFactory; import org.springframework.beans.factory.annotation.Autowired; import org.springframework.cache.annotation.CacheEvict; import org.springframework.cache.annotation.CachePut; import org.springframework.cache.annotation.Cacheable; import org.springframework.web.bind.annotation.*;
@RestController public class UserController {
private final Logger LOG = LoggerFactory.getLogger(getClass());
private final UserRepository userRepository;
@Autowired public UserController(UserRepository userRepository) { this.userRepository = userRepository; } ... }
Để đưa một đối tượng vào cache, ta sử dụng annotation @Cacheable:
@Cacheable(value = "users", key = "#userId", unless = "#result.followers < 12000")
@RequestMapping(value = "/{userId}", method = RequestMethod.GET)
public User getUser(@PathVariable String userId) {
  LOG.info("Getting user with ID {}.", userId);
  return userRepository.findOne(Long.valueOf(userId));
}
Trong mapping (ánh xạ) trên, phương thức getUser() sẽ đưa một Person vào cache có tên là ‘users’, định danh Person đó bằng key ‘userId’, và sẽ chỉ lưu trữ user có số follower lớn hơn 12000. Điều này đảm bảo rằng cache chỉ chứa những người dùng nổi tiếng và thường xuyên được truy vấn. Chúng ta cũng đã cố ý thêm một câu lệnh log trong lệnh gọi API.
Hãy thử thực hiện một vài lệnh gọi API từ Postman sau đây:
localhost:8090/1
localhost:8090/1
localhost:8090/2
localhost:8090/2
Nếu để ý phần log, bạn sẽ thấy:
... : Getting user with ID 1.
... : Getting user with ID 1.
... : Getting user with ID 2.
Ta đã thực hiện bốn lệnh gọi API nhưng chỉ có ba câu lệnh log được ghi lại. Đó là vì User có ID 2 với 29000 follower đã được cache lại. Điều này có nghĩa là khi một lệnh gọi API được thực hiện cho user này, dữ liệu đã được trả về từ cache mà không cần thực hiện lệnh gọi nào đến cơ sở dữ liệu nào cả.
Các giá trị trong cache cũng nên được cập nhật bất cứ khi nào giá trị của đối tượng thực tế thay đổi. Điều này có thể được thực hiện bằng cách sử dụng annotation @CachePut:
@CachePut(value = "users", key = "#user.id")
@PutMapping("/update")
public User updatePersonByID(@RequestBody User user) {
  userRepository.save(user);
  return user;
}
Với annotation này, một Person lại được định danh bằng ID của mình và được cập nhật với kết quả mới.
Nếu một số dữ liệu bị xóa khỏi cơ sở dữ liệu, việc giữ nó trong cache không còn ý nghĩa gì nữa. Chúng ta có thể xóa dữ liệu cache bằng annotation @CacheEvict:
@CacheEvict(value = "users", allEntries=true)
@DeleteMapping("/{id}")
public void deleteUserByID(@PathVariable Long id) {
  LOG.info("deleting person with id {}", id);
  userRepository.delete(id);
}
Trong mapping cuối cùng, chúng ta chỉ xóa các mục trong cache và không làm gì khác.
Chúng ta có thể chạy ứng dụng này một cách đơn giản bằng một lệnh duy nhất:
mvn spring-boot:run
Mặc dù Redis rất nhanh, nó vẫn có giới hạn. Redis không giới hạn dung lượng lưu trữ trên hệ thống 64-bit, nhưng chỉ có thể lưu trữ 3GB dữ liệu trên hệ thống 32-bit.
Việc có nhiều bộ nhớ hơn có thể dẫn đến tỉ lệ cache hit (trường hợp dữ liệu được lấy từ cache) cao hơn, nhưng tỉ lệ này sẽ giảm dần khi Redis chiếm dụng quá nhiều bộ nhớ. Khi kích thước cache đạt đến giới hạn bộ nhớ, dữ liệu cũ sẽ bị xóa để nhường chỗ cho dữ liệu mới.
Trong bài này, chúng ta đã xem xét khả năng mà Redis cache mang lại trong việc tương tác dữ liệu nhanh chóng, và cách chúng ta có thể tích hợp nó với Spring Boot với cấu hình tối thiểu nhưng đầy đủ tính năng. Việc khai thác cache có điều kiện giúp kiểm soát tốt hơn mức độ lưu trữ và làm mới dữ liệu trong cache. Bạn có thể áp dụng những kiến thức này khi phát triển các chức năng ghi chú, lưu tạm dữ liệu hoặc giảm tải truy cập dữ liệu thường xuyên.